PODCAST 199! Biosolutions for Ornamental Propagation
For this Tech On Demand podcast episode, which is all about propagation, biosolutions and starting your crops strong from the earliest stages, I was joined by Kristen Fowler, a technical sales consultant with Koppert. Kristen not only works with propagators but spent many years in leading propagation greenhouses as a grower—so she’s no stranger to the importance of optimizing plants at the most critical times during production.

We discussed the importance of cleanliness before and after young plants are received, tips for assessing cuttings when they arrive at your greenhouse (you don’t want to push poor product onto your benches), consistent scouting, and working with suppliers to understand what’s been applied to young plants before they come through your door.
Kristen also dug deep into what biological products can be used during each propagation stage (some products work well under mist, while others do not) and a roadmap to follow for protection when roots emerge, mitigating insect and mite pest pressure early on, and biosolutions to apply at the time of transplant. With such a strong understanding of the propagation environment, she’s keenly aware that the best way to introduce many biological strategies and hybrid approaches is to work within existing propagation processes and not change too many protocols—think tank mixes, boom applications and different options for different systems.
Listen on all the major podcast apps! Links to Spotify and Apple Podcasts are below. And make sure you subscribe so you never miss an episode. If you can, leave a positive review to help us reach more greenhouse professionals. Lastly, jump back into the archives because we have almost 200 more episodes covering a huge range of topics.

Nick’s Tip of the Week: Preventative Checklist for Poinsettias
Each week, I’ll work with my buddy Nick Flax, a technical services expert at Ball, to share a concern that’s come up during one of his numerous calls with growers across North America. This week, he’s sharing tips for keeping poinsettias moving in the right direction.
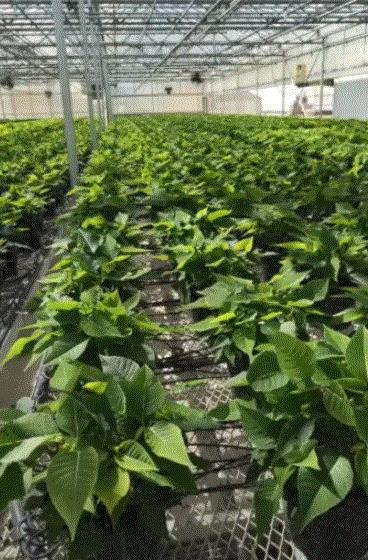
PROBLEM: An ounce of prevention is worth a pound of cure, and this holds especially true for long-term crops like poinsettias. Make sure all the hard work you’ve put into your poinsettias so far pays off and keep your crop on track! Now that we’re about one week into natural short days (for northern growers), there are a few things that all poinsettia growers should keep on their radars to ensure things don’t fall off the rails.
NICK’S TIP: Right now, plants haven’t developed bracts and still need to put on a significant amount of size. As a result, it’s still relatively easy to spot pests and early symptoms of feeding damage. However, as the canopy tightens and plants fill out in the coming weeks, it will become difficult to scout thoroughly or achieve full canopy spray coverage with pesticides.
When you spot pest outbreaks at this point in the crop cycle, step on them quickly.
-
Pest damage on leaves can be easily covered up by colorful bracts, but damage to young bracts now will magnify as they expand and it will be virtually impossible to hide at finish.
-
Similarly, at this point in the crop cycle you don’t need to be as critical of spray residues on foliage or mild phytotoxicity resulting from an aggressive spray rotation. However, once bracts are formed and start to show color, the need to be extra careful with pesticide applications will become paramount.
-
Scrutinize minor damage on leaves such as stippling, any small suberized (raised, corky) spots, or appearance of honeydew in the next couple of weeks. Don’t write off these early signs of pest-feeding damage—take a closer look at plants displaying these symptoms so pests don’t have an opportunity to establish a foothold.
-
With cooler temperatures comes the annual influx of pests like whiteflies and thrips from the field. Stay vigilant and increase preventative biological releases or pesticide applications if you see a spike in either of these pests on your sticky cards.
This is also the time of year that occasional Lewis mite infestations start to become apparent. Due to their slower reproductive cycles (compared to their two-spotted spider mite relatives) and small size, if they slipped through the cracks, you may start to see damage in the next week or so. Be sure that you have a magnifying lens for scouting and act quickly if you find hotspots of these mites.
Check out our Lewis Mite Management document HERE for more info and guidance.
Ixnay on the Daminozide and Chlormequat Chloride
As a reminder, we are past the “do not apply after” date for daminozide (ex. B-Nine, Dazide) and are approaching the cutoff period for use of chlormequat chloride (ex. Altercel, Citadel) to restrict unwanted vegetative growth and internode stretch.
-
As light levels decrease, and relative humidity and DIF (difference between day and night temperature) in the greenhouse increase, so too does your crop’s tendency to stretch. If it’s not possible to change environmental and crop cultural parameters sufficiently to curb this tendency, you may need to use plant growth regulators (PGRs).
-
If you need to restrict growth with PGRs, it’s best to use paclobutrazol (ex. Bonzi, Piccolo, Paczol) at low concentrations like 0.10 ppm at this point. Foliar sprays can be applied but substrate drenches generally achieve a better whole-plant effect.
-
Use of daminozide or chlormequat chloride at this point or later in the cycle could have adverse effects on color and cyathia development. Southern growers may be able to use chlormequat chloride for a couple of weeks still, but it’s best to err on the side of caution and switch to paclobutrazol from here on out.
Have a Bract Edge Burn Plan
While few growers have bracts forming on their poinsettias yet, think about how you will respond to signs of calcium (Ca) deficiency (aka “bract edge burn”) in your crop now.
-
When bracts begin to expand and dominate the canopy, if relative humidity is high, soil stays too wet for extended periods, and/or Ca supply in your feed program is too low, this disorder may occur.
-
Typical symptoms include blackening of bract tips and increased necrosis along the bract margin as they continue to expand.
-
Ensure that you switch to—or incorporate—a fertilizer that provides additional calcium as the crop matures. If you don’t have any fertilizer like this on-hand, don’t get caught without any when you need it—order some now and have it ready to go!
-
Similarly, it’s a good idea to keep some CaCl (calcium chloride) and wetting agent (like Capsil) on hand to supplement Ca via foliar sprays if needed. Ensure that you source high-quality CaCl because cheap sources may contain impurities that could cause phytotoxicity or leave residue on bracts.

NEW VIDEO! Perfecting Pentas Production
I recorded two videos with technical experts from Syngenta Flowers last week and the first one is now out. Syngenta Flowers’ Dr. Jamie Gibson joined me to discuss BEST PRACTICES FOR GROWING HIGH-QUALITY PENTAS—both seed and vegetative varieties.
As Jamie said multiple times, one of the biggest keys to getting the most out of pentas is keeping them warm. But there’s a lot more to maximizing production and there are nuances to understand with vegetative types, like Syngenta’s Starcluster and Starcluster Cascades; as well as the seed range, which includes Beehive, BeeBright and HoneyCluster.

Jaime kicked off the discussion with vegetative pentas in the Syngenta range—Starcluster and Starcluster Cascade. He called out some key attributes, like huge umbels, thick foliage and major pollinator attraction, before digging into propagation from URCs or callused cuttings. If you’re concerned about propagating pentas from cuttings, a good idea might be to bring in liners and just finish them in about eight weeks. Or you can even start from enhanced, larger liners to cut off a few more weeks in production. Another tip for growers in northern climates is to bring in cuttings after Week 6 to reduce the risk of cold-chain damage. Remember, pentas is a heat loving crop and receiving vegetative pentas after Week 6 still gives plenty of time to finish the crop for Mother’s Day.
Following production through finish, Jaime even taught me a new term, “xanthophyll”—the yellow pigmentation that sometimes makes pentas roots look like they’re struggling even though they’re completely healthy.
Then he turned the page and started on the seed-raised types. Jamie suggested buying in plugs from experienced pentas propagators because nailing pentas plug production can be quite tricky. Transplanted plugs still need to be grown warm (66-75F), and it’s recommended to consistently test pH and make sure it stays above 6.2, and consider adding calcium nitrate to keep the pH up and tone the crop. In terms of positioning the seed-raised series from Syngenta, Jamie suggested BeeBright for packs and smaller pots, HoneyCluster for quarts, and Beehive for baskets.
Watch for a fantastic video on seed and vegetative begonias from Syngenta Flowers coming early next week! Hit the subscribe and like buttons on the pentas video and you’ll be alerted when it drops.
Here are a few additional resources shared in the video:

Poinsettia Scab Management
Caused by Sphaceloma poinsettiae, poinsettia scab (alt. “spot anthracnose”) is a fungal disease that spreads quickly and can lead to significant damage and crop losses if left unchecked. This pathogen is endemic to tropical and subtropical regions of the Americas, including areas where many poinsettia cuttings are produced. While outbreaks in North American greenhouses are infrequent, it is critical to manage preventatively through diligent scouting and use of appropriate fungicides.
Scouting and Symptom Identification
Poinsettia scab enters the greenhouse most often via infected unrooted cuttings (URCs). Scrutinize incoming URCs for any suspicious symptoms and rogue them out before they are stuck as a precaution.
-
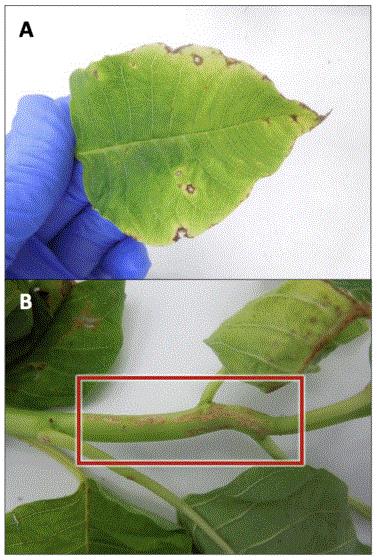
True to their namesake, scab-like lesions form on stems and petioles. These lesions are 3–10 × 2–6 mm, tan to whiteish in color and slightly raised. Margins of stem lesions are often reddish in color and centers become tan to whiteish as they grow.
-
Pronounced internode elongation is a telltale symptom of poinsettia scab. This pathogen produces Gibberellin A4 (GA4), a hormone that regulates stem elongation, among other processes
-
Foliar symptoms begin as small, angular, brown lesions ~1–5 mm in diameter. Spots can develop red or purplish margins and often have a diffuse yellow halo around them.
-
Centers of foliar lesions become sunken in appearance and turn from tan to whiteish as they grow. When sporulation occurs, leaf spots develop a dusty brown color. Severe damage to foliage can result in leaf abscission.
Disease Cycle
Native and weed species of Euphorbia in URC-producing regions and sub-tropical states are likely the landscape host for Sphaceloma poinsettiae.
-
Spore-producing structures called acervuli develop on the leaf surface within the lesion. These structures produce spores called conidia.
-
There are two conidial spore types. Both spread by wind, splashing water, insects and infected tools. This pathogen can survive on infected stems and leaves that have fallen off the plant.
-
In contrast to other fungal pathogens, poinsettia scab spreads rapidly if left unchecked. Prompt removal of infected plants and residue management is the best way to reduce spore load.
Management Strategies
Exclusion of poinsettia scab is the first line of defense. Source URCs from a trusted supplier and report any suspicious symptoms as soon as they appear.
This pathogen cannot be treated curatively. If an outbreak occurs in your greenhouse, quick action to contain the pathogen, minimize risk of spread, and protect non-symptomatic plants is critical.
-
Break “green bridges” and empty growing areas between crops to eliminate potential pathogen reservoirs.
-
Avoid overhead irrigation, when possible, as splashing water will spread spores.
-
Minimize insect pressure to further reduce possible spread of spores throughout the greenhouse.
-
Maintain rigorous scouting efforts and remove any symptomatic or suspect plants ASAP.
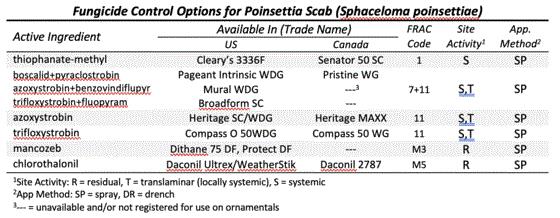
Chemical Control Options
Preventative application with appropriate fungicides is the best insurance policy to minimize risk:
-
Achieve thorough spray coverage, especially during propagation when plants are at high density,
-
Rotate FRAC groups between every fungicide application, and
-
Tank-mix with mancozeb when possible, to improve control efforts.

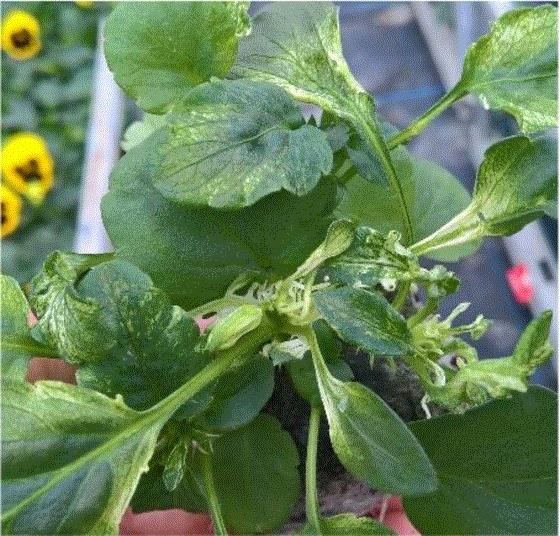
VIDEO: Finishing Fall Pansies—Pansy Mottle Syndrome
In PANSY FINISHING, retired Ball technical manager Dr. Will Healy starts with a discussion of Pansy Mottle Syndrome (what to watch for and how to mitigate the risk) before tackling common grow-out issues. He talks about ways to speed up a crop, as well as strategies to slow your pansies down.
You’ll want to watch all the way to the end of this video and then share it with your production team. Your best bet is to make sure everyone is on the same page—especially when it comes to getting pansies retail ready.
The finishing stage is not a time to deal with disease, so Will talks about prevention and control tactics. Finally, he offers suggestions for postharvest prep, with the goal of shipping the best crop possible to your retail and landscape customers.
Finish Line …
I appreciate everyone who reads this newsletter every week! But did you know Ball Publishing produces TEN e-newsletters, each covering a specific topic or market segment? Hopefully you do—because I try to shout them out every month or so …
That’s right, you have ten opportunities either weekly or bi-monthly to read timely and relevant news items and stories squarely focused on your business interests.
From perennials to tropical plants and cut flowers to controlled environment agriculture, our experienced editors have the best connections in each market to bring you cutting-edge info. In the past few weeks our editors have covered breaking global news, new retail products from summer shows, upcoming conferences and seminars, tariffs, mum and poinsettia tips, industry surveys, sustainable solutions and a whole lot more.
I could go on and on about our e-newsletters because each one is a leader in its field and each editor is passionate about the topic they cover in their own unique way. Instead, I’ll just share a link where you can CHECK OUT ALL OF OUR NEWSLETTERS—sign up to receive the ones you need. And jump back in the archives to read past issues.
Until next week …


Please feel free to send your comments, constructive criticism and topic ideas to me at bcalkins@ballhort.com.

Bill Calkins
Editor - Tech On Demand
This email was received by you and 25,509 other fine subscribers!
If you're interested in advertising in Tech On Demand, contact Kim Brown ASAP and she'll hook you up.