Happy Mother’s Day Weekend! Let’s Talk Mums …
For the past couple weeks, I’ve been teasing content on fall garden mums, and I know this can cause some anxiety as we head into Mother’s Day weekend and most of your greenhouses are packed to the gills with spring annuals and perennials. Understanding this, I also know from experience that garden mum season always seems to come unexpectedly, right about the time your team is stressing about spring sales and shipping.
Stalking greenhouses on Instagram, I’ve already seen a few pics of growers receiving mum containers, and there sure are plenty of cuttings on our weekly shipping report. Meaning garden mum time is now!
Next week, I’ll start loading up the newsletter with garden mum resources, but for now, you might as well pop in the AirPods while you load trucks or move racks of plants up to your retail and listen to my STEM podcast covering best practices for starting your garden mum crop.

In YOUR BEST MUM CROP EVER (PART 1), mum guru Dr. Will Healy goes in-depth on the two most critical factors early on: temperature and feeding. He covers the most effective temperatures (as you know, mums like it hot) and you’ll learn all about the $10 word thermophotoperiodicity. Then Will transitions over to fertilizer strategies, because mums are heavy feeders early in the production cycle. He also touches on other pieces of the production puzzle, including insect and disease prevention, PGRs and more.
With plenty of tips and tricks peppered throughout, this is a great episode to pass along to anyone who might benefit, because starting your mum crop during some of the busiest spring shipping weeks means all hands are on deck.

Koppert Corner: Pesticide Resistance & Residues on Mums
Have you found yourself challenged with an unanticipated two-spotted spider mite (TSSM) or thrips infestation in past mum crops? If so, take note of which varieties were problematic in past years as you receive your 2025 cuttings or liners. Also, review timing of past infestations to determine whether the insect pests arrived with the cuttings/liners or moved to mums from another greenhouse crop.
If insect pests arrive on the incoming liners or rooted mum cuttings, be aware that those spider mites or thrips may be pesticide resistant, meaning that you may experience difficulty controlling them using chemical active ingredients (AIs). Further, plants with pesticide-resistant spider mites or thrips may contain foliar chemical residues that could be deadly to any beneficial insects that walk across the leaves. In this case, biological control may not be an alternative option to reduce or eliminate the pests’ presence.
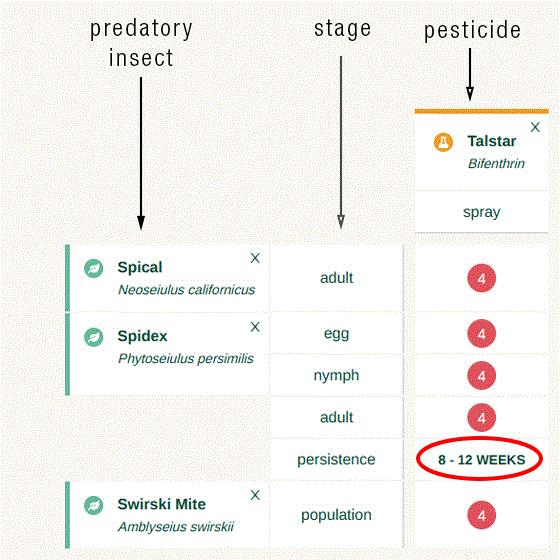
Bifenthrin is a particularly insidious broad spectrum synthetic pyrethroid, as illustrated on this KOPPERT SIDE EFFECTS CHART, with up to 12 weeks of negative side effects against beneficial insects.
There are three ways to determine whether damaging pesticide residues may be present on your garden mum crop:
-
Reach out to your garden mum broker to learn whether they’ve used bifenthrin or other broad-spectrum chemistries on their stock plants in the past three months. If the answer is yes, beneficial insects may be off the table for this crop cycle.
-
Ship a plant tissue sample to the USDA National Science Laboratories in Gastonia, Georgia, for a pesticide residue chemistry test, which identifies pesticide residues by AI that could damage beneficial insects. This information is also useful to determine which AIs have high enough levels of residues that pesticide resistance may be an issue within your IPM plan.
-
Release Spidex Vital (Phytoseiulus persimilis), which arrives clear and turns red after consuming prey, onto the TSSM-infested plants. Flag plants and return in five to seven days to look for live predatory mites. If predatory mites are observed working TSSM colonies on the plants and have turned red, you can be confident that neither the plants nor the insects contain damaging pesticide residues. If only live spider mites remain after a week, chemical controls will be your only option to manage insect pests on these plants.
Reach out to a Koppert technical consultant to learn more about navigating pesticide residues and chemical AI resistance issues on summer crops.

Nick’s Tip of the Week: Phyto Happens! Then What? (Part 2)
Each week, I’ll work with my buddy Nick Flax, a technical services expert at Ball, to share a concern that’s come up during one of his numerous calls with growers across North America. This week, he’s picking up from last week’s “phyto causes” discussion and offering advice for moving forward and dealing with the issue.
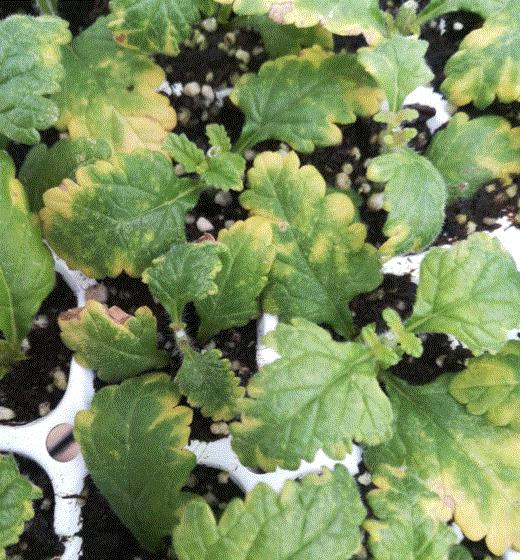
PROBLEM: After phytotoxicity (phyto) occurs in your crops, the worst thing to do is shrug your shoulders and pretend it never happened. You need to do your utmost to determine the cause, otherwise you run the risk of further avoidable crop losses or delays if you don’t. Check out my tech tip from last week to review a few of the common causes for phyto, and refer to one of my past tech tips on herbicide injury—another common cause for sudden damage in greenhouse crops.
NICK’S TIP: Once the damage is done, you have a couple of options: 1) throw the material away and move on, or 2) attempt to clean it up and push new growth to get plants retail-ready. Consider the following as you decide how to move forward after a phyto incident occurs:
To Dump or Not to Dump?
Will additional labor, bench time and inputs needed to make plants salable cost more than your profit margin? The answer to this initial question may not always be cut and dried, but here are a few helpful points to get you moving in the right direction:
-
If blooms are the only affected plant parts, recovery should be feasible within about two to three weeks, especially if additional buds are visible.
-
If 25% or less of the foliage is dying or necrotic, selective cleanup of damaged leaves and another week or two of growing time should be enough to turn things around.
-
If about 50% or more of the foliage is damaged, extensive cleanup and bench time will likely be needed. If plants will need four or five weeks or longer to recover, the prospect of turning a profit on the damaged crop is slim.
-
If phyto is the result of something applied to the root zone, recovery time may be uncertain. The decision to wait it out and hope plants push through becomes a roll of the dice and, in my experience, often does not pay off if damage from a drench-applied product is severe.
Cut Back and Clean Up
Damaged foliage doesn’t just look unsightly—necrotic leaves and shoots can quickly become food for Botrytis or other opportunistic pathogens. It’s important to remove damaged material before it can cause more problems, but the goal is to take as little plant material off as possible.
-
For spray phyto, if damage is minor (approximately 10% of foliage or less), it may not be necessary to remove affected foliage. Another week or two of grow time might be all plants need to push new growth and cover up the damage.
-
If closer to 25% of the canopy has incurred damage, a soft pinch (removal of the top 1/2 inch of shoots) with handheld electric trimmers or shears may be a quicker and more uniform way to “reset” plants than selective removal of affected leaves and shoots.
-
On more heavily damaged crops, trim back to below the most heavily damaged leaves and pick a consistent height at which to cut plants back. Avoid removal of more than the top two inches of shoots (if possible) to avoid stalled growth or sporadic axillary shoot emergence
-
For fast-growing annuals and trailing crops, “ponytailing” damaged crops to a uniform height (for example, three or four fingers below the cut point) and cutting clear across the bundle of shoots is a quick and easy strategy, as well.
IMPORTANT: Be sure to frequently sanitize any tools used to trim back damaged foliage, especially when moving between greenhouses or groups of plants.
-
Remove as much shoot and leaf debris as possible from the pot before you put plants back on the bench. A leaf blower running at medium to low power is an efficient and effective way to clear out trimmings and reduce potential disease pressure.
-
Treatment with a broad-spectrum fungicide after a trim can further protect crops as they try to bounce back.
Optimize Crop Cultural Practices to Encourage Fast Recovery
Injured crops need a little extra TLC if you want them to be retail-ready again quickly. Don’t just put them back on the bench and wait for them to recover— actively encourage strong regrowth.
Mind your moisture levels. When you remove a significant amount of leaf tissue, you reduce a plant’s ability to transpire. This will directly impact water uptake by roots and often causes growing media in recently trimmed crops to dry down more slowly. Make necessary adjustments to your irrigation strategy to ensure plants don’t become waterlogged after a cut-back.
Temporarily increase feed rates to encourage fast canopy fill. Use a fertilizer with a higher proportion of ammoniacal- to nitrate-based nitrogen (N) and moderate levels of phosphorus (such as a 20-10-20) at about 300 ppm N to jumpstart growth.

Quick Mum Tip: Avoiding Fusarium BELOW Your Ground Cloth
Here’s a challenge we hear about from time to time, and I wanted to share it so hopefully you avoid a similar situation this season.
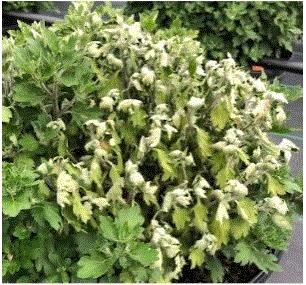
It’s odd when only half of a plant collapses, and that’s probably why this grower reached out to the Tech On Demand team for help. With only one cutting in the pot and half a plant looking terrible while the other half looks fine, we certainly have a conundrum. Here’s their diagnosis:
The problem is likely to be Fusarium stem infection, which is blocking the water uptake in the branches on one side of the plant. Clean stock and a fungicide application early in the crop cycle can prevent this if there’s a history of this problem. The disease is resident in the soil, and when plants are grown on the ground, eventually the roots grow through the ground cloth and become infected by coming into contact with the Fusarium in the soil below the cloth.
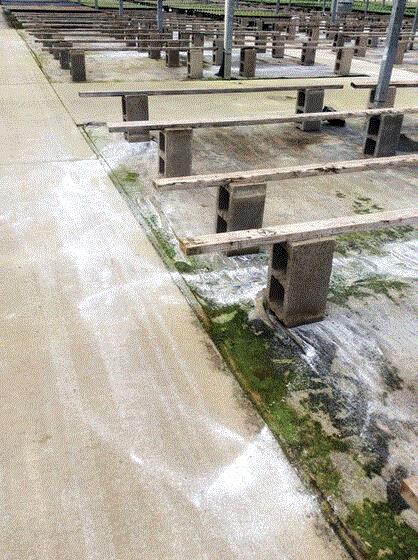
Seasonal Sanitation
Each season brings new crops and the opportunity to clean up greenhouses as they empty out. Hopefully, you have some sort of plan and protocols for sanitation between seasons … only you know. If so, fantastic! If not, you definitely should. Either way, taking some time to run through your plan before each season is a good idea. Here are a few resources to help get your sanitation strategy in order so you’re ready to rock and roll once those spring plants ship out.
Video: GET PREPARED—FROM CLEANUP & MAINTENANCE TO PLACING ORDERS is a Tech On Demand In the Break Room video featuring Dr. Todd Cavins that covers sanitation and preparation from a few angles, including what to clean and how to clean, as well as equipment maintenance and even some pest and disease control strategies.
Article: In START CLEAN. STAY CLEAN, I took the video a step further and worked with Todd to create a much more thorough plan for greenhouse sanitation. No matter the size or shape of your greenhouse, you need an organized, systematic approach to sanitation, especially between seasons. As Todd says, “Get robotic about it. Make it boring.” Every day, it should be part of the system. The good thing is that simple cleaning requires little time and labor, and results in major gains in terms of reduction in plant loss. In the article, we look at greenhouse sanitation best practices, as well as activities and methods that will help you stay on top of cleanliness.
Article: SANITATION—INSECT PEST MANAGEMENT IN GREENHOUSES, an article by Raymond Cloyd and Nathan Herrick at Kansas State University, digs deeper into the importance of cultural control strategies and sanitation to minimizing the risk of pests negatively impacting crops. Reducing the opportunities for pests to inhabit your production areas leads to reduced pesticide use, which, in turn, minimizes the risk of resistance and other challenges. This article is a fantastic look into best practices and new practices for you and your team.

Thinking Ahead: Hot Poinsettia Cuttings
I share this every year—and usually several times. Yes, it’s still early May, and for most of you, poinsettia cuttings aren’t on the radar yet … but the time is drawing near, believe it or not. Read this over, maybe watch the video and just make sure you have what you need (digital thermometer, cooler space planned) to prepare for the inevitable poinsettia cutting shipments that will arrive in the heat of the summer. There are pretty clear steps to follow to minimize plant losses and maximize successful rooting. Here’s a quick VIDEO outlining the process.

When receiving your cuttings, use a digital thermometer to check temperatures throughout the box. Temps above 64F in the center of the box and outer edges indicate the plants have been warm for a while and you should cool them overnight. Temps closer to 50F mean the heat occurred later in the journey and damage will be much less likely. If possible, you might want to put them in the cooler overnight anyway.
When cooling your cuttings, set the cooler temp to 50F and pre-cool before putting cuttings in to avoid over-cooling. You should remove cuttings from bags to disperse ethylene, or at a minimum open the bags. Make sure your cuttings are moist and add water if needed. Cool them for a minimum of four hours, but overnight is best. When you remove the cuttings from the cooler, check to make sure they’re firm and crisp before sticking.

Finish Line …
If you’re reading this, you obviously receive my weekly newsletter. But did you know Ball Publishing produces TEN e-newsletters, each covering a specific topic or market segment? That’s right, ten opportunities to read timely and relevant news items and stories squarely focused on your business interests.
From perennials and tropical plants to cut flowers and controlled environment agriculture (CEA), our experienced editors have the best connections in each market to bring you cutting-edge info. Each newsletter is a leader in its field and each editor is passionate about the topic they cover in their own unique way. I’m proud to be a member of the group! CHECK OUT ALL OF OUR NEWSLETTERS—sign up to receive the ones you need and jump back in the archives to read past issues.

HUGE shout out to all the moms reading this newsletter! Happy Mother's Day!
Please feel free to send your comments, constructive criticism and topic ideas to me at bcalkins@ballhort.com.

Bill Calkins
Editor - Tech On Demand
This email was received by you and 25,612 other fine subscribers!
If you're interested in advertising in Tech On Demand, contact Kim Brown ASAP and she'll hook you up.