9/1/2023
Pre-production Prep
Jennifer Zurko
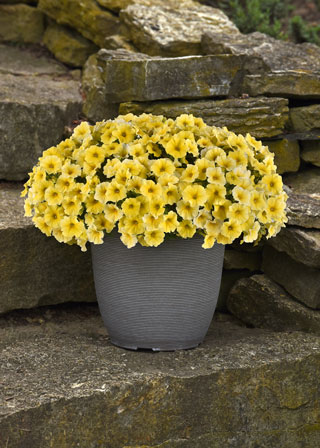
Petchoa Caliburst Yellow
By Lisa Lacy, Director of Product Development—PanAmerican Seed
Off the top of your head, you can probably name a dozen “popular pairings”: Peanut butter and jelly. Milk and cookies. Chips and salsa. It’s two things, when separate, that are awesome, but when put together—bam! They’re downright amazing.
It’s the same with the new—and first!—Caliburst Yellow Petchoa from PanAmerican Seed. This 2024 introduction for North American markets combines the power of petunias and calibrachoa for an amazing result of eye-catching color, PLUS the cold-durable production (like Wave brand products) and short daylength (nine-hour response).
Caliburst Yellow combines the best of both worlds—all with the ease of seed.
What else will growers love about Caliburst? It has a controlled, manageable habit for production in quarts, gallons and hanging baskets. It’s fantastic for mixed combinations with both seed and vegetative components, and it kicks off the gardening season in an attractive yellow color and top-notch seasonal performance. The vivid yellow and short daylength requirement also makes Caliburst Yellow a good option for fall programs.
Plug crop time: 4 to 6 weeks
Transplant to finish: Spring—6 to 7 weeks; Summer—4 to 5 weeks
Germination & plug production
Petchoa plug culture is similar to petunias, except seed petchoa requires one to two additional days to germinate (plug Stage 1) compared to petunias.
Caliburst Yellow Petchoa seed is pelleted. Sow 1 seed per cell in a 288 or 128 plug size. Seed germinates at 68 to 77F (20 to 25C) and takes three to seven days; do not cover the seed, as light is required for germination. Maintain media pH at 5.5 to 6.0 and EC of 0.75 mmhos/cm during plug production. Keep moisture high at Level 4 to 5 until radicle emergence.
During Stage 2, lower moisture levels slightly to 3 to 4 and maintain Stage 1 temperatures. Set light at 1,000 to 2,500 f.c. (10,800 to 26,900 Lux) DLI 6 mol·m-2·d-1. Apply fertilizer less than 100 ppm N, less than 0.7 EC. Lower temperatures during Stage 3 to 65 to 70F (18 to 21C) and decrease moisture to Levels 2 to 4. Fertilizer should be applied at 100 to 175 ppm N (0.7 to 1.2 EC). Provide Stage 3 light at 8 to 12 mol·m-2·d-1 2,500 to 4,000 f.c. (26,900 to 43,100 Lux).
In Stage 4, maintain the same moisture and fertilizer levels as Stage 3. Decrease temperature even further to 60 to 65F (16 to 18C). Increase light to 8 to 15 mol·m-2·d-1 2,500 to 5,000 f.c. (26,900 to 53,800 Lux).
For plant control, a daminozide/2,500 to 5,000 ppm spray can be applied in Stages 3 and/or 4. However, do not apply daminozide after the plug stage. When applied at visible bud stage, daminozide can lessen the intensity of the yellow flower color.
Finishing key tips
The daylength response of Caliburst Yellow Petchoa is very similar to the E3 Easy Wave series of spreading petunia, flowering under a very short daylength (nine hours). However, it’s still classified as a facultative long day plant and Caliburst will flower slightly faster in a longer daylength.
Temperatures for finishing:
Day: 61 to 75F (16 to 24C)
Night: 57 to 65F (14 to 18C)
 The target media pH should be 5.5 to 6.2, with an EC of 1.5 to 2.0 mmhos/cm. Apply fertilizer at a rate of 100 to 175 ppm N. For plant growth control in the finish stages, apply a paclobutrazol drench at 2 to 3 ppm at seven to 10 days after transplant, with additional applications as needed or weekly spray applications of 10 to 15 ppm paclobutrazol.
Caution: Avoid using daminozide spray at visible bud stage or later, as it can reduce the intensity of the yellow flower color.
Order your seed and plugs today from your preferred distributor and begin planning your seasonal petchoa sales. Find full culture resources for Caliburst Yellow at our new website: www.panamseed.com.
Lantana Passion Fruit
By James Doukas, Territory Manager—Ball FloraPlant
Tops on today’s gardeners’ shopping lists are plants that welcome pollinators to the garden, and plants that thrive through heat or drought. Lantana is a class that checks both boxes.
To meet this demand, Ball FloraPlant has devoted significant breeding efforts into lantana, launching habits and sizes for any application (Lucky and Little Lucky series), succeeding at sterility (Bloomify series), and now the company introduces a vibrant-colored, trailing, spreading lantana perfect for cascading hanging baskets.
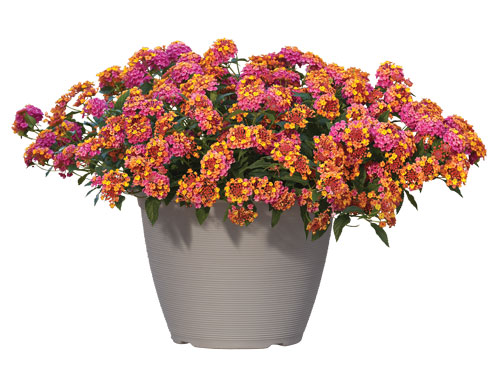
The new PassionFruit Lantana is a butterfly magnet in the summertime and it has an abundance of tropical-hued blooms that pop against its dark green foliage. Best of all, it never cycles out of flower!
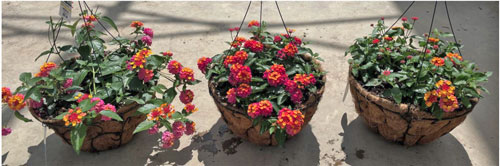 Pictured: 14-in./3-gal. hanging baskets, 6 ppp. All transplanted from pinched liners. Left: Control/no application. Center and right: Sprayed with Florel 500 ppm + Configure 750 ppm. Excessive wet-dry cycles (center) will prioritize color overgrowth (right).
PassionFruit displays colors of bright pink, yellow and orange, and the multicolor show makes it ideal for monoculture containers, but it can also pair with other sun-loving season extenders for mixed combinations. And, like all lantana, PassionFruit is drought and heat tolerant for longtime enjoyment all season. Following these guidelines and tech tips will produce flower-filled pots or baskets that shoppers—and pollinators—will find irresistible. Include PassionFruit Lantana in your next program of season-extending plants.
Spring propagation guide
Cuttings are provided through the reliable supply chain of Ball FloraPlant’s Las Limas farm in Nicaragua. We recommend sticking into 72 to 102 tray sizes. Rooting hormone is needed and the cuttings should spend an average of seven to 11 days with mist. The average propagation time is five weeks.
Our tech team recommends a pinch in the liner stage and optional Dazide/B-Nine (2,500 to 5,000 ppm) + Configure (500 to 750 ppm) to enhance branching three to four weeks after sticking. NOTE: Light levels are extremely important in propagation and finishing. Daily Light Integrals (DLI) below the minimum will stall growth and/or prolong crop times.
Propagation DLI: 8+ mol·m¯²·d¯¹ (Purdue)
Finishing DLI: 10 to 12+ mol·m¯²·d¯¹
Finishing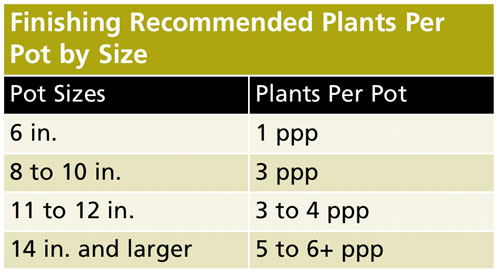
In the finish stage, maintain a soil pH of 5.8 to 6.2 and light levels at 6,000 to 10,000 f.c. Fertilization should be applied at rates of 175 to 225 ppm N. For temperature, provide daytime temperatures of 74 to 85F (23 to 29C) and night temperatures of 62 to 67F (17 to 19C).
PassionFruit is not a vigorous variety and plants can benefit from a second pinch. Ball FloraPlant recommends a pinch two to three weeks after transplant to its finish container and/or a Floral (350 to 500 ppm) + Configure (500 to 750 ppm) spray to enhance branching and to control internode elongation during production. (See the image from our culture trials to see the results.)
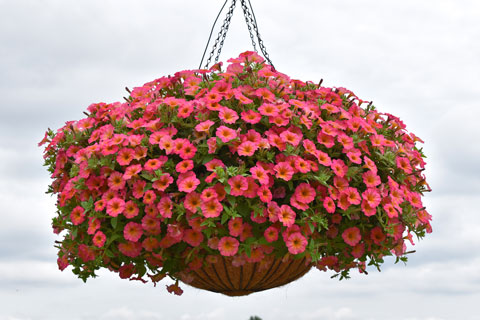
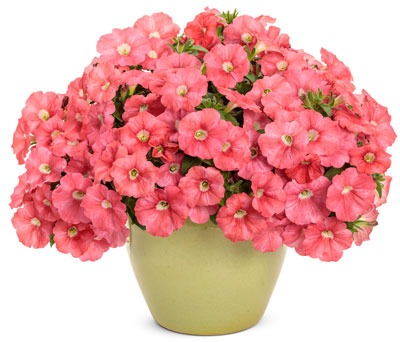
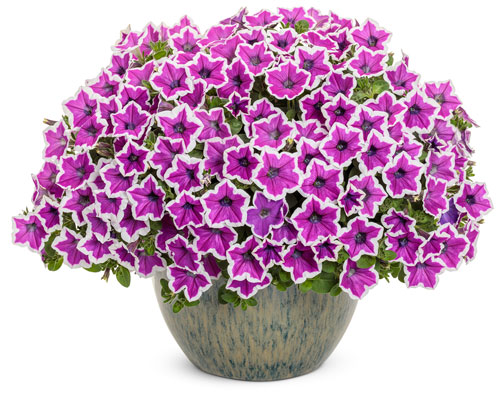
Petunia Flower Shower
By Bart Hayes, Sales Manager—Westhoff
Westhoff has developed a reputation for bringing unique and interesting petunia colors and patterns to market via the Crazytuina collection, but this successful program has highlighted the grower need for a more consistent series from our breeding, as well. As part of the push to provide this consistency, we introduced the Flower Shower series last year and added additional colors this season.
The Flower Shower series focuses on the medium-vigor plants with a mounding to semi-trailing habit with the aim of being the ideal series for hanging baskets and landscape. But with such a crowded field of competitive genetics, how does the Flower Shower series stand out? Two words: weather tolerance. The home gardener buys plants with only focus on the color and count of flowers, so it’s our duty as plant breeders to put the time and effort into selecting the other attributes that lead to superior landscape performance.
One of those traits that the Flower Shower series is primarily selected for is tolerance and recovery following strong weather events, i.e., wind, rain, hail, but also for high heat and humidity. Basically, your average Midwestern weekend. Several physiological characteristics are selected for to provide this, like a medium-sized flower, a thicker flower petal and others, but the results usually speak for themselves: a quicker recovery time from heavy rain, flowers that receive less damage and a better overall landscape performance.
Culturally, the Flower Shower series is not all that different from most modern vegetative petunia varieties. They do have some vigor, so growers should pay close attention to their growth for nutritional issues and potential growth regulation at the production level.
Production
I recommend sticking cuttings into a well-draining, loose-filled propagation media or engineered soil plug for best results at a steady temperature of 68 to 72F (20 to 22C). I personally prefer an engineered soil product because I think it avoids inconsistent liner rooting due to soil compaction or particle separation. Using KIBA at 100 ppm is recommended, but not totally necessary, to enhance rooting speed and uniformity.
Mist intermittently until root initials are visible and discontinue entirely. It’s also recommended to use an ultra-fine mist, or fog, in order to provide a high humidity environment while avoiding continually wet foliage.
Culture
A light pinch is recommended once plants have rooted to the side of the propagation cell (18 to 21 days) to enhance branching and to help control growth. Once plants are well rooted (about 26 to 30 days after sticking), they’re ready for transplant. If no pinch, then a plant growth regulator is recommended. A Bonzi (paclobutrazol) spray at 5 to 10 ppm has been shown to be effective, however, all PGR recommendations should be tested prior to wide scale adoption.
Growing on
Plants can be transplanted once well-rooted into a well-balanced, well-drained soilless media. 64 to 68F (17 to 20C) soil temperature throughout the rooting period; after potting reduce temperature to 60 to 64F (15 to 17C). Plants can be grown under cooler conditions, but growth is significantly slowed, and avoid temperatures lower than 55F (12C) for specific varieties to prevent yellow leaves.
 After initial establishment, continue to water early in the day to allow foliage to dry and allow soil to dry slightly in between waterings, avoiding a stem-wilt to prevent damaging the foliage.
Light
Daylength extension is recommended for crops finishing before April 1, but supplemental lighting may help to improve plant quality.
Growth regulation
An additional pinch is not recommended if plants were pinched in propagation. Good water management will also restrict excessive growth and result in overall better quality. A Bonzi (paclobutrazol) drench at 1 to 5 ppm has been shown to be effective at restricting growth, however, all PGR recommendations should be tested prior to wide scale adoption. Applying lower concentrations more often will help to prevent stunting and allow for specific crop needs.
Fertility
A medium to heavy feeding regime (200 to 300 ppm N of 20-10-20, for example) is recommended. An EC between 1.2 and 1.8 (using 1:2 extraction method) and pH between 5.2 and 5.8 are recommended. Be sure to regularly check soil pH and EC as part of a comprehensive plant health management program. Flush with clear water to avoid excessive salt build-up.
A supplemental fertility package, including chelated iron, could be used to help avoid nutrient deficiencies.
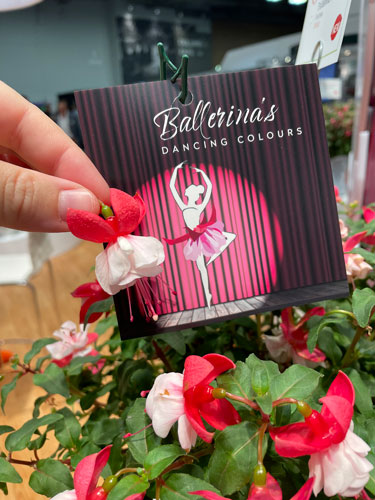
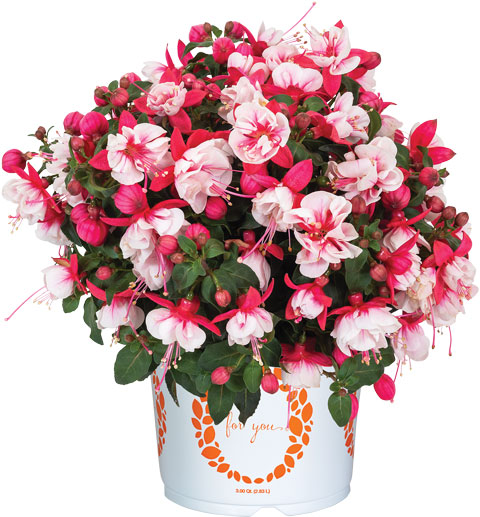 Fuchsia Ballerina
By Arnetia Verbeek-Jackson, Product Manager Specialty Annuals—Dümmen Orange
Introducing a fuchsia that will steal the show! New from Dümmen Orange for 2024 is Fuchsia Ballerina with eight new colors. These fuchsias have an abundance of colorful flowers and various habits. The names of the eight colors are ballerina movements, such as Arabesque, which has a double flower that’s red and white. This new series is daylength neutral, which will flower earlier in its class and will keep pushing its colorful, resilient blooms.
Ballerina Fuchsias will flower mid-spring into early summer with some heat tolerance. They have great branching with lush green foliage. (The various habits are notated in the 2024 Dümmen Orange catalog.) The mounding types are best- suited for quarts, and semi-trailing will work in quarts up to hanging baskets. The upright varieties can be grown in quarts up to smaller containers.
The Ballerina name was chosen because the ruffled flower petals, or corolla, resemble that of a tutu on a ballerina. These grow best in partial shade and the colorful flowers are also pollinator friendly. The unique flower structure will attract butterflies and hummingbirds.
Production tips
Upon arrival: The boxes should be unpacked, sorted and cuttings stuck as soon as possible. If these need to be stored for a small period of time, sort the cuttings and place with bags open on disinfected carts or shelves in a cooler at 54F (12C) for no longer than 24 hours. Mist cuttings in the cooler if they’re dry or wilted.
Propagation: Stick the cuttings in a 72- or 102-cell tray filled with typical, well-drained media that’s suitable for propagation with a pH of 5.2 to 6.0. Using a rooting hormone is beneficial. Maintain soil temperature at 70 to 75F (21 to 24C) and air temperatures of 68 to 80F (20 to 27C). Under-bench heating is required for rooting.
During propagation, apply only enough mist to keep the leaves turgid, avoiding saturation of the rooting media. Wean the liners off mist once roots form and begin to feed at a moderate rate at 100 to 150 ppm N with a balanced fertilizer that includes micronutrients. Consider a preventative fungicide for Botrytis in the first weeks after stick, especially if early signs of Botrytis appear. Keep media moderately moist with mild dry cycles. Rooted liners should be ready to transplant within four weeks.
Growing on: Transplant into a well-drained media with a pH in the 5.2 to 6.0 range. During the early stages of plant growth, provide even moisture—do not over-water. Fuchsias are heavy feeders; after transplant, begin with 150 to 200 ppm N. As the plants mature, the rate can be increased to 200 to 300 ppm N. An acidifying fertilizer with iron is recommended.
 Liners can be soft pinched at transplant or shortly after transplant to promote early branching. Additional pinching is not needed, as these fuchsias are free-branching even without pinching.
Avoid temperatures below 60F (15C) and above 75F (24C). Fuchsias can benefit from mild shade after transplant, but should experience high light at finish.
The best plant habit can be achieved with proper spacing. To prevent Botrytis once the plants are flowering, maintain adequate light levels, ample spacing and provide good air circulation. Avoid wetting foliage and flowers immediately before and during shipping, and completely avoid overhead irrigation on flowers if possible.
 Fuchsia Ballerina have shown early flowering without daylength extension. Although daylength extension may speed flowering, it isn’t necessary.
Plants can be over wintered in Zones 10 to 11. Their average height is 8 to 12 in. (20 to 30 cm). If repotting, grow in extra-fertile, consistently moist, well-drained soil. It’s best to shelter fuchsias from harsh conditions.
Bracteantha Granvia
By Delilah Onofrey, Marketing Director—Suntory
Looking to offer more than mums in the fall? Granvia Bracteantha varieties are a great fit! Full, vigorous plants fill out large patio pots for decorators, and the blooms have a rustic feel and texture.
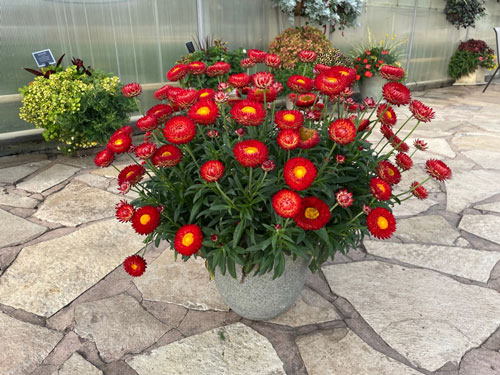 The series has expanded to six colors: Gold, Harvest Orange, Peachy Keen, Pink, White and Crimson Sun. These varieties are much larger and more vigorous than the standard bedding plant series on the market. In fact, we affectionately called Granvia Gold a bracteanthasaurus! Consumers can’t resist touching the large, papery blooms.
Granvia Bracteanthas have earned top awards in garden trials throughout the north and south. Plants demonstrate outstanding heat and cold tolerance, and mildew resistance. They’re great as a stand-alone, in mass plantings and will complement anything they’re planted or mixed with. Although we’re positioning them for fall, they could be grown for spring and summer programs, too.
Propagation
Granvia is not suited to root in a tray smaller than a 72 cell. Because of the vigor of the plant, unrooted cuttings are much larger. Cramming them into a smaller tray size will cause uneven rooting and shading from the leaves. If not done so already by the stock farm, or if the leaves appear too large, cut the leaves in half before sticking.
Additional recommendations:
• Best rooting temperature is 70 to 75F (21 to 23C). Optimum propagation temperature is 75F (23C) during the day and 70F (21C) at night.
• Rooting time is around 10 to 12 days. Callused cuttings can build roots in about six to 10 days.
• Propagation soil should be a mix of 70% peat moss and 30% perlite.
• Optimum air humidity is 90% to 100%.
• Light levels should be between 1,800 and 2,500 foot candles.
• Stop misting after first roots are visible.
• Harden off the liner for three weeks after the rooting process.
• Light levels should be increased to 3,500 foot candles and night temperatures can be lowered to 60F (15C).
Finishing
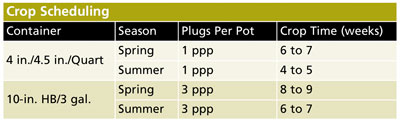
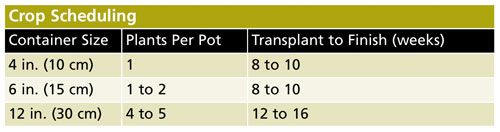
Granvia is not recommended for containers smaller than a 1-gallon/8-in. pot. Suggested crop times are:
• 1 gal./8 in. at 1 ppp (plants per pot) for 10 to 12 weeks depending on the time of year
• 10 in. to 13 in. at 3 ppp for 10 to 12 weeks (1 ppp given 16 weeks or more)
• 14 in. and larger at 4 or 5 ppp for 12 to 14 weeks
Use a soil medium that’s highly absorbent and will hold water longer with each irrigation. On warm days, bracteantha uses a high volume of water.
Use a well-balanced fertilizer, like 15-5-15 with 200 ppm constant liquid feed. A monthly iron application can prevent iron deficiency during cold and dark weather periods.
Optimum finishing temperatures are 70 to 75F (21 to 23C) during the day and 60F (15C) at night. Once plants fill the pots with roots and top growth, temperatures can be reduced to 45F (7C) at night to harden tissue and initial flowers.
Pinching the tips 10 days after transplant will stimulate more side shoots early from the base. No plant growth regulator (PGR) is recommended for early spring crops. For summer or fall sales, an early application of Sumagic can help induce branching before flowering. Bonzi drench is recommended at 10 to 14 days before shipping to help hold the plant and extend the shelf life of the foliage.
Pests to monitor for are aphids and whiteflies. Watch for downy mildew, although we’ve observed Granvia varieties are resistant to mildew.
For more information about Granvia Bracteanthas, visit suntoryflowers.com.
 Petunia Supertunia
By Proven Winners Staff
Supertunia Petunias are best-sellers thanks to their incredible versatility, self-cleaning blooms and impressive flower power. Not only are they reliable performers, there’s always something new coming to market. There are some exciting introductions for 2024, including the bright purple and white Supertunia Hoopla Vivid Orchid and sunny yellow Supertunia Saffron Finch, which won a whopping 21 awards in 2022 trials. Plus, there’s Supertunia Bermuda Beach Improved with bigger, brighter flowers and improved garden performance. This refined stock will help it move through the supply chain smoothly, delivering reliable and consistent liners to growers.
With 40 unique varieties in the collection, there’s a Supertunia for every application. They’re incredibly versatile, mixing easily in all sorts of container recipes and growing well in mixed borders.
Temperature
Rooting out: 65 to 72F (18 to 22C)
Growing on: 55 to 68F (15 to 20C)
Holding: 40 to 50F (4 to 10C)
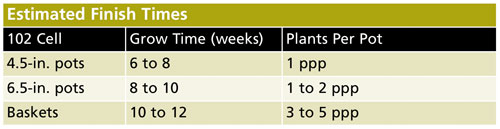
Pleasant View Gardens liner timing
6.5-in.: 4 weeks with one 32 Enhanced liner
1-gal. Royale: 5 weeks with one 32 Enhanced liner
10- to 12-in. HB: 6 weeks with four to six 32 Enhanced liners
12- to 16-in. Patio: 6 to 8 weeks with six to eight 32 Enhanced liners
4.2-in. Grande: 4 to 5 weeks with one 72 Enhanced liner
4.5-in. Classic: 4 to 5 weeks with one 72 Enhanced liner
Four Star Greenhouse liner timing
Grande to QT: 5 weeks with one Supernova 52 liner
6.5-in. to Royale: 6 weeks with one Supernova 52 liner
8.5-in.: 7 to 8 weeks with one Supernova 52 Liner
10 to 12-in.: 9 to 11 weeks with three to five 104 liners
Planting
Supertunia Petunias should be planted into a well-drained potting medium selected to match individual water quality and fertilizer blends. Water in without saturating the mix and maintain a constant moderate soil moisture level for the first seven to 10 days for establishing new roots. When using Supernova-treated liners, no pinching is required unless they’re deemed taller than desired. Supernova liners are programmed liners with a treatment of intensive lighting, spacing to encourage growth, pinching, PGRs and heat—all of which help the liners flower faster and consistently with thicker branching. If standard liners are used, pinch at transplant if size allows. Supertunia petunias branch quite well and pinching isn’t necessarily needed, except for shaping purposes.
Lighting
Supertunia Petunias should be grown in a high-light area of the greenhouse for optimal flowering and plant development. Supertunia Supernova liners have been treated for earlier flowering and will not require additional grower lighting. If very early crops are scheduled before the onset of 12-hour natural daylengths, daylength extension lighting is helpful. If growing from Standard 84 liners, additional lighting to 14 hours per day is required for early spring finish dates. Additional PGR treatments may also be required on plants not treated with Supernova.
Growth regulators
As required, either a light spray of Sumagic at 5 ppm to 10 ppm or a 1 ppm to 3 ppm Bonzi drench can be applied to control growth. Treatments are usually made to smaller containers seven to 14 days after planting. Treatments to larger containers can be made when a desired “pre-finished” size is attained (two to four weeks before scheduled finish). Watch for the “softening” look and lighter green appearance of new growth as an indication for PGR treatment needs. In more northern areas, the lower rates should be used as a starting base, while in more southern areas, the higher rates will probably be needed.
Other materials such as flurprimidol and paclobutrazol can be used at rates that correspond with the degree of treatment recommended for Sumagic or Bonzi. Cooler growing temperatures, high light levels, proper spacing and drier growing practices can be very helpful at managing plant size. Supernova-treated plants should require fewer PGR treatments than Standard 84 liners.
Pest & disease management
Pests are not much of an issue with Supertunia Petunias. Proper growing environments and watering practices should be followed to avoid Botrytis and various stem or root rots.
Outdoor growing schedule
Supertunia Petunias can be grown outdoors as a first-out crop if good frost protection is provided.
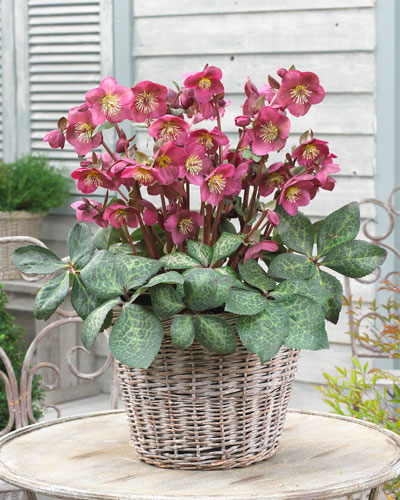 Hellebore Frostkiss
By April Herring-Murray, Marketing Director—Pacific Plug & Liner
Contrary to popular belief, hellebores are remarkably resilient plants that are actually simple to grow. Through my years working with Hellebore Frostkiss breeder Bart Noordhuis and many visits to growers, I learned that growing hellebores slightly differs from growing traditional perennials. By following the simple tips provided in these culture notes, you'll be well-equipped to grow the best-quality Frostkiss Hellebore crop possible. So fasten your seatbelts and let's embark on a journey to unravel the dos and don'ts of producing these stunning plants.
Crop placement: Key considerations for optimal growth
Selecting the right location for your crops is vital to their success. Poor placement can negatively impact growth and overall quality, such as low spots in a field causing poor drainage. It’s also crucial to choose a location that provides protection during winter and shade during summer. Consider utilizing structures like hoophouses, which offer both benefits.
Healthy soil and hellebores: Maximizing crop quality
Proper air circulation is crucial for root health and improving crop quality. Avoid waterlogged and compact soil, which can suffocate hellebores. Use well-drained soil with white peat (Canadian or Baltic) as the main component and limit black peat to 20%. Hellebores thrive in slightly acidic soil with a pH of 5.4 to 5.5. High pH levels above 6 hinder phosphorus uptake and reduce flower production.
Start strong: Timing is everything
When it comes to planting your hellebore crops, timing is everything. For optimal growth and bountiful blooms, it's best to get a head start by potting early in the season. This is especially important for hellebore plants, as they flourish in cooler temperatures. Delaying planting can hinder their growth and reduce the number of flowers they produce.
If you're looking to save time or avoid over-summering a hellebore, fall planting is the way to go with our Fast-Track 32 cell. It can significantly shorten the crop time, cutting it in half.
When potting, it’s important to fill pots to the top with soil to prevent warm roots. Leaving a gap between the top of the pot and the soil can cause pots to heat up, which may damage the hellebore roots. When planting liners, ensure to plant a bit deeper than the surface of the soil to promote better flower bud development.
 Spacing: Hellebore like to keep it cozy
Frostkiss Hellebore varieties are bred for efficiency. They thrive when grown in a triangular pattern, minimizing root exposure to sunlight. Close proximity shades the pot, protecting roots and ensuring cool conditions. This helps plants grow larger and to produce more flowers. Once plants start flowering in spring, they can be spaced out to allow their flowers to fully develop, while still ensuring adequate shade for the pots.
Pictured: Proper air circulation is crucial for hellebore root health and improving crop quality. • If you're looking to save time or avoid over-summering a hellebore, fall planting is the way to go with the Fast-Track 32 cell.
Fertilization & irrigation guidelines
Keep hellebore growing year-round by never stopping fertilization. Aim for a steady feed with an EC of 1.2 to 1.5, measured directly in the soil. Use a slow-release eight-to-nine month fertilizer for spring planting.
During fall, when days shorten and temperatures cool, hellebore need extra nitrogen (N) and iron (FE) for flower initiation. Maintain EC levels at 1.2 to 1.5 with a liquid drench.
Phosphorus is crucial for hellebore. Aim for a P:K ratio of 1:3 with 150 ppm P and 450 ppm K. Perform soil tests throughout the crop's life to keep P:K levels balanced.
Proper watering is essential to avoid stress. Drip irrigation is preferred, but overhead irrigation with feed is possible. Avoid watering during the hottest hours of the day to prevent temperature shock and stress. Water using overhead irrigation only in the early morning or late evening.
Exposure
Helleborus prefers cool roots and benefits from sun protection. To prevent direct sunlight on the pots, place them close together and ensure the leaves create shade. Use 30% to 35% shade cloth during warmer months. When overwintering under plastic, opt for white poly to avoid sunburn.
Temperature
In fall, hellebores grow best between 40 to 50F (4 to 10C), triggering flower initiation. This occurs between September and December, depending on the climate. In winter, keep helleborus inside a frost-free structure with temperatures of 32 to 40F (0 to 4C). Frost delays flowering, so plants will naturally flower when there’s no frost. Provide 30% to 35% shade in summer when temperatures exceed 80F (26C).
Insects & diseases
Hellebores are generally disease-resistant, but may occasionally be affected by Botrytis. Prevent this by keeping plants dry with good air circulation. Watch for aphids and spider mites, particularly in drier climates, as they can transmit viruses. In wet conditions, snails can be a problem, so it's important to keep the crop dry and choose a well-drained location.
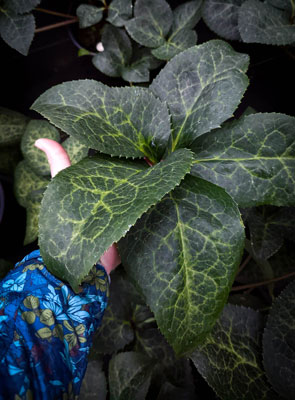 What not to do
Do not pinch hellebores, as it hinders flower formation—the leaves are the LUNGS! The leaves provide energy for bud development, even when damaged. Damaged leaves can be removed once the plants are ready to ship.
Pictured: Do not pinch hellebores, as it hinders flower formation—the leaves are the LUNGS!
Avoid using growth regulators, as they can delay or halt flowering. Hellebores grow pretty slow already, so no need to stall them further.
We can create a customized hellebore program for your operation, taking into account the various climates, growing operations and other variables. Contact us at PP&L with any questions or to arrange a visit for optimizing your Hellebore Frostkiss crop.
Want to learn more about how to delay bloom of your hellebore crop? Watch our hellebore webinar, where we talk about this and much more, hosted by Chris Beytes of GrowerTalks.
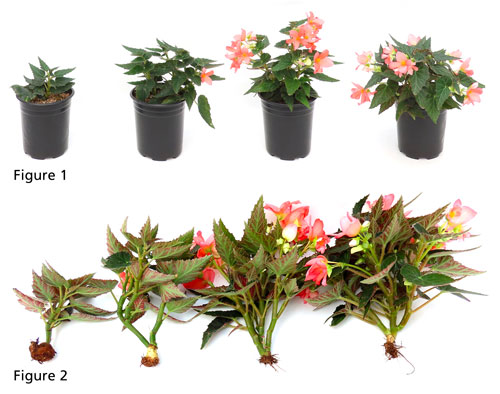 Vegetative Begonias
By Syngenta Flowers Technical Services Team
We all love vegetative begonias for their striking flower colors and bold foliage. However, they can be challenging if you don’t pay attention to the photoperiod that they’re propagated and grown under. When grown under short days, they’ll form tubers and have poor branching and flower development. To ensure a high-quality crop, propagate and finish plants under long days (> 14 hours).
The examples demonstrate the effects of photoperiod during propagation and finish on plant quality.
Finish photoperiod
Long days during propagation and finish are needed to promote vigorous vegetative growth and a fibrous root system for the highest- quality finished plants.
In this example, (Figures 1 & 2) Florencio Pink Begonia performed best when long days were used in propagation and finish. Also, even when plants were propagated under long days, but finished under short days, the plants developed tubers and quality declined.
 Short days trigger tuber formation, reducing vegetative growth, branching and flowering.
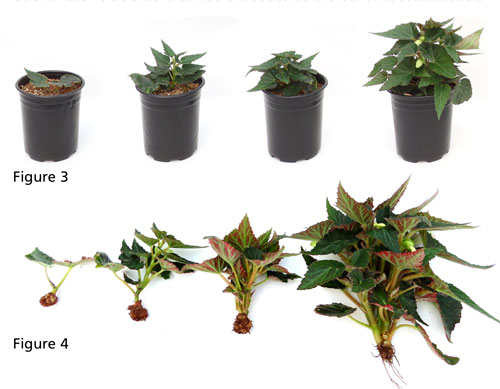
Plants propagated under short days and finished at 13.5 hours branched and developed tubers, but flowering was delayed and of poor quality. Short days during propagation are never recommended (Figures 3 & 4).
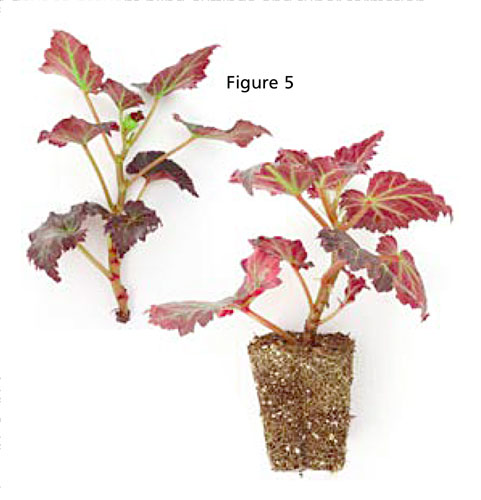 Blind cuttings, or those that don’t branch after pinching, can be caused by poor cutting quality and short daylengths. Always propagate under long days to prevent blind cuttings and tuber formation (Figure 5). GT