NEW PODCAST: Root-Zone Climate Control with Taylor from BioTherm
When most of us think about greenhouse temperature, air temperature usually gets most of the attention. But in the latest Tech On Demand podcast, BioTherm’s Taylor Readyhough explains why root-zone temperature can be just as important for crop quality, uniformity and energy efficiency.
In EPISODE 280: FROM THE ROOTS UP—PRECISION GREENHOUSE CLIMATE CONTROL, Taylor and I discuss how root-zone heating puts warmth directly where plants need it. By circulating hot water through small-diameter tubing on benches or floors, you can maintain precise substrate temperatures without heating your entire greenhouse to the same level.

In propagation, this can be hugely beneficial—because the right root-zone temperature supports faster rooting, better germination and more uniform crops. It can also help reduce disease pressure by creating conditions that favor healthy root development. As Taylor points out, good environmental management fits right into the familiar “start clean, stay clean” approach.
There are also energy benefits to be realized. Instead of relying solely on unit heaters to warm a large volume of greenhouse air, hydronic systems (using liquid to transfer heat) allow you to target heat around the crop. That can reduce fuel use while maintaining the conditions plants need. And faster rooting can mean earlier starts, shorter crop cycles and potentially more turns through the same production space.
Conveniently, upgrading to a hydronic root-zone system doesn’t have to mean replacing an entire heating system at once and I really wanted to hear from Taylor about this because I know he works with tons of growers with many different budgets and situations. He explained that you can start with a propagation area or a few benches and build from there. Modern boiler systems can be designed with future expansion in mind, allowing additional zones, benches or boilers to be added as your production needs change.
For older greenhouses, Taylor suggests evaluating your aging boilers and opportunities to add hot-water heating to existing systems. He also recommends checking with local utilities and NRCS for potential energy efficiency incentives.
The bottom line is to look beyond fuel savings when calculating payback. Better rooting, increased turns, improved reliability and fewer winter nights worrying about a failing boiler all have real value.
This is a fantastic conversation with plenty of action items so be sure to stick around all the way to the end.
There are now 280 Tech On Demand podcast episodes in the archive covering a huge range of topics related to the professional greenhouse, garden center, landscape, nursery and CEA markets. Jump back in to get caught up or take a minute to subscribe—that way you’ll never miss an episode.

Nick’s Tip of the Week: One Last Poinsettia Push
Each week, I’ll work with my buddy Nick Flax, a technical services expert at Ball, to share a concern that’s come up during one of his numerous calls with growers across North America. This week, he’s following up on James’ tech tip from last week because he’s had at least three calls with growers this week who desperately need to add some height to poinsettias to meet retail specs.
PROBLEM: There are only three weeks until Thanksgiving and that means poinsettias will start shipping soon! This time each year, I have conversations with growers whose poinsettias are not quite where they need to be size-wise and they are concerned their plants won’t hit retail spec. While I am generally in agreement with my colleague James Doukas, who wrote for this segment last week about not chasing finished spec, it’s not always possible to find different buyers for plants that are too small.

NICK’S TIP: If your crop still needs to pick up a couple of inches, act now—but cautiously! Here are a few tips and tricks to get your points across the finish line:
The Cold Calculus
First, consider your end goal before you start to push the crop. How much height do you need to make up and how much time do you actually have to do so?
-
Use graphical tracking data to guide your decisions. If you haven’t implemented this process throughout the season (check out my past Tech Tip HERE for details), measure at least five plants of each variety you feel are still too small to get a representative average height.
-
Reserve the last week (at least) to tone the crop and avoid pushing plants right up until ship. You don’t want soft plants going into sleeves and heading to retail, as they will be much more likely to break!
Are you satisfied with the height of your plants, but you need bracts to be larger? Thankfully, you can do something about this!
Second, come to terms with a couple of things:
-
If you are just 1 to 2 inches shy of spec, you may be able to reach the goal line with some purposeful environmental and crop cultural tweaks.
-
If your crop is 3 or more inches shy of spec, it’s unlikely that pushing for additional size will end well. In this case, take James’ advice and have some frank discussions with your wholesale customers and find alternative sales avenues or other ways to fulfill orders if needed. If you are growing strictly for in-house retail sales, perhaps this year is the year of “compact” poinsettias! Bushy and colorful is better than soft, floppy and broken.
Gaining Height
If you make the decision to try to reach that finished spec and your crop only needs to put on about 1 to 2 inches, you can likely make up most of the difference by marginally increasing your DIF (difference between day and nighttime temperature), running media slightly wetter, and giving them a gentle “nudge” with PGRs. Here’s some food for thought:
-
Increasing feed rate significantly or switching to a high-phosphorus fertilizer formulation to push size is not a good idea—just don’t do it.
-
When increasing DIF, to minimize the impact on your average daily temperature (which largely controls the rate of color change), increase your daytime temp setpoint and reduce your nighttime temps in similar magnitudes. That way, the average stays at or close to the same, and you aren’t suddenly running significantly higher or lower overall temps. Failure to do this could lead to faster or slower color change and cyathia development than desirable. Also, be sure not to drop nighttime temps suddenly to avoid stressing plants or running into dewpoint issues.
-
When running soil moisture levels slightly higher than normal, mildly increased turgor (internal pressure of cells) can encourage a little bit of stretching without significantly increasing the risk of “crud.” That said, don’t allow the root zone to stay sopping wet for long periods, just water/feed slightly earlier than you normally would. Be sure to manage greenhouse humidity levels by venting as much as possible to further reduce risk of crud and Botrytis on bracts with that extra moisture around. Also, make sure you’ve applied a good root-zone fungicide recently before using this approach, or pathogens like Pythium could sneak up on you.
Heavy use of gibberellic acid (GA)-based plant growth regulators (PGRs) won’t do the trick and is generally unadvisable at this stage. The better route is to give plants a little “nudge” with GA and let the mild PGR effect work together with your other environmental and crop-culture adjustments. For GA-based PGRs, be sure to use ones that contain both GA4, GA+7 and benzyladenine (BA), like Fresco and Fascination. These forms of GA coupled with BA generally yield more consistent results in poinsettias than PGRs containing only GA3.
-
Drench applications of Fresco (Fascination is not labeled for drench) will enhance growth a bit more evenly across the plant, whereas sprays have somewhat of a localized effect on growth enhancement closer to the spray application site.
-
At this point, a single 1 to 2 ppm drench of Fresco or spray of Fresco/Fascination is about all I would suggest. As James wrote in his tech tip last week, chasing a certain spec too hard often does not yield good results.
-
Consistent application volume across the crop is key, especially when your goal is to not overdo it. For drenches, apply 1 fl. oz. per inch of container diameter + 1 fl. oz. per additional ppp to each pot. For example, a 6-in. pot with 1 plant per pot (PPP) would need 7 fl. oz. (about 205 mL) and a 10-in. with 3 PPP would need 13 fl. oz. (385 mL) per pot. As a foliar spray, dialing-in a half gallon per 100 square feet of bench space spray volume target is a solid standby.
-
If you don’t have experience using GA-based PGRs in poinsettias this late in the season, exercise caution!
If bract size enhancement is your goal and you don’t want much additional height on the crop, about 3 ppm (foliar application) of Fascination or Fresco 7 to 14 days before anthesis (when cyathia are showing pollen) will increase bract size.
-
Keep in mind that late foliar application may impact plant height. Test a few rates on different cultivars before applying to your whole crop.
-
Foliar applications of Fascination/Fresco can also deepen the color of darker-bract cultivars and brighten the bracts of white cultivars.
-
Be aware of the risks associated with applying foliar sprays to poinsettias with mature bracts. Some growers experience increased Botrytis pressure after applying these late foliar sprays due to prolonged leaf wetness and high relative humidity in the crop canopy. Adjust environment controller setpoints to eliminate prolonged periods of high humidity (more than about 4 hours) or apply an appropriate fungicide ahead of time to minimize the risk of encountering disease pressure.

Case Study: Herbicide Drift & Clean Up
I know we’ve covered this topic in past newsletters, but the experts at e-GRO released a fantastic Alert last month that I made a note to share with you. It’s no secret that herbicide drift can cause serious greenhouse crop damage—the real challenge is that the source isn’t usually obvious.
In FROM HERBICIDE DRIFT TO RECOVERY: CLEANING UP THE GREENHOUSE, a dynamic trio of researchers at Michigan State University share a real-world case involving a sweet potato transplant grower in which they offer practical steps for recovering from suspected contamination.
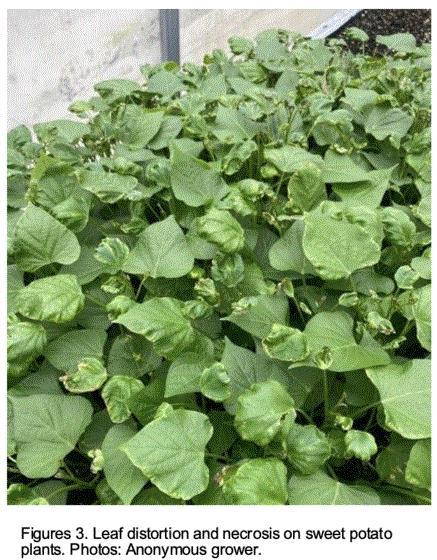
The grower began seeing leaf distortion and necrosis in January. Tests of their plants, soil and water eventually detected a small amount of 2,4-D. By then, the damage was significant. According to the Alert, the crop was set back about a month and acceptable transplant numbers dropped by 50%. Even plants that later produced normal-looking growth performed poorly after transplanting to the field.
The article explained how MSU's Debalina Saha, Erin Hill and Heidi Lindberg helped the grower recover. Recommendations include flushing irrigation lines, replacing weed mats, power washing surfaces, ventilating the greenhouse, treating contaminated soil and thoroughly washing greenhouse surfaces. After all of that, a bioassay using sensitive indicator plants can help determine whether conditions are safe for the next crop.
This really is a useful case study for any grower concerned about herbicide drift, contamination or unexplained crop symptoms.

OSU Conference Notes: Irrigation System Sanitation
When growers think about irrigation water quality, “chemistry” often receives most of the attention. But water has three dimensions growers need to manage: physical, chemical and microbial.
At the OSU Floriculture & Nursery Conference (the one I’ve been sharing notes from for the past few weeks), researcher and consultant Dr. Peter Konjoian focused on that third dimension (microbes) and how irrigation system design and sanitation can help manage algae, biofilm and plant pathogens. It was an awesome talk loaded with great advice for growers.
Peter is excellent at sharing technical information in a real-world way and his presentation was full of photos from his own research and actual greenhouse irrigation systems. (My notes only capture a small fraction of what he shared so we’re hoping to talk him into writing a much more comprehensive article for GrowerTalks.)
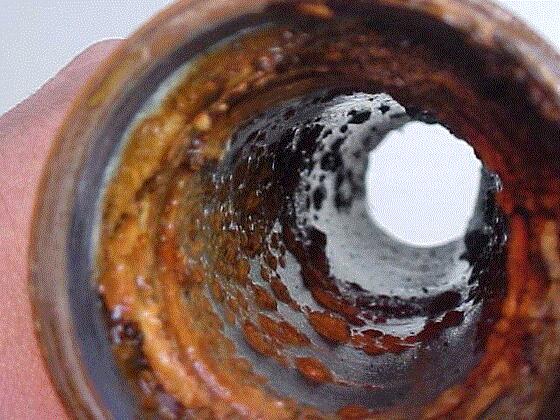
Peter explained that algae and biofilm can work together, allowing algae to survive in places where sunlight is limited, including within irrigation systems. That makes filtration increasingly important, particularly as more growers use recirculating water.
Peter suggested filtration to at least 50 microns—preferably below 25 microns—with 5 microns an achievable goal. Stepping down filtration through the system can help. Better filtration costs more, but physically, he said, you really can’t have too much.
Greenhouse design matters, too. Raw concrete surfaces can support algae and pathogens while creating slippery conditions for employees. And irrigation systems vary widely from greenhouse to greenhouse, making sanitation strategies more complex.
One area of research Peter cited involves didecyl dimethyl ammonium chloride (DDAC) chemistry, and he shared research using products such as KleenGrow and UpTake Pro. Continuous injection for algae control can result in phytotoxicity, so Konjoian discussed using non-continuous or “pulse” treatments instead. Research with DDAC-treated water at 2 to 8 ppm provided control of Phytophthora.
That strategy could influence how recirculating irrigation systems are designed, Peter explained. He discussed a dual-reservoir approach, with a second reservoir allowing water to be isolated for sanitation and pulse treatments rather than simply draining treated water to waste.
The takeaway is that irrigation sanitation isn’t just about choosing a product. Filtration, greenhouse surfaces, system design and treatment strategies all need to work together to manage water quality and reduce pathogen pressure.

Thinking Ahead: Rehydrating Cuttings
As you and your team get ready for spring young plants to arrive, it’s a good time to review some best practices. One that the Tech On Demand team (especially Ball culture research manager Nathan Jahnke) has spent a lot of time studying and sharing with growers is how to rehydrate cuttings that dried out in transport.
The goal is actually pretty simple (but there are a few ways to achieve the results): Get URCs hydrated before sticking so they begin propagation as uniformly as possible. That strong start can translate directly into better rooting, fewer losses and a more uniform liner crop.
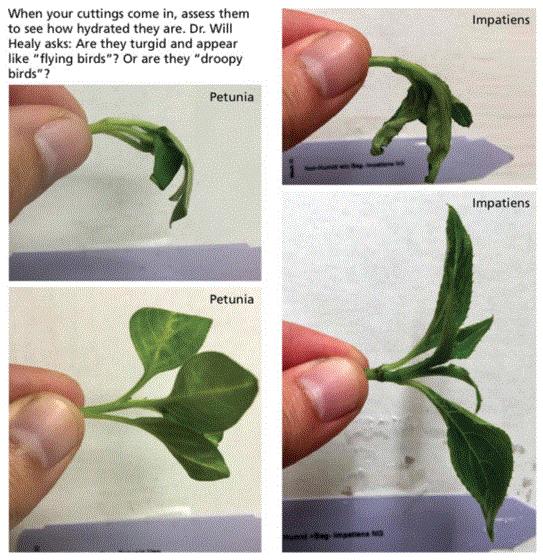
Unrooted cuttings go through a lot before they reach your greenhouse. From harvest through packing, cooling and shipping, they’re continuously losing moisture. In fact, OUR REHYDRATION WHITE PAPER cites research showing that cuttings can arrive as much as 20% dehydrated! And dehydrated cuttings can be harder to stick, root less uniformly and ultimately increase shrink.
That means your rehydration strategy should start as soon as boxes arrive.
First, check cutting temperature. Measure stem temperature rather than leaf temperature because leaves change temperature quickly. An infrared thermometer is a useful tool for this job (and a perfect gift to ask for this holiday season). Then evaluate turgidity. A dehydrated cutting tends to droop when held horizontally by its base, while a well-hydrated cutting stays relatively straight with erect leaves.
Don’t assume putting cuttings in the cooler solves the problem. Refrigeration naturally removes moisture from the air. Without added humidity, your cooler can continue drying cuttings. A fog system that adds moisture while minimizing free water on surfaces is a much better approach.
How long should you rehydrate? OUR INFO SHEET recommends at least eight hours under fog, with 12 hours better and 24 hours best. If cuttings remain inside their bags, 24 hours is preferred. Removing them from the bags before applying fog provides the best opportunity for rehydration.
Water dipping can also rehydrate cuttings quickly because it creates excellent surface contact. But there’s a catch—dipping can spread disease between cuttings, meaning this strategy is better suited to low-risk crops. Fogging avoids much of that concern while still providing excellent moisture contact.
CHECK OUT THIS GREAT VIDEO on the importance of hydration for uniform rooting of URCs.

Finish Line ... Whiteflies
I was looking through some reports from past years and spotted a high-priority issue a grower encountered during Week 45 in 2023. Hopefully, none of you will deal with the same thing this year, but greenhouse pest issues tend to strike right around the same time every year, so I’ll close the newsletter with this scenario:
A grower walks into his greenhouse at the beginning of November only to discover that whiteflies have moved into his poinsettia crop—not good this close to shipping, because the last thing retailers and consumers want to see is bugs on the plants they’re about to take home to their living rooms! So if you see these pests, you have to act quickly. Here are some solutions shared by Tech On Demand experts:
Identify the hotspot(s) and assess how far the infestation has spread. Look primarily on leaves immediately below the bracts. Presence of mature crawlers and adults here means your previous preventitive measures have worn off.
Apply a contact or translaminar insecticide that provides relatively quick kill. Altus, Flagship, Mainspring, Rycar and Safari are effective options for foliar application, but good coverage is required for quick-kill to be achieved. Risk of bract burn is low for these products but always test on a small group of plants first before applying to the entire crop. (Perhaps your best bet is Rycar at a high label rate to knock down the population.)
Follow up with a soil-applied systemic insecticide to clean up any stragglers. Safari and Mainspring are good options for this type of application. If one was applied as a foliar spray previously, apply the other product as a drench. This will provide longer-term “out the door” control for your customers and control whitefly that evaded the initial spray.
Talk to you next week!


Please feel free to send your comments, constructive criticism and topic ideas to me at bcalkins@ballhort.com.

Bill Calkins
Editor—Tech On Demand
This email was received by you and 25,394 other fine subscribers!
If you're interested in advertising in Tech On Demand, contact Kim Brown ASAP and she'll hook you up.