NEW VIDEO & PODCAST! Ornamental Pepper Tips & Tricks
Frequent newsletter contributor Josh Henry from the Ball Seed tech team joined me to share BEST PRACTICES FOR PRODUCING ORNAMENTAL PEPPERS as part of our series on crop culture for key annuals and perennials. As we work our way through common crops grown across North America, I was particularly excited for this one because while we’ve covered ornamental peppers as an “at-risk crop,” I see more and more ornamental peppers sold as fall decorations in small pots and even in seasonal combos because consumers really seem to love them.
To me, that means more of you are growing them, and your team can probably benefit from a refresh on ornamental pepper production best practices—from seed propagation to finishing.
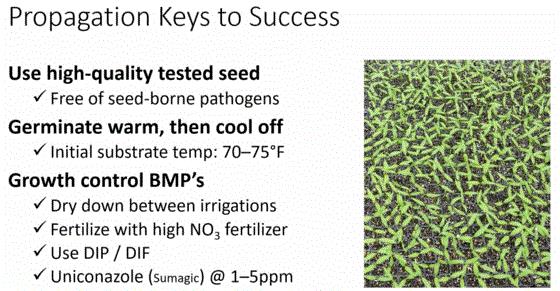
Josh covers all the angles—from the importance of sanitation before sowing and purchasing tested seed, to keeping temperature, light and nutrition up. He also spends time on protocols for preventing INSV and TSWV as key diseases to watch out for, as well as bacterial leaf spot (Xanthomonas).
Here are some additional resources Josh mentioned in the presentation:
As we often do, this presentation is also available as an audio podcast, if you so choose. Listen on all the major podcast apps! Links to Spotify and Apple Podcasts are below. And make sure you subscribe so you never miss an episode. If you can, leave a positive review to help us reach more greenhouse professionals. And jump back into the archives, because we have more than 200 episodes covering a huge range of topics.

Koppert Corner: Preparing Perennials for Winter
Before shutting down perennials for winter, making proactive plant health applications can strengthen plants against abiotic stresses, enhance their ability to emerge from winter stronger, reduce root pathogens, and disrupt insect pests planning to overwinter in the pots.
Integrated Plant Health
Perennials that need a boost to enhance secondary root growth before shutting down before winter, or those with weak root systems, will benefit from a drench of the plant growth-promoting rhizobacteria (PGPR) found in Microflora SA. Microflora SA is formulated with two species of Bacillus, B. subtilis and B. amyloliquefaciens, which colonize the rhizosphere and improve the availability and uptake of nutrients in the root zone.
Integrated Pest Management
Are foliar or root pathogens your main concern? If you are concerned about pesticide resistance management or just want to take a proactive health approach to managing foliar and root pathogens, Bacilirid is the right tool for the job. This FRAC Group 44 biofungicide is a Membrane Integrity Disruptor—broad spectrum with several modes of action, which include:
-
Competition for space and nutrients
-
Production of metabolites that kill fungi
-
Formation of a protective barrier against pathogens around roots and foliage

Now that you’ve determined whether root establishment or disease prevention is your goal, we need to consider timing. Microbiological products are best applied 3 to 4 weeks prior to the beginning of consistent cold temperatures to give the spores time to colonize and reproduce.
Insect Pest Management
Typical insect pests present in fall perennials include spider mites, thrips, aphids and mealybugs, all of which can successfully overwinter in perennial crops. These pests resurface in early spring and damage emerging new growth, and they may transmit diseases, too.
If there is active insect pressure in your perennial crops, make a spray application of horticultural oil to suffocate insects still working on above-ground portions of the plant. To further control insect pests while strengthening the plant (IPH approach), tank mix myco-insecticide Isarid with the Microflora drench for a one-two punch. Where plant pathogens are a concern and insect pests may be present, make a final foliar or drench treatment for the season by tank-mixing Isarid with Bacilirid to impact label-listed foliar and root pathogens.
Not sure how best to lay your perennials down to sleep for winter? Reach out to a Koppert Technical Consultant to determine which approach will yield the best results for your specific situation.

Nick’s Tip(s) of the Week: Chlorotic Poinsettias in the Fall (Part 1)
Each week, I’ll work with my buddy Nick Flax, a technical services expert at Ball, to share a concern that’s come up during one of his numerous calls with growers across North America. This week, he’s hoping to preempt some later-season poinsettias issues related to chlorosis or provide some strategies to deal with the issue if it arises in production.
PROBLEM: Later this month and into November, I expect to hear from growers struggling to keep mid- and later-season poinsettias green. Not the bracts, of course—leaf color in various parts of the canopy is the issue here.
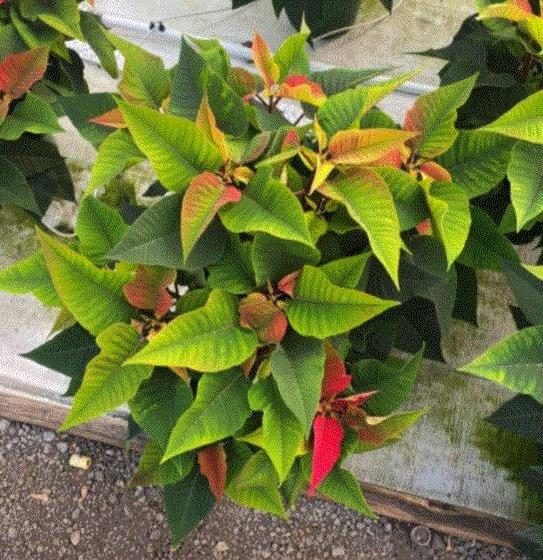
NICK’S TIP: While the emphasis of poinsettias is their showy bracts and golden cyathia, no one wants to see a poinsettia with chlorotic foliage in the mid and upper canopy. If you tend to struggle with anemic-looking poinsettias, this week’s tip will help you when the crop is ready to ship.
Potential Causes for Late-Season Yellowing
Different factors can cause chlorosis in your poinsettia crop toward the end of the production cycle. Some of the most common reasons include:
Too-low fertilizer rates throughout production. Poinsettias are regarded as heavy feeders, but some growers opt to use a lower fertilizer rate to check excessive growth and reduce need for growth regulators. However, plants’ demand for mineral nutrients increases as they develop—especially after pinching. If you’ve been riding the line between “just enough” and “not enough” fertilizer throughout the crop cycle, deficiency symptoms may start to manifest in the last several weeks before shipping.
Fertilizer was cut off too early. While it’s generally regarded as best practice to irrigate poinsettias with clear water toward the end of production, the last week (or two) before ship is the timeframe to do this. Switching to clear water too early will flush mineral nutrients out of the media while the crop is still growing and cause general chlorosis.
Poor water quality is catching up to the crop. If your irrigation water has moderate to high alkalinity and it’s not being managed appropriately, chlorosis is most likely in the upper canopy; this is the typical iron (Fe)/manganese (Mn) deficiency symptoms. If you normally use an ammonia-based fertilizer during warmer months, the acidity of your feed may be enough to prevent high pH issues. However, when you switch to a more nitrate-based fertilizer as the weather cools down, your growing media pH will increase over time and limit uptake of Fe/Mn by plants later in the growing cycle.
What Is “Too Yellow” to Ship?
Poinsettias are usually your last major crop of the year, so it’s easy to get anxious about crop quality this close to shipping. Unless you recently applied a PGR containing chlormequat chloride (Cycocel, Citadel) at too high a rate, chances are that the yellowing you are observing is due to nutrient deficiency of some kind. However, before you take corrective action, make sure any adjustments to crop culture you make are in proportion to the scale of the problem.
Level I: If only the very bottom of the canopy is showing some chlorosis, it may not be worth doing anything at all. Leaves on the bottom nodes will most likely be obscured by a decorative pot cover, so changes to crop culture may only cause problems at this point.
Level II: If leaves in the mid and lower canopy are chlorotic and visible with a pot cover on, a last-minute green-up treatment is in order.
Level III: If leaves throughout the canopy are chlorotic and lower leaves are (likely) senescing, identifying the exact cause and quick action to correct nutrient deficiency symptoms is critical. Also, be sure to enact preventative disease control measures, as your crop will be more susceptible to attack from pathogens in its weakened state.

Nick’s Tip(s) of the Week: Chlorotic Poinsettias—Corrections (Part 2)
Level I Correction: If only the lower-most leaves are yellowing, the main concern is whether they will impact shelf life. Senescing leaves often become infected with Botrytis, and fungus-infected leaves hanging out in the pot will serve as the source for a secondary infection. Since poinsettias are often watered heavily before shipping and pot covers further restrict air flow in the lower canopy, the combination of high moisture and humidity, darkness and a source of fungal spores creates the perfect storm for a bigger disease outbreak. Carefully remove and clean up yellowing lower leaves during the pulling and sleeving process to keep chlorotic, senescing foliage from becoming a liability.
Level II Correction: Increasing fertilizer rates for mid- to lower-canopy yellowing may seem like a logical solution, but increasing feed close to shipping can cause plants to become soft and more prone to lodging and breaking. Whether low feed throughout the growing cycle or cutting off fertilizer too early is the cause, applying an Epsom salt (magnesium sulfate; Mg2SO4) drench can help re-green the mid to lower canopy without making plants too brittle. One or two applications of Mg2SO4at 1 to 2 lbs./100 gal. will help you achieve green-up.

Level III Correction: When plants are exhibiting chlorosis throughout, more drastic measures need to be taken to make your crop shippable. There’s also a good chance that overall growth and development has been impacted, so this is likely not the prettiest crop you’ve ever grown, too … But if you have a few weeks before they need to be ready, take the following steps if you want to try and save your crop:
-
Make sure your fertilizer injector is working properly. If this is the reason your crop is so malnourished, attempts to treat symptoms with fertilizer won’t work until it is repaired or replaced. Also, check your crop’s root zone for signs of disease. Root rot hampers nutrient uptake, so apply a fungicide ASAP if you see disease symptoms.
-
If/when roots are healthy, feed ASAP with your fertilizer of choice at 300+ ppm N once you are certain your injector works; repeat two times if possible, allowing for some dry-down between applications.
-
Increase your air temperature slightly to speed up uptake and distribution of nutrients throughout the plants. After a couple of fertilizer “hot-shots,” you can follow-up with one or two Mg2SO4 drenches at 2 lbs./100 gal. to get the last bit of green-up, if necessary. (Note: Warmer temps and increased feed WILL make your crop softer. However, you must weigh the risks of shipping a softer-than-ideal crop over taking a 100% loss on your poinsettias.)
-
Once you crop has regained sufficient color, reduce air temperatures to help tone the crop as much as you can before ship. Also, if possible, try to provide at least two clear-water irrigations to flush excess salts out of the media. A light drench with paclobutrazol (Bonzi, Piccolo, Paczol) at about 0.25 ppm can also help tone plants more quickly and suppress excessive stretching due to the sudden feed increase.
Level II and III (especially) corrections are last-ditch efforts to make your crop salable, rather than having to eat a major loss on your poinsettias. By NO means should these be considered best practices.

Trending Now: Innovative High Tunnel Greenhouse
A couple weeks ago, I talked to Corenthin "Felix" Chassouant, the VP of Sales—Poly Greenhouses at Harnois Industries, about the company’s new TunnelPro Plus high tunnel greenhouse. In THIS SHORT VIDEO, Felix explained the reasons Harnois developed the TunnelPro Plus structure, designed specifically for modern, extreme climate conditions while also taking into account agronomics and optimal growing conditions for a range of crops traditionally grown in open fields.

As you’ll learn in the video, Harnois’ new greenhouse system is extremely durable and economical, with the height, width and structural specifications to create a uniform climate for plants and production teams. TunnelPro Plus is scalable for future expansion and large enough to allow for machinery and automation, and it can accommodate a range of different poly coverings and structural additions like hanging basket lines to maximize production. As Felix explained, it’s a truly innovative upgrade to traditional shade houses and high tunnels.

Finish Line …
That was a ton of information packed into one newsletter! So, I’ll keep the closing short and sweet—with a promotional message.
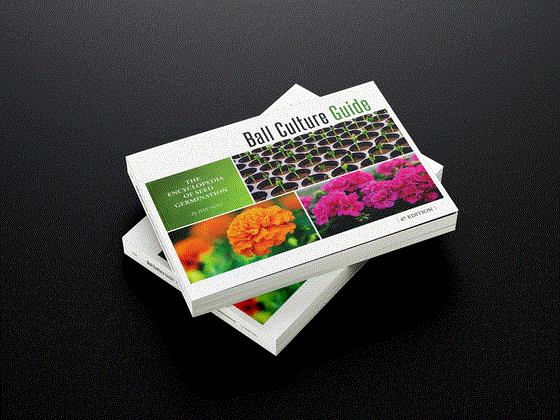
As you prepare for 2026 spring production, it might be a good idea to snag a copy of the Ball Culture Guide: The Encyclopedia of Seed Germination. It’s been a mainstay resource for growers since its introduction in 1989. That first volume was the culmination of a decade’s worth of research and development in seed germination knowledge and experience, thanks to the new technology of plug production.
Now in its fourth edition, the guide provides detailed information on germination, scheduling, production temperatures, lighting requirements, propagation and growing-on tips, final garden height and much more. The chart format makes it an easy-to-use guide for producing a multitude of seed-grown crops in all categories—annuals, perennials, potted crops, cut flowers, foliage plants, vegetables, herbs and ornamental grasses.
If you (and your production team) don’t have a copy on hand, NOW’S THE TIME TO ORDER!
Talk to ya’ next week!


Please feel free to send your comments, constructive criticism and topic ideas to me at bcalkins@ballhort.com.

Bill Calkins
Editor - Tech On Demand
This email was received by you and 25,500 other fine subscribers!
If you're interested in advertising in Tech On Demand, contact Kim Brown ASAP and she'll hook you up.