Tech On Demand on Instagram!
One of my goals for 2025 is to share more information across a wider range of platforms. To be honest, I’ve avoided Instagram for years, other than an random post or a bit from California Spring Trials. But I know a lot of greenhouse professionals use the app, and with its focus on images and short video clips, it’s actually pretty perfect for Tech On Demand content. I’ve found it to be a fairly simple way to share quick tips and showcase some of our videos that may or may not hit everyone’s radar. The results have been amazing—19 posts generated about 2,000 views in the past 28 days.

We make a lot of videos. Most of them are long-form, presentation style and they get plenty of views. But if you don’t have 30 minutes to sit and watch best practices for finishing crops like lantana, angelonia or coleus, follow @balltechondemand on Instagram and find shorter videos (most less than a minute) with quick tips to share with your production team. So far, our experts have covered topics like understanding your fertilizer, dealing with red or black margins on foliage, causes of internode stretch and more.
As long as you keep watching and following, we’ll keep sharing tips on Instagram—that’s a promise. Drop a comment on a post and we'll follow you back! And no, we won’t be on TikTok any time soon (ever).

Nick's Tip of the Week: Think Ahead About PGRs (Part 2)
Each week, I’ll work with my buddy Nick Flax, a technical services expert at Ball, to share a concern that’s come up during one of his numerous calls with growers across North America. This week, he’s following up on last week’s PGR prep tip with another that takes you through application best practices.
PROBLEM: Once you’ve decided which plant growth regulator (PGR) you’re going to use to restrict growth in a crop, it needs to be applied properly to achieve the desired effect.

NICK’S TIP: In last week’s tech tip, I touched on this briefly when I mentioned relative activity level and absorption sites of different PGRs. While paring these two factors with info on which PGRs are best to use with certain crops (via PGR guides, etc.), that’s not ALL you need to know to make effective PGR applications.
Target Spray Volume for PGRs
When you apply PGRs as a foliar spray, how much are you actually supposed to apply? Many of you have likely heard the terms, “spray to runoff” or “spray to glisten” and have a general idea of what that should to look like. The reality is … those are very subjective spray indicators and don’t lend to precision or repeatability. I would argue that consistency is more important than total effect when it comes to PGR applications, so keep the following in mind when you’re about to make a foliar spray application of any PGR:
-
Target a 1/2 gal. (2 qt.) of spray solution per 100 sq. ft .of bench space.
-
When you read different PGR labels, you will see this volume written in the spray application instructions of every product. This spray volume is not just indicated for legal reasons—it’s there to help ensure that you achieve consistent results whenever you apply that product to control crop growth!
If you aren’t sure what a 1/2 gal. per 100 sq. ft. with a backpack or hydraulic sprayer looks like:
-
Measure out a 100 sq. ft. area of bench/floor and tape it off in a neat rectangle.
-
Fill up a sprayer with a 1/2 gal. of clear water and practice spraying over the taped-off growing surface.
-
Maintain a slight overlap per pass with your spray pattern so you don’t have dry “stripes” and adjust arm movement speed so that you spray the entire 1/2 gal. without having to go back over the same area more than once.
-
To stay consistent, count out loud as you track arm movement speed per pass (one one-thousand, two one-thousand, three one-thousand…) and maintain the same arm speed for the entire 1/2 gal. before you adjust it up or down.
-
Repeat this process until you can apply the full volume in a single run. If you want to improve your precision per pass, put down some sheets of water-sensitive paper (turns blue when water hits it) on the growing surface and compare the depth of color on the indicator paper from the start of a single pass to the end.
While you can (roughly) calculate speed and number of passes needed to achieve a /2 gal./100 sq. ft. via a manual spray application, there is no real substitute for this process. Sprayer pressure, tip/nozzle size, the state of your sprayer’s seals and diaphragms, and human error will all impact the timing needed to achieve a 1/2 gal./100 sq. ft. Take the time to dial-in this spray volume precisely—you won’t regret it! The more consistently you can apply PGRs, the more predictable the outcome will be. Consistency and predictability will give you confidence to use these tools to maximize crop quality year after year.
PGR Substrate Drenches
In general, I’m a bigger fan of substrate drench applications of PGRs over foliar sprays. While the process is a little more involved, the outcomes are often better when it’s done correctly.
-
Foliar sprays tend to have a somewhat localized effect, in the sense that the magnitude of growth suppression they yield tends to be greater relative to where the spray solution was absorbed.
-
Substrate drenches generally have a more uniform effect across the whole plant. Active ingredients are absorbed by the roots and translocated throughout the shoots and canopy.
Last week, I mentioned that the “high-activity” PGRs are (generally) the most effective active ingredients (a.i.s.) in the rootzone. There are several to choose from, but I prefer paclobutrazol over others for substrate drenches—mostly from an ease-of-use standpoint.
-
Many crops are responsive to ancymidol, flurprimidol and uniconazole in the rootzone, but you’ll find that most crop culture sheets list recommended paclobutrazol rates over other a.i.s.
-
Having a safe starting point when you decide to PGR a crop that’s new to you takes a lot of the guesswork and self-doubt of, “did I overdo it or just waste my time with too low a concentration?” out of the picture.
-
If you’re new to PGR drench applications, do yourself a favor and start with a paclobutrazol-based product!
Much like foliar sprays, the key to effective PGR substrate drench applications is consistency—but in a different sense. You must be able to deliver the same volume of PGR solution to each container AND apply an appropriate volume of solution per pot.
-
Target drench volume depends entirely upon the size of the container your crops are in. I always refer growers to Syngenta’s Bonzi Drench Guide for info on target drench volumes for different container sizes. Table 3 (on the last page of the PDF) lists different PGR solution volumes and makes it easy to calculate exactly how much solution you need to mix up in total.
-
You need to deliver the target volume per pot precisely to each container. Running a drench through pressure-compensating drip emitters can ensure each pot gets the same volume for larger containers or hanging baskets fed from the same irrigation line, but you may not always be able to PGR everything that’s hooked up to a common irrigation zone.
-
You can count the number of seconds needed to hold a hose and breaker over each pot to hit the desired PGR drench volume per pot, but this almost always introduces LOTS of human error. I’m a huge fan of tools like Dramm’s ChemDose as an alternative to guesswork, and tools like this allow you to quickly and precisely deliver a desired solution volume pot-by-pot every time. While it’s an investment to buy a dedicated piece of equipment for drench applications, it can reduce man-hours associated with these applications and greatly improve the consistency of your drenches. Consider purchasing something like this if you frequently apply PGRs (or pesticides) via substrate drench—you won’t regret it!
Next week, I’ll wrap up this topic with crop culture considerations before and after you apply PGRs and other tips to help you get the most out of your PGR applications.

It’s Back! Black Root Rot
In an e-GRO Alert this week, University of Wyoming extension plant pathologist Jean Williams-Woodward detailed a fungal disease that too many of you dealt with in 2024 spring production—and it seems to be rearing its ugly head again. Black root rot, or Berkeleyomyces basicola (the artist formerly known as Thielaviopsis basicola) can look like a nutritional deficiency, and Dr. Williams-Woodward explained symptoms can be easily overlooked before—in the worst-case scenario—plants collapse and die. The moral of the story is: CHECK YOUR ROOTS!
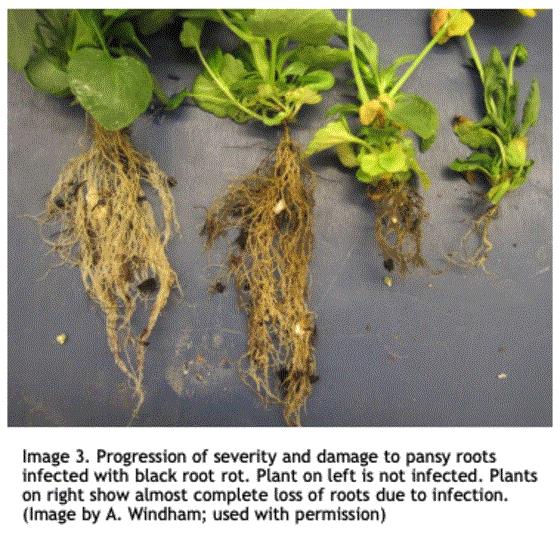
In BLACK ROOT ROT IS STILL A PROBLEM, Jean goes through the plants most susceptible to black root rot (like pansy, viola, snaps, petunia, calibrachoa, vinca, begonia, dianthus, geranium, etc.). Then she explains what to look for when examining roots and identifies some common symptoms. Her advice is to assign a production or pest management manager to check the roots of all plugs and liners coming into your greenhouse. There are tell-tale signs to watch for and Jean explains what the fungal disease will look like under a scope. If you don’t have a microscope (even if you do …) and you suspect black root rot, send samples to a diagnostic lab ASAP.
There’s so much more content in this article (e-GRO always provides awesome info!), and I encourage you to read the full article at the link above. For now, here’s a quick summary of black root rot disease management from Jean:
Black root rot is generally managed through preventative measures. By the time above-ground symptoms are evident, the root system is usually too damaged to salvage. Best control involves using both chemical and cultural control practices.
-
Inspect incoming shipments for symptoms of black root rot.
-
Use clean, unused plug trays or flats for new crops.
-
If re-using trays or flats, wash and disinfect to reduce Berkeleyomyces contamination.
-
Never re-use rooting medium.
-
Sanitize benches, floors and other surfaces.
-
Avoid excessive irrigation, which could attract fungus gnats and shore flies.
-
Adjusting pH of mix to 5.6 or below and using certain nitrogen sources can help but will not completely reduce disease development.
-
Grow resistant cultivars if possible.
-
Protective fungicide drenches should be used for black root rot prevention. There are no curative treatments for black root rot.

VIDEO: Perennial Pitfalls
Last week, I mentioned there have been requests for more perennial plant tips and tricks in the newsletter and subsequently shared great info from Paul Pilon on perennial PGR strategies. If you missed it, here’s a LINK.
This week, I wanted to turn toward disease management, and I remembered a GrowerTalks webinar a few years ago that went deep into the topic—with tons of practical information. In PERENNIAL PRODUCTION PITFALLS, host Bossman Beytes was joined by Laura Robles from Walters Gardens for an action-oriented discussion that will get you and your perennial production team prepared for the coming season.
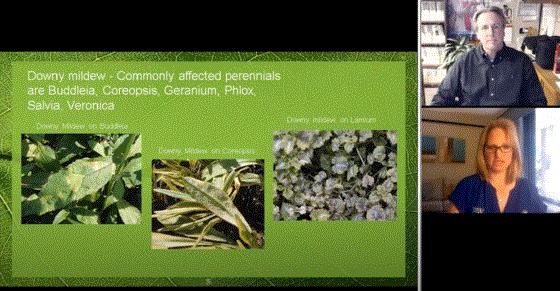
As both Chris and Laura said, perennials may still be a trendy crop category, but that doesn’t mean they’re easy to grow or don’t come with their own set of challenges. This webinar focused on the common diseases and other issues that can crop up in your perennial production.
Laura, the trials manager for well-known perennial producer Walters Gardens, gave an overview of the common production problems perennials face, and she provided tons of trialed, tested and proven solutions. She looked at methods for preventing, diagnosing and controlling diseases, and gave advice on avoiding them in the first place.
This is a must-view for anyone growing perennials, whether you’re an expert or perennial rookie!

Succulent Propagation Protocols
I don’t cover succulents enough in this newsletter, but I’ve been reaching out to a few suppliers lately to try to line up a video or podcast. Hopefully, we can make it happen sooner than later. But I wanted to share some basic succulent propagation tips from the Tech On Demand team in the meantime. Because these crops are most often native to arid and warm regions, the environmental conditions in your greenhouse need to be much dryer than with other ornamentals. Many growers find that misting isn’t necessary and can even be problematic, leading to disease.
Substrate
A wide variety of potting substrates are suitable. Many commercial propagators use approximately 70% peat / 30% perlite blend in North America. This blend lends itself to suitable aeration and drainage when irrigation practices are used. Upon sticking, the soil should just be damp—about a level 3 on the 1 to 5 scale—and never saturated.
Sticking
Many succulent URCs are just fleshy leaves that may not need to be inserted into the soil for rooting. However, the crop time is lengthy, and the plants are generally uneven when propagated from leaves instead of stems. Recognizable stems should be inserted into a dibbled hole and ensure good stem to soil contact is made.
Misting & Moisture
Succulents need low to moderate moisture during propagation. Wet foliage is a critical issue and should be avoided as much as reasonably possible. URCs and plants should go into the night with dry foliage to reduce disease incidence, which can permanently scar leaves. Misting is generally not recommended at night, and most succulents are successfully propagated without mist.
Many growers find that wetting the soil (level 3) during sticking and then tenting the crop with Reemay (or similar) is beneficial, while others choose not to tent. This will depend upon your environment.
Light
A light shadecloth (or Reemay) can be beneficial during the first few days of propagation in southern climates if you’re starting plants in summer with high temperatures and light. Propagation in late fall or spring generally warrants full sun.
Feeding
Low fertilization rates (100 to 150 ppm N) are appropriate from a complete fertilizer selected based on your water quality. Substrate electrical conductivity (EC) levels should be kept below 1.2 mS/cm until roots are established.
Feedings are generally every four days except for Sempervivum varieties, which are two to three days apart. After two weeks, increase the substrate EC to 1.5 mS/cm.
Disease
Dry foliage is the number one key to reducing disease. Fungicide applications targeting Fusarium, Alternaria and Botrytis are suggested during the first week of propagation. Be sure to follow all label instruction and conduct trials.
Here is a general propagation strategy—keeping in mind each variety will require a specific protocol, and you always need to be aware of nuances. Work with your suppliers and technical experts if you need assistance putting together the best plan:
-
Stick URCs into a rooting substrate with moisture level 3.
-
Do not apply water for the plants for several days.
-
After several days, a light irrigation and feeding (solution EC of 1.2) can be applied.
-
Moderate to high fertilizer concentrations will burn the tissue.
-
A quick rinse of the foliage may be beneficial to remove fertilizer residue.
-
Shading should only be used to reduce temperature stress when temperatures surpass 80F.

Finish Line …
I started the newsletter with Instagram, so I might as well close with Facebook and do my part to help those of you with META in your portfolio …
As we head into the whirlwind of spring production, I encourage you to join our GREENHOUSE TECH TEAM FACEBOOK GROUP and the more than 6,100 greenhouse professionals around the world who use this resource to ask questions, share solutions and search for topics related to the issues at hand. The group is positive and always willing to share tips and tricks to help you navigate the crazy world of seasonal greenhouse production.
For your benefit, the group is “private” to reduce the number of hobbyists and home gardeners and keep the conversation focused on topics pertinent to greenhouse professionals. Thus, you will need to answer a few questions before being accepted as a member. As the administrator, I tend to approve requests within 24 hours.
With almost five years of content, chances are you’ll find the info you need—when you need it. Be sure to use the search function and check out the list of topics on the right side of the page. I try to keep things organized, although it’s sort of like herding cats.
Until next week, stay safe and warm!


Please feel free to send your comments, constructive criticism and topic ideas to me at bcalkins@ballhort.com.

Bill Calkins
Editor - Tech On Demand
This email was received by you and 25,667 other fine subscribers!
If you're interested in advertising in Tech On Demand, contact Kim Brown ASAP and she'll hook you up.