IPM Essen—Instagram Blitz
GrowerTalks’ editor-in-chief Chris Beytes made his way across the pond this week to cover the massive IPM Essen horticultural trade fair in Germany. According to the show, there are more than 1,400 exhibitors from 43 countries and more than 35,000 attendees expected. All of horticulture is represented—plants, technology, floral products, garden décor and much more. Chris has been making his way through all of the nine exhibit halls and reporting back to me via text about what he’s seeing and hearing.

From new automation and company mergers to breakthrough varieties and leading-edge trends, his reports are always intriguing and inspiring. Chris has been covering the show for some 20 years and knows where to find the hot new products, concepts and industry scoops.
Watch for full coverage in Acres Online and in the magazine, but for a taste of what he’s seen (and eaten) this week, head to @growertalksgreenprofit on Instagram, where I’ve been posting a ton of pics since his plane touched down and he fought off jet lag by walking flower markets near his hotel and texting me what he saw. When you’re on Instagram, the show hashtag is #IPMEssen2025 and plenty of exhibitors and attendees have been sharing the event through their camera lenses, as well.
(Note: Writing this caused me to reminisce all the way back to 2007 when Chris and I covered the IPM Essen show for GrowerTalks and Green Profit. It was an awesome trip and believe it or not, we found the time to send daily Acres of buZZ! newsletters from Germany each evening! Geez, we’ve been at this a long time … Here’s a BLAST FROM THE PAST.)

Nick’s Tip of the Week: Think Ahead About PGRs (Part 1)
Each week, I’ll work with my buddy Nick Flax, a technical services expert at Ball, to share a concern that’s come up during one of his numerous calls with growers across North America. This week, he’s sharing thoughts on PGRs for annuals that get out of hand for one reason or another. Nick’s information pairs nicely with the article that follows covering PGRs on perennials.
PROBLEM: When the weather is cloudy and cool and greenhouse humidity stays high, spring annuals tend to get leggy. If you want to avoid the need to give hundreds or thousands of flats, pots or hanging baskets a “haircut,” consider using plant growth regulators (PGRs) this spring. While I'm a firm believer that it’s best practice to optimize your growing environment and crop cultural practices to keep plants appropriately sized, these factors are not always 100% controllable. Also, growers are human beings and we make mistakes on occasion (overwater, apply too much fertilizer, etc.), so it’s important to have PGRs in your toolbox.
NICK’S TIP: If you’re new to PGRs and aren’t sure where to start, consider the following as your benches and basket lines start to fill up for spring 2025.
Which PGR is which?
There are several growth-retardant PGRs available in North America. The same active ingredient can often be found under multiple trade names (like with pesticides) and not all PGRs can or should be applied the same way due to absorption rate and site activity. As such, it’simportant to know which is which and how each active ingredient (a.i.) works best.
I like to break growth-retardant PGRs into two general groups:
Low-activity PGRs: Chlormequat chloride (CCC, such as Altercel and Citadel) and daminozide (for example Dazide and B-Nine).
-
In general, these have slow absorption times (4+ hours) and higher concentrations of a.i. are required to restrict plant growth appropriately. For example, 500 to 750 ppm or 2500 to 5000 ppm are common ranges at which chlormequat chloride or daminozide, respectively, would be applied.
-
Daminozide is only absorbed by leaf tissue and is applied as a foliar spray. While CCC does have some rootzone activity, it is also predominately applied as a foliar spray on floriculture crops.
These a.i.s are (generally) more “forgiving” if slightly overapplied. Excessively high rates of daminozide can delay flowering but won’t “lock up” plants for the rest of the spring season. Similarly, slight over-application of CCC can cause mild phytotoxicity on the foliage of plants, but tissues can recover from mild damage or new growth can simply cover it up as the crop matures.
High-activity PGRs: Ancymidol (like A-Rest and Abide), flurprimidol (TopFlor), paclobutrazol (such as Bonzi, Paczol and Piccolo) and uniconazole (for example, Sumagic and Concise).
-
Compared to the low-activity group, these a.i.s are applied at much lower concentrations to achieve desirable growth restriction (like 5 to 10 ppm as a foliar spray) and absorbed by plant tissues quickly (in about 30 to 60 minutes).
-
These active ingredients are absorbed by leaf, stem and root tissue, and most can be applied as foliar sprays or substrate drenches. Application as a substrate drench also magnifies the effect of growth suppression. For example, a 5-ppm foliar spray and about 1 to 2 ppm substrate drench of paclobutrazol will yield a similar degree of growth restriction.
-
If these a.i.s are overapplied—especially as a substrate drench—it may take many weeks for plants to metabolize the a.i. away and grow out of it.
If you have limited (or no) experience with PGRs, I suggest you get familiar with how to use a.i.s in the “low activity” group first. Once you are comfortable with applying these in your greenhouse, you can start to use some of the “high activity” PGRs with confidence.
Which PGR should I use?
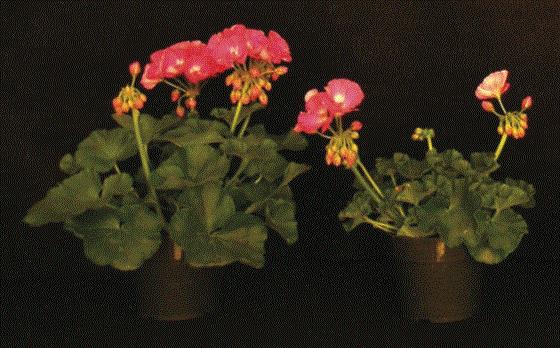
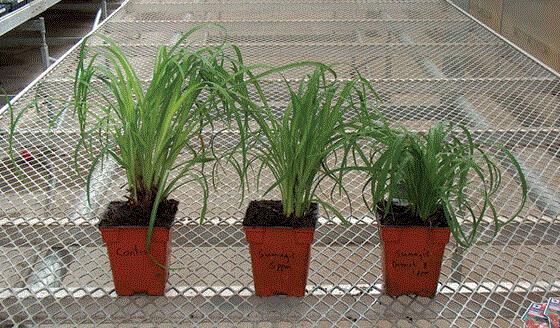
Not all PGRs are effective at suppressing growth in all crops. For example, daminozide is highly ineffective at suppressing growth of crops like canna lilies, but paclobutrazol and flurprimidol are effective. Conversely, some PGRs work a little too well on some crops. In begonias, ancymidol, CCC and daminozide can be used to suppress growth appropriately, but even 1 ppm of paclobutrazol, flurprimidol, or uniconazole can completely halt their growth for many weeks (or even months). Be sure to consult technical resources before you decide to use a particular a.i on a crop that you’ve never applied PGRs to before!
Crop culture sheets from the breeding company that produced your genetics are often the best resource. They typically list the best a.i.(s) to use, appropriate concentrations and application frequency guidelines to give you a starting point of reference. My suggestion is to start with the lowest recommended rate in the range provided and see how your crop responds before increasing the concentration or making repeat applications.
If a crop on your bench does not have a culture guide from the breeder, check out these excellent (and FREE) resources from GrowerTalks:
These guides are updated with the latest research-backed information every two years and cover a wide range of genera and species of annual and perennial bedding plants.
If you cannot find any info on which PGR might be an effective solution to check growth in a given crop, feel free to reach out to your favorite technical specialist for advice.
Next week, I’ll cover BMPs for applying PGRs. Stay tuned!

Perennial PGRs for Early Spring
Last week, I shared some perennial videos from Darwin, and a handful of you reached out and asked for more perennial technical tips as you and your teams “wake them up” from overwintering. I looked back through editions of Paul Pilon’s Perennial Pulse e-newsletter for some appropriate content and put together a list that I’ll include in Tech On Demand for the next few weeks.
First up are some PGR guidelines Paul shared way back in March of 2017. Here’s what he had to say:
PGRs are a great tool to help growers manage plant size during production. Although I can’t cover specific products and rate recommendations for every variety in the newsletter, I thought I’d share some guidelines with you to help improve the consistency and efficacy of your applications. These are the PGR rules I live by:
-
Choose an effective PGR for the desired perennial. When multiple choices exist, pick the one you're most comfortable using.
-
Determine the application method (sprays, drenches).
-
Calculate the rate. Adjust rate recommendations to fit your growing environment and season. Florida rates are typically two times higher than the rates used in the North. Summer rates are typically at least 50% higher than early spring rates.
-
Evaluate the need for PGRs weekly; apply or reapply if necessary.
-
Apply PGRs throughout the production cycle rather than as the crop matures.
-
Applying low rates frequently provides better results than single applications at high rates.
-
Know the volume applied. The volume applied has a greater effect on the results than the concentration of the solution. Always aim to apply 2 qt. of spray solution per 100 sq. ft. of production space when making PGR applications.
-
Ensure proper coverage. Apply the proper volume uniformly. It's best to spray from different angles or opposing directions.
-
Evaluate the effectiveness of your current PGR strategies. Consider making multiple applications, changing the application method, increasing the rates applied, changing chemicals or using tank mixes if you don't obtain a sufficient amount of height control.
For even more from Paul on using PGRs to control perennial height, here’s a much more detailed article he wrote for GrowerTalks in 2020: PAUL’S PGR PRIMER.

Scouting for Broad Mites
Broad mites are too small to see with the naked eye and are adept at hiding on the underside of foliage, making them a major challenge to detect. Their lifecycle is quick and the damage they can cause is extensive, as is the range of crops they can impact.
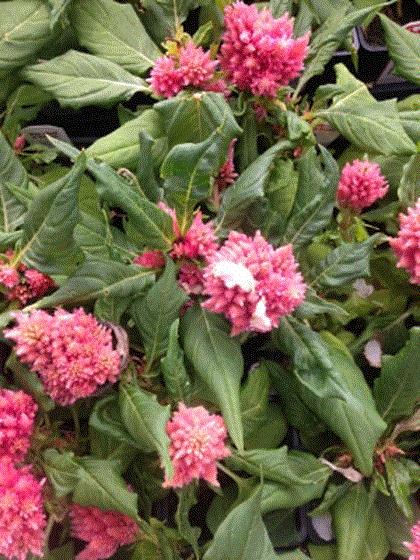 Broad mite damage on celosia. Photo: Heidi Lindberg
Michigan State University Extension expert Heidi Lindberg has written multiple articles about scouting methods for broad mites based on her research and experience. She’s also cited a Belgian study that suggested a method to isolate and identify broad mites before damage and symptoms are seen. Here’s an excerpt from an article she shared in GrowerTalks titled BROAD MITES IN ORNAMENTAL CROPS that might provide some food for thought as you put together scouting plans for your 2025 spring production.
Scouting for broad mites poses challenges for growers in that the damage is often noticed 20 to 30 days after the initial infestation. In addition to these and other factors I listed above, scouts often wonder: Where is the best place to find the broad mites?
A study by Gobin et al. (2017) in Belgium found that the “manifestation of broad mite damage lagged behind the actual infestation numbers, with broad mite populations often higher on plants next to plants showing symptoms.” Therefore, growers scouting for broad mites should examine the plants in the immediate area of the plants with damage. On the plants themselves, 50% to 60% of broad mites were found on the top shoots, while 40% to 50% were found on the lower foliage. The broad mites often hid in the crevices between leaves and the stems of plants near the apical meristem and were also found on flower buds. The broad mites entered the flower buds once the flowers began to open, allowing them to hide between the petals.
Growers who have experienced extremely high broad mite pressure or are growing a significant number of one of their preferred crops might want to consider a more intensive strategy to find broad mites and prevent crop damage. For example, a greenhouse in Belgium (which mainly grows azaleas and rhododendrons) adopted an apical meristem sampling program with assistance from ornamental plant researchers.
In the joint project, growers randomly snipped apical meristems throughout the crop and placed the shoots in a 70% ethanol solution. After shaking, they then would remove the plant shoots and use vacuum filtration to isolate any broad mites. While this is a labor-intensive process, it reduced plant losses and proved to be a strategy to monitor broad mite populations and alter their releases of A. swirskii accordingly.
In order to implement this intensive broad mite scouting strategy, Michigan State University Extension recommends dipping shoots into alcohol. Growers can buy a box of scintillation vials and then dip 10 shoots into one vial. The vial should be labeled with the location information that indicates to the grower where the samples were taken. Growers will need a Buchner funnel, an aspirator and filter paper. Shake the vial and pour over the center of the filter paper, then examine that area of the filter paper under the microscope. This method also works well for thrips.
If growers aren’t interested in this intensive strategy and do suspect broad mites in their crop, they should send plants to a plant diagnostic lab (such as MSU Diagnostic Services) for evaluation to verify the insect or mite pest.

Transplanting Rules of the Road
Here are some basic transplanting tips from Tech On Demand experts. These are perfect to share with your team and post in your break room or by the transplant line.
Unboxing. While plug and liner producers do all they can to ship a quality product, you should practice due diligence by inspecting plug and liner quality upon arrival. Ensure the young plants are free from obvious signs of pests, diseases or physical damage. If trays are in boxes, get them unboxed as quickly as possible to minimize the negative effects of shipping stress. While in transit, tender young plants may be exposed to numerous stresses, including temperature extremes, physical damage and ethylene buildup.
Pre-Transplant Applications. Prior to transplant, consider whether any PGR or fungicide applications should be made to the plugs or liners. PGR dips are an efficient way reduce chemical waste, and pre-transplant fungicides can help prevent unnecessary substrate saturation from a post-transplant drench.
Holding Crops. Try to get newly received plant material transplanted quickly. Holding young plants for too long often results in a reduction in quality. For instance, plants may become rootbound, making it more difficult for roots to proliferate into the new substrate, stalling growth.
Planting Depth. Some species, including tomatoes and dahlias, can tolerate being transplanted with some of the stem below the surface of the substrate, but most species should be planted close to level with the container substrate. Transplanting most species too deep will often result in increased disease pressure, including root, stem and crown rots. If plugs or liners are planted too shallow, young plants may dry too quickly and struggle to root out into the new container. If using an automated transplanter, make sure it is set to the proper height. If transplanting is done manually, make sure everyone on the planting line understands proper transplanting technique and ensure quality control measures are in place.
Pot Fill. Use the correct type of substrate for the intended crop, container and production stage. Finishing mixes tend to have larger aggregates that provide greater aeration compared to plug mixes. Upon transplant, ensure the substrate is not excessively wet, dry or compacted. Substrates should be moist, but not saturated, with sufficient aeration to allow the roots to respire. Although pre-filling and stacking pots seems efficient, it often leads to compacted substrates with uneven moisture. If you do pre-fill, offset trays to prevent compaction and use them as soon as possible to avoid water loss.
Post-Transplant Acclimation. In general, avoid exposing plants to stressful conditions for at least one week after transplant. This means maintaining moderate substrate moisture, fertility, light and temperature. Once roots have proliferated to the sides of the container, environmental conditions can be adjusted as necessary for the species.
For more on transplanting, check out our MAXIMIZE TRANSPLANT SUCCESS VIDEO.

Finish Line …
This has been a particularly science-heavy newsletter, which is sometimes necessary due to the challenges encountered each spring when growing unique crops and battling complex pests and diseases. Another critical piece of the puzzle is, of course, the people who manage all the complexities on a daily basis. Hiring can be a challenge, but retention of top-notch talent is the true goal and HR experts will tell you that the first weeks at a new job can make or break the likelihood of retaining the best new hires.
In the January issue of GrowerTalks, Harrison Downing, a senior executive search advisor at BEST Human Capitol, wrote an article about the importance of “onboarding,” with tips and tricks for integrating new hires into your company and culture using a repeatable process. He explained the high costs associated with onboarding and why you need to approach this with the same precision you would when growing a crop, so your company doesn’t waste resources and instead builds an exceptional workforce.
You can READ the article by clicking the link—or better yet, listen to it (in 8 minutes) as a Tech On Demand Podcast Audio File—it’s episode 164! Here are direct links to The Root of Long-Term Engagement on APPLE PODCASTS and SPOTIFY.
Talk to you next week!


Please feel free to send your comments, constructive criticism and topic ideas to me at bcalkins@ballhort.com.

Bill Calkins
Editor - Tech On Demand
This email was received by you and 25,679 other fine subscribers!
If you're interested in advertising in Tech On Demand, contact Kim Brown ASAP and she'll hook you up.