NEW VIDEO! A Fresh Take on Cut Campanula
In OUR LATEST COMPREHENSIVE VIDEO covering a key cut flower, Ball Seed’s cut flower business manager Joan Mazat and Sakata Seed America’s product technical manager Bob Croft discuss Sakata’s Champion II series of campanula—which has a uniform and shorter flowering window compared to older series, saving time and providing a quicker cycle for growers.

Bob shares tips and tricks based on years of campanula production experience, taking you from germination to transplant and on to finishing and post-harvest care.
Campanula crops certainly have some nuances to be aware of, and Bob provides plenty of critical information for managing all factors of plant growth (light, water, nutrition, temperature and gas exchange), as well as strategies for controlling pests and diseases.
If you grow cuts or are interested in adding more to your product mix to capitalize on a fast-growing market segment, check out Ball Seed’s CUT FLOWER PLAYLIST on YouTube! There are more than 20 videos to peruse—all packed with solid information and fresh ideas.
Lastly, because one of my goals is to share this information in any way you (or your team) choose to consume it, this awesome video with Joan and Bob is available as an audio podcast, too. Be sure to subscribe to the Tech On Demand podcast on your favorite app so you never miss an episode. And this winter, why not jump back into the archives and get caught up—there are 157 episodes as of today.
TECH ON DEMAND ON SPOTIFY
TECH ON DEMAND ON APPLE PODCASTS

Koppert Corner: Optimizing Your Nematodes
Given the winter growing season, just about everyone should have lots of moist, exposed growing media in their greenhouses ... the favorite breeding ground for fungus gnats! Beneficial nematodes are the single most effective control for fungus gnats available, and they always work—assuming a few variables are properly handled, that is.
Steinernema feltiae (Entomen) has been the industry standard, but recently Steinernema carpocapsae (Capsanem) has been gaining ground due to its tolerance of warmer soil temps and larger target range.

A main point to consider with nematodes is that they don’t have significant longevity in your potting media. You will get a complete kill of all susceptible targets for around 72 hours or so after the application; after that, the beneficial numbers fall rapidly. This means frequent applications are required to keep target populations in check.
In a propagation or early production scenario, this means weekly apps. As the crop matures and the pest pressure decreases, applications can get spaced out further or you can transition to a different control altogether, like Stratiolaelaps (Entomite-M).
Putting this product where it’s going to work for you is another key component to success. The application is frequently referred to as a drench, but that can be misleading. Your goal is to saturate the top half inch or so of your media with about 50,000 nematodes per square foot (regardless of what container or tray size you’re growing in). When this is done correctly, every target in that area will be having an extremely bad day.
It’s easy to run into issues when the correct number of nematodes are applied in too much water, though, diluting them deeply into—or out the bottom of—the container. This is the No. 1 reason why experienced growers have intermittent results: the target rate is mixed correctly but diluted too deeply into the media. Make sure to keep your nematodes in the top of the pot where the fungus gnats (and western flower thrips pupae) are present.
Finally, these are the only BCAs (biological control agents) that you can safely store in a normal refrigerator. They want to be between 37F and 42F. We strongly recommend the usage of an IR thermometer and/or a basic min/max thermometer to verify that your fridge is within range. A few hours a day in the upper to mid 40s F will significantly shorten your storage time, so keep this in mind when buying in bulk.

Nathan’s Tip of the Week: Rehydrating Your URCs
As you know, most weeks Nick Flax shares a concern that’s come up during one of his numerous calls with growers across North America and follows up with strategies to solve the issue. This week, Ball Seed culture research manager Nathan Jahnke messaged me about a timely topic that’s been on the minds of many growers he’s talked to—dehydrated cuttings. Thankfully, he and I have worked together in the past year to create and share a lot of resources digging into rehydration research and strategies to overcome the challenge. (One such resource is this ARTICLE from last January’s GrowerTalks magazine.)
PROBLEM: Before unrooted cuttings (URCs) even leave their farm of origin, hydration is variable. While stock plant production facilities strive for uniformity and certainly intend to ship young plants that show up on your dock turgid and ready to take off, perfection is impossible since they’re dealing with a living thing transported by shipping companies that don’t always take the best care of them—not to mention inclement weather in transport.
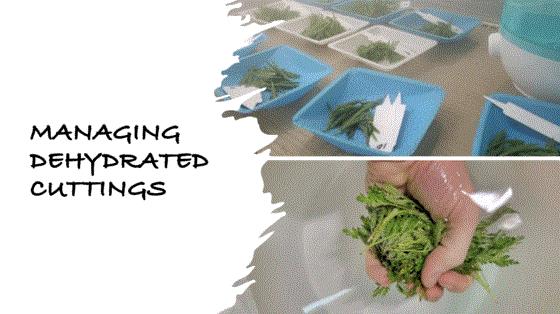
NATHAN’S TIP: The moment URCs arrive at your greenhouse and you open the box, you can start the processes to restore and rejuvenate the cuttings.
First, check the temperature of the cuttings—the air between each plant and the temperature at the base of the cutting. It’s important to measure the stem temperature and not the leaf temperature, which changes quickly. An infrared thermometer is a good tool to use and one you should keep on hand.
Next, evaluate the conditions within your cooler: is it set up to create hydration conditions or to dry cuttings out even more? Refrigeration is a dehumidification system unless you’re adding moisture. And how long are you planning to hold them? The answers to both questions will help you and your team build a solid rehydration plan. An ideal chamber has a fog system to add moisture over a period of time.
Rehydration Strategies
Two rehydration methods that have shown positive results in recent trials are dipping cuttings in water and applying fog. Dipping URCs obviously creates the highest surface contact for moisture, but there’s some associated risk. Dipping cuttings in a container of water can spread disease. If you plan to use this method, be sure to select plants with low disease risk and avoid disease-prone crops. Fogging is a superior method and also creates high surface contact, driving moisture into cuttings. Check out our GOOD, BETTER, BEST APPROACH TO REHYDRATION.
One consideration your team might debate is whether to take cuttings out of the bag before fog/humidity is applied or to leave them in the open bags. No matter what, applying fog is the key and both approaches can be successful. The absolute best strategy is to remove cuttings from the bag and apply humidity, but if time or labor is a concern, at least open the bags and add fog. This is far better than just placing cuttings in a cooler—with or without the bag.
At minimum, URCs should be in fog for eight hours—12 hours is better and 24 hours is best. (If cuttings are loose, eight or 12 hours work well, but if cuttings are kept inside the bag, 24 hours is the better option.)
Remember, 90% of rooting issues can be avoided by optimizing turgidity before the URCs are stuck. If you neglect this process, you’ll be trapped in a bad game of catch-up throughout all propagation stages.
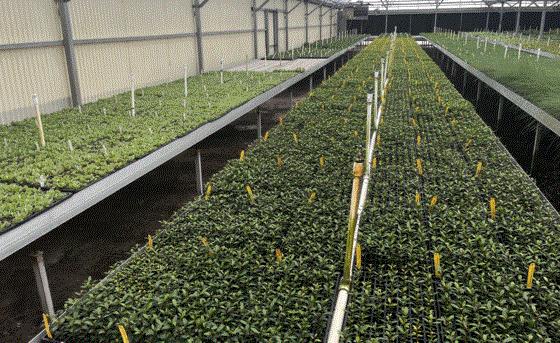
Managing Your Sticking Area
When thinking about cutting hydration, be sure to consider your sticking area. Most are quite dry, and depending on the time of year, things can be chaotic in that area and cuttings might sit for a period of time while waiting to be stuck or remain in trays on carts for a while before moving out to the greenhouse. Both are detrimental to the health of young plants. Research has shown that URC moisture can decrease as much as 40% in just two hours sitting in a dry sticking and staging area. That means all of your hard work bringing URC moisture levels up prior to stick are more or less wasted.
Remember, the goal is to get URCs unpacked and stuck as quickly as possible. Work with your teams to create efficient product flow into and out of sticking areas. Consider regular training on the dangers of leaving cuttings and trays in these zones for long periods of time, and work to maintain adherence to protocols.
Because most sticking areas are dry, open areas with a lot of airflow and people moving, some greenhouses have installed systems adding fog to carts of cuttings and trays in a dedicated area within the headhouse before and after they go through the stick line or to the greenhouse bench. This maintains a moisture chain and they’ve seen significant improvements in rooting uniformity.
Misting Strategies in Prop
Once URCs are stuck, Stage 0 (Days 0 to 3 in propagation) is all about keeping humidity levels high. Air moisture is more important during this timeframe than soil moisture. Prevent wilting by misting, but don’t add so much water that soils become saturated. Otherwise, cuttings will only develop callus or rot. Remember, as Dr. Will has taught us, "fish grow in water, roots grow in air." Trays should be hydrated to a level 4 (wet, but not saturated). If trays start with the correct amount of water in the substrate, then use fog nozzles to control the humidity in the air. Fog nozzles create smaller droplets that hang in the air longer than mist, which falls quickly. This will lead to optimum turgidity and build the foundation for quick rooting.
In Stage 2 (Days 4 to 7), as your cuttings are building callus, the goal is to keep trays at a level 3 to 4 allowing for some dry down, but not to the point of wilt. Again, adjust your mist cycles to the point you’re putting down enough to avoid wilt, but not to the point of saturation. Both the frequency of misting and the duration of mist can be changed to manage air and substrate moisture. Vapor pressure deficit can be a useful tool to manage mist via greenhouse control systems.
Roots are developing in Stage 3 (about Day 7 to 21), and at this point, irrigation should be applied to a level 4 and then your young plants should be allowed to dry to a level 2. Level 4 is wet, but not saturated; level 2 is quite dry, but not to the point you can blow the media out of the cell. When cuttings have roots, they likely don’t need mist anymore. Prolonged misting is asking for foliar and root diseases … plus, it creates the perfect environment for shore flies and fungus gnats.
For much of this important information in video format, be sure to watch STAY HYDRATED: THE KEY TO UNIFORM ROOTING OF URCs.

Quick Tech Tip: Battling Bulb Mites
Bulb mites are often present on bulbs, feeding on healthy and rotting scales, but they only become a major issue when scale and root health is compromised due to improper culture and lack of preventative pesticides for root protection. The usual course of action is to dispose of rotting or soft bulbs that are infested with bulb mites.
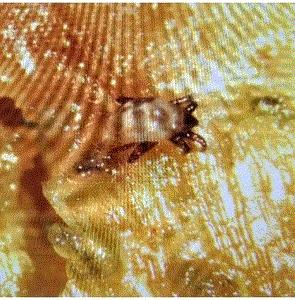
The challenge is that bulb mites are resistant to pesticides in several chemical classes. Most conventional miticides and biologicals have little to no effect against bulb mites. However, research at the University of Connecticut has indicated limited effectiveness of Stratiolaelaps scimitus (Hypoaspis miles)—a predatory mite, which could be an option.
Note: In high populations, bulb mites commonly hitch rides to new areas on more mobile pests like whiteflies, thrips fungus gnats and shore flies.
For more on bulb mites, here are a few additional resources:

Grouping Plants By Temp & pH
In a fantastic Greenhouse & Floriculture FACT SHEET on transplanting plugs and grouping plants from UMass Extension (one of my favorite go-to resources), they reference Dr. Claudio Pasian (Horticulture and Crop Science at The Ohio State University) and his suggestions for grouping crops. Dr. Pasin explained crops can be divided (and grown apart) based upon two environmental characteristics: temperature and substrate pH. Dr. Pasian went on to share the following:
Some crops can be grown at lower temperatures than others. For example, grouping crops that can be grown cool such as nemesia, bacopa, snapdragon, diascia, scaevola, osteospermum, separately from crops that need warmer temperatures such as geraniums, begonias and New Guinea impatiens will allow cool crops to be grown at the lower temperatures and save on energy costs. The cool crops can be sold earlier or moved outdoors for finishing, making room for later plantings.
Within the temperature groups, crops can then be separated based on their substrate pH preferences. Paul Fisher, University of Florida, and Bill Argo, Blackmore Company, have divided crops into three distinct groups—geranium, general and petunia—based on their efficiency to pick up iron from the substrate.
-
Geranium group (pH range of 6.0-6.6) includes plants that are efficient at taking up iron, such as lisianthus, marigold, New Guinea impatiens, seed and zonal geraniums.
-
General group (pH range of 5.8-6.4) includes begonias, chrysanthemums, ivy geraniums and impatiens.
-
Petunia group (lower pH range 5.6-6.2) includes plants that are inefficient at taking up iron. The petunia group includes calibrachoa, scaevola, snapdragon, bacopa and argyranthemum.
Once plants are grouped according to temperature, crops can then be grouped based on their response to substrate pH, and crops can be treated differently according to their needs. For example, it is possible to have different injectors in different zones using different fertilizer types: acidic for the petunia group and neutral or basic or perhaps liquid lime application for the geranium group.

Finish Line …
I want to close with a big shout out to the team at Koppert, the well-known natural solutions company that’s been providing sustainable alternatives for chemical pesticides since 1967. Many growers I talk to use Koppert products, and I’ve been constantly impressed with the information and resources shared by experts on their team. I’ve seen presentations at tradeshows and conferences and picked up info sheets and watched their videos for years. Last year, I had the opportunity to chat with Koppert’s crop team manager Jeremy Webber, resulting in a two-part Tech On Demand podcast, and I also worked with him on an article for GrowerTalks’ 2024 Biosolutions Guide.
All that said to emphasize how excited I am that once a month, you’ll now see an item in this newsletter titled Koppert Corner, where (you guessed it) an expert from the company will share a timely and relevant tip for those of you using biocontrols or interested in learning more about natural approaches to IPM. If you missed it, scroll back up for this month’s tips for maximizing success with nematodes.
Until next week, stay warm and get those cuttings rehydrated and stuck quick!


Please feel free to send your comments, constructive criticism and topic ideas to me at bcalkins@ballhort.com.

Bill Calkins
Editor - Tech On Demand
This email was received by you and 25,698 other fine subscribers!
If you're interested in advertising in Tech On Demand, contact Kim Brown ASAP and she'll hook you up.