Overwintering Echinacea
I recently received a question from one of my awesome subscribers. The question was so good and so timely, I thought I’d share it, along with my response. The question was:
Do you have any suggestions for overwintering hybrid echinacea?
When I first saw this question, I thought to myself, if I only had a dollar for every time I’ve been asked this over the years. In reality, I guess I wouldn’t have collected as much money as I’m implying, but I guess my main point is many growers have asked me this question, because overwintering echinacea is still a concern.
As long as echinacea from tissue culture have been on the market, with their stunning range of flower colors, growers have experienced issues with overwintering them successfully. It doesn’t make it right and it may not make you feel better, but even the best growers have had issues with survival rates on premium echinacea cultivars during the winter months.
The current cultivars tend to overwinter much better than the original echinacea varieties that hit the market. However, overwintering success is not a given. I’ve tried numerous tricks and strategies over the years, and I have put together this summary that hopefully with steer you in the right direction:
-
Let them go dormant naturally, and avoid trimming them until the plants are dormant (as in the photo above). During the late fall, it’s okay for them to be exposed to cold temperatures—frost is even acceptable and beneficial to help the plants become acclimated.
-
Consider applying a broad-spectrum fungicide drench in the fall (several weeks before they go dormant) to make sure the plants (roots) go into the winter healthy.
-
Since they are not actively growing this time of year, you likely do not have to continue fertilizing them.
-
During the winter, keep the EC below 0.6 mS/cm using the 2:1 media extraction or less than 1.4 with the pour through method.
-
Avoid wide fluctuations in temperatures from day to night. Many growers keep their premium echinacea (as well as liners) just above freezing to prevent freeze/thaw events, which can lead to decreased survival rates. I often aim for overwintering temperatures between 33 and 38 F when overwintering our echinacea.
-
Keep the foliage and crown of the plant dry. If they are getting drips of condensation from the structure, consider applying an anti-condensate to reduce the daily “rain” events. Provide lots of air circulation using HAF fans.
-
The crowns are super sensitive to botrytis during dormancy—particularly in the late winter when the crowns begin to de-acclimate.
-
To prevent botrytis, consider applying fungicide sprays every two to three weeks (weekly if botrytis is present and active). FYI: Botrytis can occur with temperatures as low as 34 F. I like to use Astun, Chipco or Broadform during the winter months.
-
To further help, keep them on the dryer side when they are dormant— moisture level 2. They are not using water during dormancy. Water only when absolutely necessary and when conditions allow the foliage/crown to dry quickly. Keeping them overly wet often leads to the development of crown rots.
-
If survival has been an issue in the past, consider placing plugs in heat (55 F) for 7 to 14 days before planting to wake them up. Only plant the liners where some new shoots are emerging.
Do you have a question or diagnostic challenge you'd like help with? I've got your back! Please send any questions or diagnostic challenges I can use in future newsletters to paul@opelgrowers.com.

Echinacea Prima Spider
Speaking of echinacea, check out this new one from Terra Nova Nurseries: Prima Spider.
Prima Spider is a captivating new introduction with two-toned strap-shaped petals. The salmon-rose flowers transition to magenta as the blooms turn upward into intriguing “spidery” displays. It has an attractive vase-like habit reaching just 18 in. tall when blooming. Prima Spider makes excellent cut flowers and is great for attracting pollinators into the garden. Hardy to Zone 4.
Veronica Da Vinci Delight
Here's another recent introduction that caught my eye:
More than bees will be buzzing about this new veronica introduction from Walters Gardens.
Veronica Da Vinci Delight resembles a piece of art when it blooms. Da Vinci Delight is a dense, well-branched cultivar producing loads of soft lilac purple flowers. The deep green foliage has shown good powdery mildew resistance. It grows 20 in. tall and is hardy to Zone 4.
Injector Calibration
Most growers use injectors to deliver nutrients from water soluble fertilizers. I can’t emphasize enough how important it is to properly maintain and calibrate injection equipment. Nick Flax, a Technical Services expert at Ball Horticultural Company, discussed injector calibration in a recent Tech On Demand newsletter from fellow editor Bill Calkins. Here’s what Nick shared with the TOD readers:
PROBLEM: Injectors are the backbone of some of our most critical growing tasks. From fertilizer applications and correcting deficiencies with amendments to applying insecticides and fungicides, injectors are daily workhorses that shouldn’t be neglected. If you haven’t given your injector some TLC in recent months, check your calibration and perform routine maintenance now—or at least before spring crops start arriving.
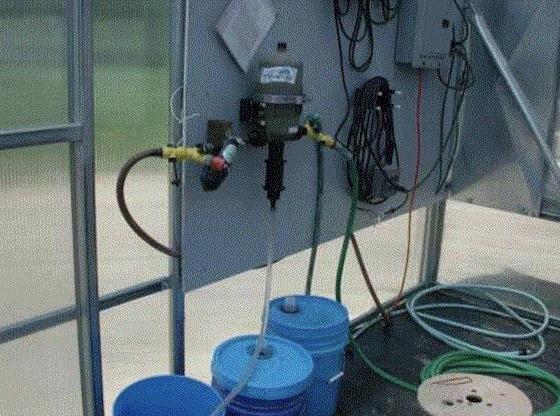 Photo: Tina Smith, UMass Extension
NICK’S TIP: Over time and with frequent use, your injector's calibration can “drift.” This means you may be over or underfeeding your crops or not applying insecticide or fungicide drenches at the correct rate. A calibration check is the easiest way to make sure your injector is hitting its mark. To do this, you’ll need the injector (of course), an EC meter, your favorite fertilizer and a cup or beaker for sample collection.
-
First, run your clear water for a couple of minutes and collect a sample in a clean cup. Test your raw water’s EC and write the value down (for example, raw water EC is 0.41 mS/cm).
-
Next, find the label on your fertilizer bag, select your desired feed rate and injection ratio (ex. 200 ppm N at 1:100), and find the corresponding EC value that you should be getting at the end of your hose (for instance, if the label says at 200 ppm N 1:100, EC should be 1.29 mS/cm).
-
Add the raw water and fertilizer target EC values (like … 1.29 + 0.41 = 1.70 mS/cm).
-
Next, set your injector ratio to the prescribed setting. In this case, adjust to 1:100. Run your injector for a minute or two, allowing fertilizer stock solution to fully enter the injection stream. Collect a sample from your hose and test the solution’s EC.
-
If the EC value is close to what your math says it should be, your injector is good to go. Repeat this quick check several times throughout the season and adjust as follows:
-
If the EC value is too low, reduce the denominator of your injector ratio. (ex. if your target EC is 1.70 mS/cm at 1:100 but the test reads 1.50 mS/cm, change the ratio to about 1:90, run the injector for about one minute, collect a fresh sample and retest.
-
If the EC value coming out of your injector is too high, do the opposite and increase the denominator (An example would be1.90 mS/cm when it should be 1.70 mS/cm).
-
Retest and readjust until the EC of the solution coming out of your hose is close to what it should be, per the fertilizer label and your quick math.
If calibration adjustments to your injector are large (for example, you need to set it to 1:75 to achieve the target EC that your fertilizer bag says you should achieve at 1:100), it’s time to service your injector. For many piston-driven injectors, manufacturers sell rebuild kits that include new O-rings, diaphragms and other parts that wear out over time and need to be replaced. Always follow manufacturer recommendations for self-service repairs and rebuilds, and make sure that you do not void any warranties that may be active for your injectors.
NOTE: For computerized and other digitally-driven injector systems, contact the manufacturer and schedule a service appointment ASAP. Parts and labor availability always get tight leading into spring, so don’t wait until the week before major planting starts in your operation to get your system tuned up.
Thanks Nick, for passing this along and for all the great work you do!

College of Knowledge
If you’re looking to enhance your horticultural knowledge or if you have employees you’d like to improve their cultural knowledge so they can help you grow better plants, look no further than MSUs College of Knowledge.
Beginning December 1, Michigan State University Extension’s Online College of Knowledge Greenhouse series will be available. The self-paced pre-recorded courses are:
All four courses are available in English and Spanish.
This award-winning series serves as an excellent resource for greenhouse growers new to the industry or those who want to learn more about other areas of greenhouse crop production or pest management.
Registrants have three months to complete the courses: December 1, 2024 through March 15, 2025. Each course is $129. Scholarships are available.
Please sign up by January 1, 2025.

Thanksgiving Wishes

Thank you for reading this issue and for your continued loyalty. Without you, Perennial Pulse would not be possible. I hope you have a pleasant holiday season!
My email is paul@opelgrowers.com if you have any comments, article suggestions or if you'd just like to say hello.
Best regards,

Paul Pilon
Editor-at-Large—Perennial Pulse
Director of Growing—Opel Growers
This email was received by you and 34,421 other fine subscribers!
If you're interested in advertising in Perennial Pulse, contact Kim Brown ASAP and she'll hook you up.