10/30/2026
Plugs 101
Dr. Roger C. Styer
A plug is a containerized transplant grown in the smallest container you’ll grow. That small size can quickly be affected by several factors that can either promote or inhibit germination, root and shoot growth. The goal of plug production is to produce pullable or transplantable plugs on time with a yield per tray of 85% or higher. Let’s look at those key factors in each stage of plug growth (Stages 0 to 4).
Stage 0: Everything before germination starts
Poor air porosity in the plug media starts with your selection of plug media and continues through flat filling and stacking plug trays. Particle size of components in the media are smaller and shorter to fit into the small plug cells. However, if peat fibers are too small, then they hold more water and less air porosity, which makes it more difficult to manage moisture and get good root growth later. Flats filled with too much moisture in the plug media or compression during filling or stacking plug trays on top of each other squeezes out the air spaces in the media. Aim for a good flat filling with brushing off to give a somewhat pillow effect for the seed to settle into the plug cell.
Your water quality can really affect plug growth in ways you may not know. The main factor to measure and control is water alkalinity, which is like lime in the water. Levels higher than 80 ppm will raise media pH over time each time you water. You can easily go from starting media pH of 5.5 to over 6.5 in just a couple of weeks. Alkalinity levels more than 80 ppm can be reduced by using acid injection. Levels more than 300 ppm will likely need to be controlled with reverse osmosis.
Sowing the seed into each plug cell is easier said than done. Mechanical seeders can do a good job, but only as good as your seeder operator. Accuracy of seeding is critical; no seed in the cell means no plug to transplant! Seed quality is another factor that affects how many seeds per cell you sow or get from germination. Buy the best quality seed you can and try not to store seed more than a year.
Covering certain seeds is needed for high humidity around large seeds, dark conditions for some varieties to germinate better and for many crops to root into the media rather than crawl over the soil surface. Coverings can be the plug media, coarse vermiculite or lightweight frost cloth (Figures 1 and 2).
 Stages 1 & 2: Germination stages
Moisture management is critical for germination, so we developed different levels of moisture ranging from 1 to 5, with 5 being saturated to 1 being bone-dry. Germination starts the minute you add moisture after seeding, whether germinating on benches or floors or in germination chambers. Most seeds will germinate with Levels 4 to 5, but will need to be reduced once initial roots come out to get them to go down into the media and to prevent initial stretching of seedlings. Some crops such as verbena and pepper, which are covered, will do better with Level 3 to start.
Soil temperature is very important for seed germination. Generally, soil temperatures of 72 to 75F (22 to 23C) will satisfy most crops, but some want lower temperatures of 65 to 68F (18 to 20C; pansy, most perennials, cool-season vegetables, cyclamen, primula). However, there are some crops that want higher than 75F, which includes vinca, begonia and celosia. Using well-water measuring 50F (10C) or lower will drop soil temps low and keep them low for long periods, which slows down or reduces germination. Heating the water with hot water heaters to 70F (21C) is ideal.
By the end of Stage 2 you should be able to identify bad seed lots, especially if you have other varieties of the same crop germinating side-by-side. Replace these bad seed lots with new lots if possible or increase seeds/cell or sow more trays to get your transplantable numbers.
Certain crops that are quick to germinate and stretch up by the end of Stage 2 will need to be controlled with plant growth regulator sprenches of Bonzi, Sumagic or Topflor at low rates even before cotyledons have emerged. A sprench is about double the spray rate, but less than a full drench, going only into the top half inch of the media (Figure 3).
 Stage 3: Growth stage for roots & shoots
Moisture management is the most important factor in promoting roots and controlling shoot growth in Stage 3 (Figure 4). Water plugs when needed to avoid wilting, but then allow them to dry down to Level 2, not Level 1. Spot-watering edges, which dry out fastest, will prevent losses in those plug trays. Wet growers typically are afraid of losing plugs to too dry and therefore end up watering too frequently, which can cause more problems with root rots and foliar diseases. Fungus gnats are the main insect problem when plugs are kept too wet. Larvae feed on roots and adults can spread some root rot spores. Dry growers tend to lose some edges, but get great roots (if they don’t burn them off!) and control shoot growth with less disease problems (Figure 5). Every plug grower starts off being too wet and eventually learns to be a drier grower.
Soil temperatures will determine how fast roots develop. Again, well-water not tempered to 70F will slow down root growth and tend to cause more root rots. The heat source for plug production will also determine soil temperature. Under-bench heating is the best for promoting proper soil temps for root growth and drying down of plugs. Overhead heating will heat mostly the air and not so much soil temps.
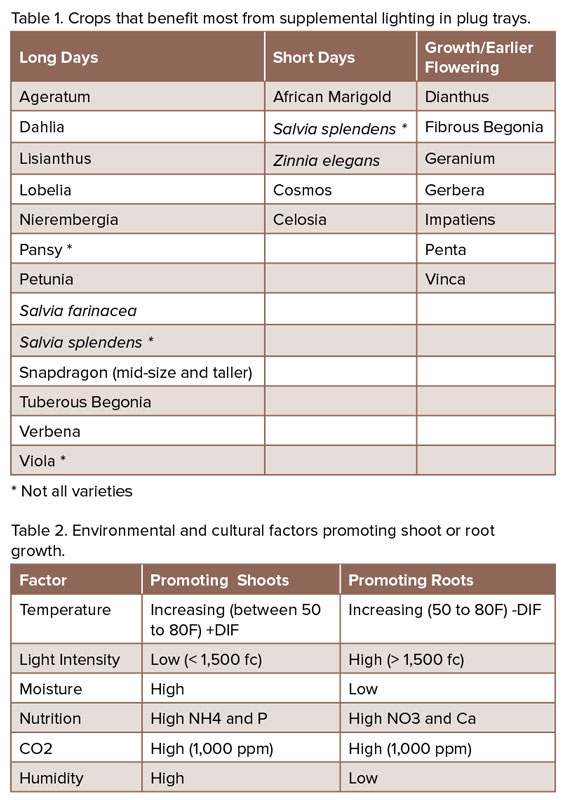
Light is essential for shoots to photosynthesize and provide food for roots and more shoot growth and flowering. For Northern growers, light is in short supply during winter and early spring months, necessitating the need for supplemental lighting from HPS or LED lights. Increasing the daily light integral (DLI) or total photosynthetic light increases root and shoot growth. This supplemental light also reduces plug crop timing while also helping long-day-flowering crops to initiate early and short-day flowering crops to stay vegetative in the plug tray (Table 1). Night-interruption lighting (NI) using incandescent or reduced supplemental lighting only acts on flowering response as noted above, not providing enough total light to increase photosynthesis and growth.
Nutrients provided through water-soluble fertilizers are needed on a consistent basis for good root and shoot growth. Fertilizers containing ammoniacal nitrogen (NH4) and phosphorus (P) will promote more rapid shoot growth, but not so much root growth. Fertilizers higher in nitrate-nitrogen (NO3) and calcium (Ca) will favor more root growth and toned shoot growth. Your choice of what fertilizer to use will also affect media pH over time, with high NH4 fertilizers being more acidic and high NO3 fertilizers being more basic.
Controlling shoot growth during Stage 3 with environmental and cultural practices works well (Table 2), but there will be a need for applying chemical growth regulators, as well. These growth regulators can be applied as sprays, sprenches or even drenches, but will differ greatly between different crops, varieties, greenhouse used, weather conditions and whether growing on benches or on floors. Knowing what to use when, how much and applying it evenly takes time to learn. Many a plug grower has made mistakes stunting or missing applications on plug crops.
 Stage 4: Toning or holding stage
This final stage can be very short (transplanting on time) or last a couple of weeks due to delays in transplanting. Reducing moisture to Level 2, not Level 1, but not over-watering, will control shoot growth. Changing feed to high NO3 + Ca fertilizers, but at lower rates will tone up shoot growth and keep roots healthy. But watch your media pH to avoid going too high and restricting some micronutrients. Running soil temps cooler (mid-50sF) will slow down growth, as well. Again, use chemical growth regulators to stop growth if needed, but plugs should grow out again within two weeks to avoid overdose. Keep control of insects such as fungus gnats, thrips and aphids, as well as drenching fungicides for Pythium, Fusarium or Thielaviopsis and downy mildew. Overgrown plugs are very susceptible to Botrytis and Rhizoctonia if kept too wet at cooler temperatures.
As pointed out throughout this article, there are many steps involved in producing quality plugs, not all of which are under the control of the plug grower (Stage 0). Even with experienced plug operations, I see problems in sowing and bad seed lots, improper germination conditions, not paying enough attention to moisture management regardless of stage of growth, soil temps too low, not enough light, insect and disease problems, and misapplication of chemical growth regulators. Paying close attention to all your plug crops every day and making quick decisions is key to getting healthy transplantable plugs on time.
Dr. Roger C. Styer is president of Styer’s Horticultural Consulting, Inc. and can be reached at (630) 842-1629 or rcstyer@att.net.