Sallyfun Salvia can also be used as a thriller in the middle of combos to upgrade the look of the mix and include additional longevity for the combination. Salvia is also desirable as a standalone plant for early spring sales through the fall. Sallyfun Salvia is exceptional in a multitude of container sizes, from quarts to larger patio containers. And don’t forget—Salvia farinacea is a pollinator magnet! No pollinator program is complete without a few of these in the line-up.
The Sallyfun series is available as unrooted from the Danziger Guatemala Farm or rooted liners from a multitude of suppliers. There are also Salvia farinacea varieties available from seed; however, there are advantages to using vegetative forms. Most seed varieties are smaller in stature and don’t have the flower power that vegetative varieties possess. The larger stature of the vegetative Sallyfun will develop beautiful garden plants. Additionally, seed varieties don’t flower as uniformly and will require more selection of saleable plants at shipping. A vegetative crop will flower uniformly and allow for row-run shipping.
Stick one cutting per cell. The most commonly used trays are 100- and 72-cell count. Place trays directly under the mist to keep plants turgid. A spray of Chlorothalonil the same day as sticking is recommended to help prevent Botrytis. This treatment is important because Botrytis can become active in as little as three hours after being packed in the shipping box. The sooner that spray is applied the better the control of unwanted fungus. Another application at the beginning of the second week will help to clean up any spores left on the plant. The rooting temperature should be 72F (22C). Once roots are showing, lower to 68F (20C).
In the third week after sticking, pinch the liner leaving at least two nodes for future branching. After approximately eight days, remove the plants from the mist. Rooting should take about four weeks total. Transplant the fifth week after sticking.
Daminozide (B-Nine) can be used to control unwanted growth—2,000 ppm is a good rate to start with, however, always read the labels and test an application rate before broad use. Keeping tighter internodes on plants will help develop a stronger plant for shipping.
The optimal pH range is 5.8 to 6.0. Above 6.0, the plants may start showing symptoms of iron deficiency recognized by interveinal chlorosis of the meristems. EC should be maintained at 1.0 to 1.2 as measured with a 2-to-1 (water to soil dilution) test.
Fertilizers should be chosen based on the quality of the water. Alkalinity and pH should be considered when choosing your fertilizer. A basic feed should be used when your water allows or if you’re injecting acid to correct the quality of your water. If you have to use an acid feed like 20-10-20, try to alternate with a calcium-based feed about every third watering. This will help to reduce any unwanted growth.
Another first-in-seed for the industry, Solarscape is the new interspecific impatiens series from PanAmerican Seed that provides landscapers unbeatable color in full-sun garden beds and containers with the same durability and performance as familiar vegetative varieties. With its seed propagation, growers now have the flexibility of an input available all year round, making scheduling a breeze. Solarscape offers a non-branded option for professional landscape growers and for use in mono or multi-species mixed containers.
In terms of garden appeal, Solarscape plants are low-maintenance in beds and containers, offering high-impact color. The blooms are large with a tropical charm, showing off satiny textures in vibrant, glowing hues.
There are four eye-catching colors to launch the series and an additional XL variety with a plant height 20% larger than standard Solarscape.
To help growers bring the best plants to market, our research team published germination and plug culture trials filled with production findings and recommendations. Below are a few key insights from our trials.
Light and humidity are beneficial to the successful germination of Solarscape Impatiens. A light covering of coarse vermiculite is beneficial where maintaining a high relative humidity in production stages 1 and 2 is challenging.
During stage 1, maintain temperatures at 72 to 77F (22 to 25C). In our trials, we found that temperatures at or above 85F (30C) resulted in slower germination speed and lower germination results.
The moisture level surrounding the seed is very important in stages 1 and 2.
In terms of growing-on temperature ranges, keep the day temperature range at 68 to 75F (20 to 24C) and night temperature range at 60 to 68F (15 to 20C). The maximum temperature should be 85F (30C). Similar to vegetative products, flower bud development slowed at that max temperature or higher. Conversely, the minimum recommended temperature is 60F (15C). While plants can survive, production slowed below 55F (13C) ADT resulted in chlorosis, delayed plant fill and delayed flowering. Lowering ADT by 2F (1C) will delay flowering by two to four days, with longer delay at cooler ADTs.
Solarscape Impatiens plugs are very responsive to paclobutrazol spray at a rate of 1 ppm applied 10 to 14 days after sowing. Repeat this application as needed. A daminozide 2,500 to 5,000 ppm spray 10 to 14 days after sowing can also be used to control growth. Repeat application as needed. A drench in the plug stage is not recommended.
Post-transplant, the responses to PGRs differ between Solarscape varieties.
One final observation: Solarscapes are low-to-moderate feeders, therefore low rates of the nitrate form of nitrogen fertilizer are recommended: 75 to 100 ppm N (EC target of 0.5 to 0.75).
With these recommendations above, you’ll have a healthy, durable crop of cost-efficient alternatives to vegetative sun-loving impatiens for your customers.

Little Hottie Panicle Hydrangea
By Jasmina Dolce, Trade Communications Strategist—Bailey
When it comes to introducing new plants into the First Editions Shrubs & Trees lineup, performance—both in production and in the landscape—is top priority. Along with plant performance, all new introductions must offer something new and truly unique to the market. All prospective plants undergo rigorous testing to ensure they check each box and Little Hottie is no exception. We’re incredibly proud of the effort put behind Little Hottie, the newest hydrangea addition to the First Editions collection.
Background
For four years, Bailey Innovations—the breeding arm of Bailey—tested and trialed three Hydrangea paniculata siblings across various locations throughout the United States. While they all shared similar characteristics, one clear winner emerged in our large-scale production trials. This hydrangea outperformed the others with its heavy flowering and compact stature. The Bailey Innovations team also found that this particular variety was not only very cold hardy, but it was also able to take the extreme heat in Georgia. As a bonus, it hasn’t required much pruning in production or the landscape to maintain its shape.
Little Hottie is a truly special Hydrangea paniculata that performs from the greenhouse to the garden. Growers will appreciate its low input requirements and ability to maintain its small size even without the use of PGRs. At retail, this hydrangea’s strong stems will keep it looking healthy no matter where it’s displayed. Landscapers will appreciate its tidy appearance in the ground and impressive season-long heat tolerance. In the garden, consumers will love the show it puts on, from green blooms that age to white and then soft pink in the fall. Plus, it’s incredibly versatile—at just 3 to 5 ft. at maturity, Little Hottie will fit just about anywhere in the garden.
Because of this variety’s year-after-year performance, we can confidently say Little Hottie will be an absolute rock star wherever it’s planted in nearly any region of the country. Already a grower favorite, this hydrangea will demand attention with its compact size, full flower heads and ability to thrive in warm climates while keeping its crisp white color through the summer.
To grow a successful Little Hottie panicle hydrangea, follow these cultural guidelines. Keep in mind, these recommendations are based on our own experience at Bailey growing operations and will vary depending on region, climate and growing practices.
Media & fertilizer
• Media pH will vary depending on region. Maintain pH between 6.0 to 7.0 and EC between 1.0 to 2.0.
• Fertilization recommendations also vary by location. In Minnesota, we incorporate 17-3-10 at 10 lbs. per yard at planting. We top dress in the second year with 22-3-8 at 15 grams per gallon. In Illinois, we incorporate slow-release 19-2-8 at time of planting. In the Pacific Northwest, we incorporate 18-6-11 at time of planting.
Water
Little Hottie has medium to high water requirements. Water approximately 1 in. per day during the summer months.
Pest & disease management
This hydrangea is nearly maintenance-free. However, two-spotted spider mites and flea beetles have been observed. Spray as needed with common insecticides and miticides.
Overwintering
• In Minnesota, plants are consolidated, tipped and covered with poly and Sudan grass. A second method is to use cold frames with black-and-white poly along with a 4 oz. frost blanket, keeping plants at an 18 to 20F (-7 to -6C) temperature range.
• In Illinois, plants are consolidated into poly houses and temperatures are maintained above 10F (-12C).
• In the Pacific Northwest, plants are consolidated and overwintered outdoors, with temperatures in the 20 to 25F (-6 to -3C) range.
Special note
In cooler climates like Minnesota, prune in early spring and leave the rest of the season. We’ve found that when executing vegetative pruning, buds will not form for 11 to 12 weeks.
Finishing time
Growers have many options for growing Little Hottie panicle hydrangea that can easily adapt to their production schedules. Bailey’s 6-in. bareroot will finish in 10 weeks in #2 containers and larger-sized bareroot will finish in 10 to 12 weeks in #5 containers. JumpStarts potted liners planted in spring or summer will finish in #2 containers in 12 to 14 weeks.
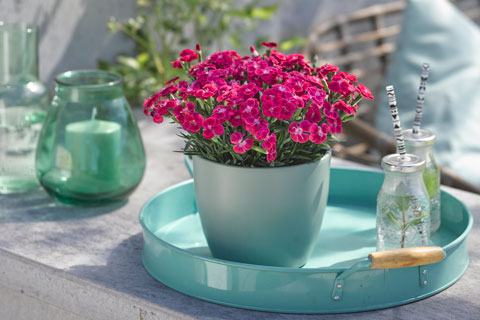
Best Friends Forever Dianthus Series
By Bart Hayes, Sales & Marketing Manager—Westhoff
Although Westhoff breeding has become well-recognized around the world for the unique flower color and patterns of series like Crazytunia Petunias and Chameleon Calibrachoa, we’ve been quietly working on expanding our efforts to include new product categories, specifically in potted plants.
This year, we’re proud to present our new series of potted dianthus called Best Friends Forever. With six colors, these varieties are continuously blooming with excellent indoor performance, making this new series an ideal choice for retail-ready gift/holiday potted programs. It’s also relatively easy to produce with a degree of flexibility that can allow this series to be produced just about anywhere, most of the year.
Propagation
Rooting Best Friends Forever Dianthus is straight-forward, but takes a bit longer than typical spring crops. Stick unrooted cuttings immediately upon receipt into fresh, sterile media with a consistent 68 to 70F (20 to 21C) temperature, utilizing 100 ppm KIBA to aid in rooting speed and uniformity, followed by a preventative fungicide application.
An initial misting schedule should be set up to keep moisture levels high enough to avoid the cuttings wilting while avoiding saturating the media continuously. Reducing the water steadily to keep pace with the plant’s use will result in higher quality rooted cuttings.
Initial rooting should occur within 10 to 14 days, at which point you can begin fertilization. Once roots extend to the edges and bottom of the cell, the plants can be pinched, removing only from the newest growth, to encourage branching.
The young plants can be treated with a plant growth regulator—a spray of Daminozide at 2,500 ppm, if deemed necessary. Although this has been shown to be effective, all chemical applications should be trialed prior to widescale application. Depending on the tray size (105 or 72 cell is typical), you should allow for six to eight weeks of total propagation time.
Finish growing
In general, Best Friends Forever Dianthus do prefer to be grown under cooler conditions (and I would also recommend this) to minimize the need for growth regulators or additional mechanical shearing. Once transplanted young plants have begun rooting into their finished pot, average temperatures can gradually be reduced to 60F (15C). High light conditions and cool temperatures will enhance the finished quality of the plant, but if conditions don’t allow, additional plant growth regulator applications can be done to prevent excessive growth.
Allow plants to dry slightly in between waterings and maintain a low to medium fertility regime for best growth. 100 to 150 ppm N applied when watering, enough to maintain a 0.6 to 0.9 EC (1:2 extraction), should be sufficient.
Regular scouting for insects and disease to catch them early will make the crop easier to maintain, and although preventative applications and good cultural controls are typically sufficient to prevent major issues, excessive water can lead to root issues like Pythium or Fusarium. Cooler-season pests, like aphids, can also cause issues.
It should be noted that the varieties in the Best Friends Forever series are very well suited to smaller pots—4- to 6-in. diameter pots seem to be the best fit. But to get to that larger size, additional growing time should be added. Expect a minimum of 12 to 16 weeks for smaller pots, with 16 to 20 weeks for a larger pot, of growing time following transplant. Plants will finish quicker under high light and warmer conditions, and slower in darker, cooler conditions.
One of the best features about the Best Friends Forever Dianthus series, the continuous blooming, also makes it very grower friendly. Obviously, this is good for the end consumer, as they get great performance for an extended period. But for the grower, this allows for an extended harvest period. The plants can be grown and shipped over a longer period of time. Plants are tough with excellent handling and post-harvest performance, allowing for boxed and DC shipping methods, both of which are very common for potted gift programs.
Sales and marketing assistance are available for branded retail programs, and cuttings are available through your preferred live plant brokerage. Contact your sales representative or your local Westhoff representative for more information.
SureShot Petunia
By James Doukas, Territory Manager—Ball FloraPlant
The petunia lineup from Ball FloraPlant continues its targeted approach to meet growers’ needs for multiple sizes and plant vigor. For 2023, the new SureShot Petunia series launches as a medium-vigor, versatile selection for baskets and landscapes.
This series has been bred to our rigorous standards for a seven-day flowering time, as well as matching habit, so all colors can be shipped to retail customers at the same time. SureShot debuts with four core colors and two novelties. Of particular note is SureShot Blueberries & Cream with its dark blue center and yellow picotee. All varieties mix well together to create a range of color combinations.
To help you produce fantastic plants for retail, here are a few propagation and finishing tips from our support team.
Propagation guide
Cuttings are provided through the reliable supply chain of Ball FloraPlant’s Las Limas farm in Nicaragua. They can be stuck into multiple tray sizes: 50, 72, 84 and 105. No rooting hormone is needed and the cuttings should spend an average of six to nine days with mist.
We’ve found that no pinch is needed during propagation. To avoid stretch, move the crop to cooler air temperature in the second and third week of propagation and be sure to transplant on time.
Overall, the general propagation time for SureShot Petunias is three to four weeks.
Finishing
When finishing your SureShot Petunias, maintain the soil pH at 5.4 to 5.8 EC and provide light levels of 5,000 to 8,000 fc.
As for temperature, day temperatures can range from 59 to 76F (15 to 24C) with a night temperature range of 53 to 61F (12 to 16C). Set the feed rates to 225 to 300 ppm N.
 To control growth habit early, a B-Nine spray can be applied two to four times at a rate of 1,500 to 2,500 ppm. A Bonzi drench at a rate of 0.25 to 1.0 ppm can be applied as the crop matures. This will control the final height, but not delay flowering or reduce flower size. Cool temperatures and high light will also reduce the need for PGRs.
Monitor your SureShot benches regularly for high pH and possible iron deficiency. Keep an eye out for typical petunia pests and diseases, too, to stay ahead of any complications and to keep your crop healthy.
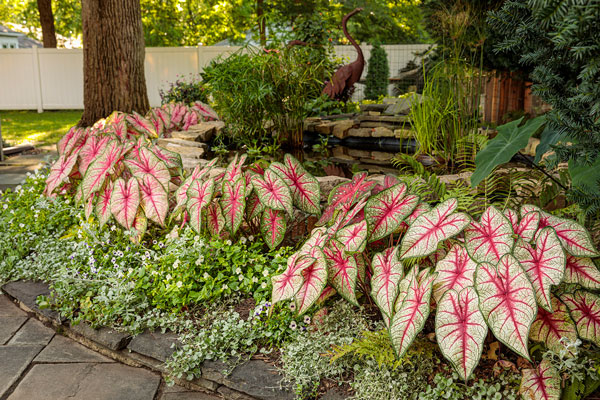
Achieving Predictably High-Quality Caladium Crops
By Proven Winners Staff
During the past few years, caladiums have experienced a phenomenal resurgence in North American gardens, thanks in part to more sun-tolerant varieties offered in the Heart to Heart collection from Proven Winners. Led by world-renowned caladium breeder Dr. Bob Hartman based in Avon Park, Florida, Classic Caladiums has bred these varieties with thicker, more durable leaves that help them hold up better in adverse weather conditions. Innovative growing practices at the farm ensure strong crops and reliable availability.
Varieties in the Heart to Heart Caladium collection are selected for their rapid sprouting rate and ability to fill the pots fully in finished production. That’s partly due to the fact that every tuber is de-eyed to promote uniform sprouting and a well-branched habit. They’re also painted white on top to identify which side to plant up—something that’s not so obvious if you’ve ever seen a caladium tuber. All of these traits help growers produce predictably high-quality caladium crops every time.
Follow this formula to produce caladiums any time of year, whether it’s to fill your lineup in spring through summer with heat tolerant, always-in-color plants to offer potted plants for indoor sales in fall and winter, or to sell during the holiday season as a complement to poinsettias.
Timing
For spring sales, we recommend planting caladium tubers as early as January to allow plenty of time to finish under shorter days. At that time of year, you can expect them to finish in eight to 10 weeks. If planted later in spring when light levels and temperatures are naturally higher, caladiums can finish in as little as five to eight weeks. The tubers typically sprout within 14 to 21 days on average, varying a bit by cultivar.
Planting & growing media
When you order Heart to Heart Caladium tubers from Proven Winners, they’ll arrive to you de-eyed and painted so they’re ready to be planted. It’s best to pot them up as soon as they’re delivered, but if you must store them for a short time, be sure to keep temperatures at 65F (18C) or warmer with humidity levels between 65% to 75%. For extended storage, remove the tubers from their boxes and place them in well-ventilated open trays to ensure good air circulation.
Caladiums are often sold in a variety of pot sizes, and thus, price points, including 1.0 qt., 6.5 in. or 8.5-in. jumbo containers. The number of bulbs needed per pot is as follows:
• Jumbo Bulbs: 1 per 6.5 in., 2 per 8.5 in.
• #1 Bulbs: 1 per 1.0 qt., 2 per 6.5 in., 4 per 8.5 in.
• #2 Bulbs: 2 per 1.0 qt., 4 per 6.5 in., 6 per 8.5 in.
Before planting the tubers, it’s wise to treat them with a preventative broad-spectrum fungicidal drench. Then plant Heart to Heart Caladium tubers with the white painted side up, sinking them 1.5 to 2 in. deep. Water them in thoroughly after planting.
We recommend using a well-drained growing media that contains organic matter. A mix of pH-adjusted peat moss, pine bark and perlite has proven successful for caladiums. Aim for a pH of 5.5 to 6.5 and an EC of 0.6 to 0.9.
Lighting & watering
Caladiums prefer to grow under moderate light levels in greenhouse production. Take care not to grow them under too much shade or with tight spacing since doing so will cause them to stretch and lead to a less attractive pot presentation. The pots can be spaced at planting time or right after sprouting.
Caladiums generally have moderate water requirements. Keep them moist from the time you plant them until they sprout. Once sprouted, let the growing media dry down slightly between irrigations, but not to the point of the foliage wilting. You can avoid the possibility of stunting or delaying your caladium crop by irrigating with water that’s above 60F (15C).
Growing on
Caladiums love heat, humidity and moisture when they’re getting ready to sprout. You can speed up the sprouting by tarping the potted tubers to build heat and humidity around them. Uniform sprouting will occur when the soil temperature rises to 75 to 85F (23 to 29C) and the soil moisture is kept at 90%. Soil temperatures in the 60 to 70F (15 to 21C) range will cause uneven and delayed sprouting.
Caladiums require far less feeding than many flowering annuals. Medium to light rates are typically sufficient to produce a high-quality crop. Fertilizer options include a constant liquid feed of 75 to 100 ppm Nitrogen, a balanced nutritional package such as 20-6-20 or 12-4-12, or a controlled-release
fertilizer.
To rein in a caladium’s growth and improve its habit, use a Bonzi drench foliar spray and tuber soak. Apply Bonzi at 15 ppm, plus B-Nine at 2,500 ppm in a weekly spray. Sprench the crop beginning three to four weeks before shipping to improve the plants’ durability during shipping.
Do not move potted caladiums outside unless temperatures are guaranteed to remain above 70F (21C) or you’ll risk damaging or stalling your crop. These are tropical plants—grow them warm and bright and you’ll be alright.
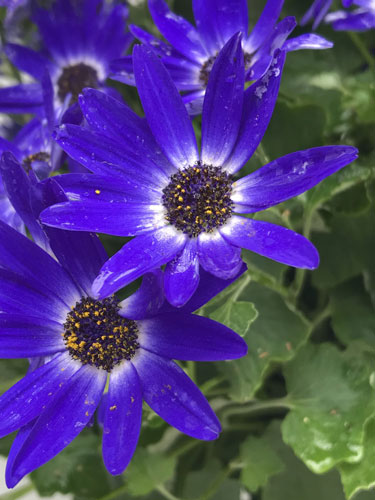
Expand Your Senetti Palette
By Lorentina McKoy, North American Sales & Product Representative—Suntory Flowers
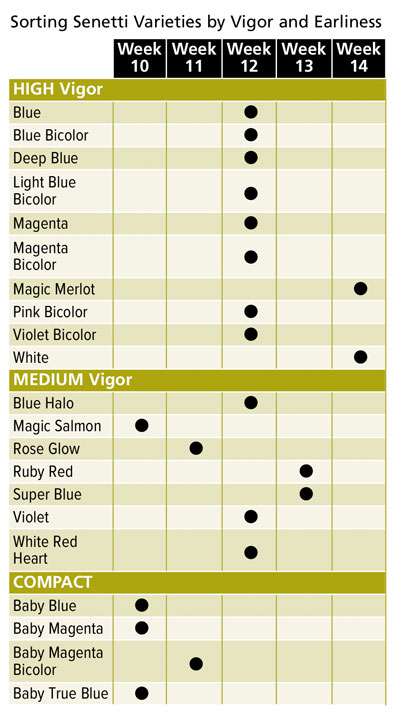
Senetti Pericallis has been one of our most vibrant and unique brands. In addition to working on improving tried-and-true colors, the breeders at Suntory Flowers have been working their magic creating color-changing varieties, such as Magic Salmon, Magic Merlot and Rose Glow. In general, the breeding direction has been making the plants tidier and more compact with an increased flower count, and overall better tolerance to fungal diseases in production.
This is evident in our two new introductions for 2023—Senetti White Red Heart and Blue Halo. White Red Heart has bright white daisy flowers with velvet red centers. Southern growers and retailers are eyeing them for Valentine’s Day promotions. We expect Blue Halo to become the new favorite for blue. Plants are loaded with gorgeous delphinium-blue flowers with white halos around the center eyes.
We’ve published two new tools to help you choose Senetti varieties. One is a chart that sorts the varieties by vigor and bloom time. The other is grading varieties as “Senetti Select” based on performance in stock production. Ten varieties have earned the Senetti Select designation, including the new Blue Halo. These varieties demonstrate the most disease resistance and resilience during cutting harvests. (Marked with a blue “S” on page 13 of the Suntory catalog.)
Production planning
With the early spring sales window, Senetti has its own season, beginning in January in the South and March in the North. Plants will tolerate cool temperatures down to 35F (1.6C). This also gives growers the option of growing Senetti “low and slow” under cooler temperatures as an energy-saving crop. Crop time is 10 to 20 weeks depending on final size, temperature and number of cuttings transplanted.
Crop times
• 4-in./quart pot (1 liner): 9 to 12 weeks (recommended only for Baby Senetti varieties)
• 6-in./1-gallon pot (1 liner): 10 to 12 weeks, 1 pinch
• 10-in. pot (2 to 3 liners): 12 to 14 weeks, 1 pinch
• 12-in. pot (3 to 4 liners): 12 to 14 weeks, 1 pinch
Establish plants at 65F (18C) and then reduce temperatures—35 to 45F (1.6 to 7C) for cool, 50 to 55F (10 to 12C) for moderate.
Propagation
Root initiation: Within 14 days. Rooting media should have a pH between 5.6 and 5.8. Set aerial temperature to 75F (23C). If growing with bottom heat, set to 68F (20C). Set humidity at 90%.
Root development: 14 to 21 days. Mist is no longer required. Mist only if wilting occurs when plants are transferred to a brighter environment. Set humidity between 60% to 70%. On brighter days in higher light regions, 30% to 40% shade may be required.
Finishing liner: 21 to 35 days. Cease misting and keep relative humidity and temperature the same as the root development stage. At seven to 10 days prior to shipping or transplant, give cuttings a light pinch to encourage branching.
Potting
Transplant liners into well-drained growing media. Keep pH between 5.5 and 6.0. Optimal growing temperatures post-transplant is from 40 to 50F (4 to 10C) with relatively low humidity. Senetti can be grown warmer, between 55 to 65F (12 to 18C), but keep in mind this will affect flower timing and possibly stretch flower stems. (See the following PGRs section for suggested application, if needed.)
Fourteen to 21 days post-transplant, give plants a pinch to ensure optimal branching/soil coverage and overall shape.
Senetti is daylength neutral. Ideal light conditions are between 5,000 and 6,000 foot candles. Above 6,000 foot candles plants develop stress symptoms.
Irrigation/fertility
Right after initial transplant, hit plants with a strong application of 250 ppm nitrogen 20-10-20. Continue this feed for the next four weeks of crop time. Senetti is a heavy iron feeder. A monthly drench application of STEM (or similar product) is recommended.
Senetti does best when grown on the dryer side. This helps to develop a strong, dense plant and helps minimize diseases. However, due to its vigorous root system, Senetti will require heavy watering on brighter and warmer days. Achieve this with clear water only.
Finish the last few weeks of production on higher phosphorous fertilizer to support flower production (10-30-20).
Plant growth regulators
Senetti is very responsive to B-Nine, which can be used every 14 to 21 days at 2,000 ppm. Senetti Light Blue Bicolor will need extra treatment early on and a stronger application during flower development. Florel can also be used at the rooting stage to promote lateral shoots. Bonzi can be applied as a late drench once plants are fully established at 2 ppm.
Pests & diseases
Aphids are the number one pest for Senetti. Spider mites and whitefly can also be present during production. Scout for thrips during flower development.
Thielaviopsis (black root rot) is the biggest disease problem for Senetti. Subdue/Cleary’s tank mix is recommended, rotating Terraguard or similar product every four weeks.
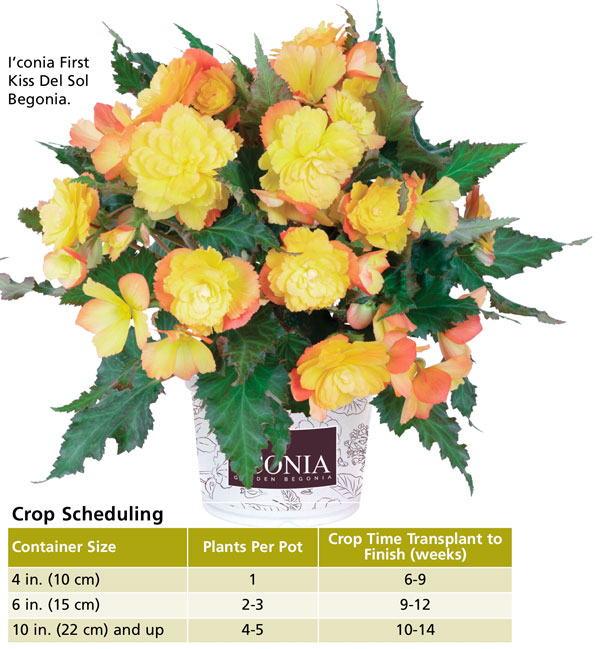
I’Conia Begonia
By Kelly Nicholas, Technical Support—Dümmen Orange
I’Conia Begonia are the most luxurious series of hybrid begonias available for both sun and shade. These exquisite plants make a dramatic statement in the garden, in combination containers and in hanging baskets.
I’conia are available in distinct families to make programming and sizing easy. New standouts for 2023 are First Kiss Del Sol and Bachelorette Red, a variety sure to wow with spicy red, single flowers.
Production tips
Upon arrival: The boxes should be unpacked, sorted and cuttings stuck immediately. If that isn’t possible, sorted cuttings should be placed with bags open on disinfected carts or shelves in a cooler at 54F (12C) for no longer than 24 hours. Mist cuttings in the cooler if they’re dry or wilted.
Propagation: Stick the cuttings in a 50-, 72- and 102-cell tray filled with typical, well-drained media that’s suitable for propagation with a pH of 5.6 to 6.2. When sticking, arrange the leaves in a single direction so the apical growing point isn’t covered. Maintain soil and air temperatures of 68 to 74F (20 to 23C). Under-bench heating is required for rooting.
During propagation, apply only enough mist to keep the leaves turgid, avoiding saturation of the rooting media. Wean the liners off mist once roots form and begin to feed at a moderate rate (150 ppm N) with a balanced fertilizer that includes micronutrients. A remay or cheesecloth cover can significantly increase rooting success. Consider a preventative fungicide for Botrytis in the first weeks after stick, especially if early signs of Botrytis appear.
Day extension or night interruption lighting providing long days (14 hours) is necessary to create good branching. Keep light intensity between 1,500 to 2,000 fc (16,000 to 21,500 lux) during callus formation, gradually increasing between 2,500 to 3,500 fc (27,000 to 38,000 lux) for root initiation and toning. Increasing light, decreasing humidity and temperatures as cuttings begin to root will help reduce stretch.
If PGRs are needed, a 250 to 350 ppm spray of Cycocel (Chlormequat 11.8%) can be used to reduce stretch and tone liners in the propagation tray. Spray only to glisten; do not allow to trickle into the roots. Rooted liners should be ready for transplant within three to four weeks. It’s important to transplant on time, as root bound and stressed liners (too dry, too little light, lack of fertility) can reduce branching, finished plant quality or even become blind.
 Growing on: Transplant into a well-drained media with a pH in the 5.6 to 6.2 range. During early stages of plant growth, keep both day and night temperatures steady at 65 to 75F (18 to 24C). Gradually lower the night temperature to 55 to 60F (13 to 16C) as the plants begin to establish. Daytime temperature can be reduced to 64F (18C) as the plants are actively growing. Final plant quality will be improved with a cool finish, ADT of 55 to 60F (13 to 16C). Schedule production to finish under daylengths of more than 13 hours. Long day conditions can be achieved using day extension or night interruption lighting, if necessary. Finishing under short days will result in small, poorly branched plants. Acclimate plants to new conditions slowly, avoiding movement of plants from moderate light to high light or high temperatures quickly, as leaves can scorch.
Keep plants moderately moist and avoid stress (too dry and lack of fertility) for the best finish. Apply periodic fertilization with balanced fertilizer at a rate of 150 to 200 ppm N aiming for an EC as measured with SME of 0.5 to 1.3 mmhos.
The best plant habit can be achieved with proper spacing and small amounts of PGRs starting in propagation and utilized throughout the growing cycle. This tones the foliage and forces node development while the plants are still soft. Use 250 to 350 ppm of Cycocel (Chlormequat 11.8%), 1,000 to 1,500 ppm B-Nine (Daminozide 85%) or a tank mix spray of the two. Apply only to glisten.
To prevent Botrytis once the plants are flowering, maintain adequate light levels, ample spacing and provide good air circulation. Avoid wetting foliage and flowers immediately before and during shipping, and completely avoid overhead irrigation on flowers if possible.

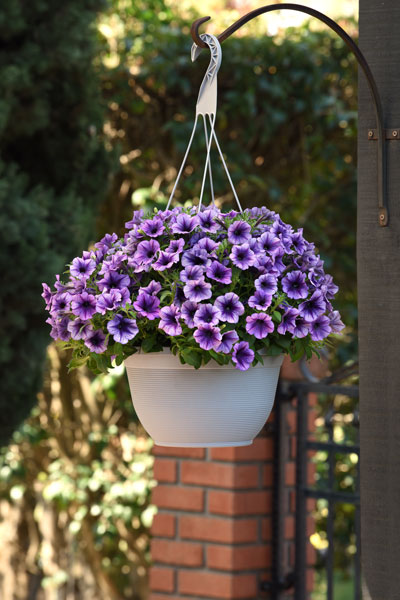
Growing Perfect SuperCal Petunias
By Michael Wiebe, Product Technical Services Manager—Sakata Ornamentals
Petunias—they’re everywhere. Mass plantings of landscape beds, decorative containers, combination planters, and in both generic and high-end hanging baskets. Sakata Ornamentals understands the need for continual improvement of this industry standard and is raising the bar to bring consumers greater value and performance.
The SuperCal Petunia series is an intergeneric cross between petunia and calibrachoa, which incorporates the best of each genera to benefit growers and gardeners alike. This can be summed up in a term commonly known as “hybrid vigor.”
By combining the best attributes of these two genera, Sakata has developed a new breed of petunias, with wider weather and pH tolerance, that finishes with mounds of vibrant and top-quality blooms. SuperCal outperforms the competition in the summer by maintaining good growth and flowering through the harshest months. These hybrids will also stand to tolerate light frost in spring and fall. Another quality to note is SuperCal’s ability to bounce back very quickly after a heavy rain.
Introduced in 2006, the SuperCal brand continues to expand with bright, radiant and unique colors, and a more uniform habit among new and improved varieties, with a reliability that continues to amaze gardeners with outstanding performance. SuperCal and SuperCal Premium together contain colors that are perfect for all three growing seasons, from a springtime Artist Rose to summer’s deep Blue and all the way to a Bonfire Mix, a three-color autumn beauty.
The standard SuperCal varieties have a semi-trailing habit that exhibit multiflora-size blooms, while SuperCal Premium Petunias have a more mounded habit with larger grandiflora-size flowers. Depending on a grower’s petunia program, variety selection is one of the key components in determining which type to produce.
Propagation notes
• After sticking unrooted cuttings, avoid excess misting, as too much water will slow callous formation and root development. A rooting hormone of up to 2,500 ppm of IBA is recommended.
• Maintain soil temperatures of 68 to 72F (20 to 22C). Bottom heat will enhance and speed the development of roots.
• Cuttings should require mist for the first five to seven days and only as needed to keep cuttings turgid.
• After three to seven days from sticking, spray early in the day a tank mix of 1,250 to 2,500 ppm daminozide (B-Nine) and 500 ppm of ethephon (Florel). (Note: Florel must be applied at least eight weeks prior to shipping to prevent flower delay.)
Transplant to finish notes
• If not applying Florel, pinch rooted liners to the third node prior to or at transplanting to promote branching.
• Soil aeration: Select a sterile, well-aerated mix with a pH of 5.5 to 6.0.
• Moisture management: Avoid excessive irrigation when the plants are still young and developing roots. Once plants are rooted in, allow media to dry between irrigations to tone plants and maximize nutrient uptake.
• Fertilizer: Select a well-balanced cal/mag fertilizer formulation with a complete minor element package. Once rooted into the pots, target soil EC levels at 1.0 to 1.5 (1:2). Consider chelated iron supplement drenches to maintain ideal pH levels. Supplementing magnesium sulfate at 16 oz./100 gal. will aid in maintaining healthy green foliage.
• Temperature/humidity: Initially maintain an average temperature of 65F (18C). Once established, grow at 65 to 70F (18 to 21C) during the day and at 63 to 65F (17 to 18C) at night. Provide good air circulation at all times to reduce humidity levels. Relative humidity levels below 60% will help prevent diseases like Botrytis.
When the plants have rooted into the pots, cooler temperatures (55 to 60F/10 to 15C) combined with 10-plus moles of light/day results in high-quality plants with intense flower color, but may add one to two weeks of crop time.
• Light: SuperCal is a facultative irradiant plant, so high light intensity combined with the recommended photoperiod per cultivar are needed to induce flowering. Once established, provide a minimum of 4,000 foot candles (43,000 lux) along with supplemental lighting on cloudy days. When growing in natural short days of winter, extending the daylength to 14 to 16 hours beginning at midnight is beneficial for early spring flowering, especially in northern, low-light areas.
• PGRs: SuperCal are highly responsive to foliar applications of B-Nine (daminozide) at 2,500 ppm and ARest (ancymidol) at 5 ppm. Avoid spraying when flower buds appear, since the use of PGRs may delay flowering one to two weeks and slightly reduce flower size. For best results, grow SuperCal under high light, cooler temperatures and a slight negative DIF. If additional control is needed later in the production cycle, a paclobutrazol drench at 2 to 5 ppm is very effective at controlling plant height without compromising flower size. GT