1/1/2022
New Tricks for Pansy Production
Bill Calkins
Growing core seasonal crops is big business, and with the inherent short sales windows, mistakes can be devastating.
Pansies are a prime example, and whether you’re starting from seed or plugs and no matter the finished container size, there’s little room for error. This article is based on a three-part video series by Dr. Will Healy, one of the Tech On Demand experts at Ball Horticultural Company who’s certainly seen just about everything with this species, working with growers on hundreds of spring and fall pansy crops over the past three-plus decades.
Propagation and plug production
Dr. Healy is quick to remind growers that your pansy crop is a fast one, so you have to get things on track right at the beginning, starting with propagation. At the seed level, pansies are notoriously “un-uniform,” but thankfully, seed technology experts have figured out how to “prime” the seed, bringing it to the point of germination before it’s packed and shipped. For the absolute best results, always start with primed seed.
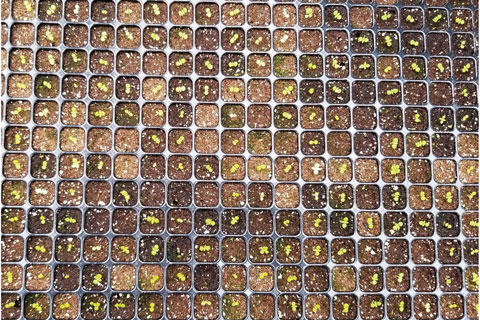
Pictured: Uniformity is the goal with pansy production. Uneven plug trays can result from poor irrigation strategies and non-uniform media coverage.
This theme will continue through this entire article because pansy production is all about uniformity. And uniform germination, even when using primed seed, requires consistent moisture and media coverage across all cells in all plug trays. Make sure your flat filling line is on point and all flats are being irrigated and covered completely.
Another point to make on irrigation is that you’ll need to water at sowing up to a level 4 (very wet, but not flowing from the bottom of the tray) to hydrate the seed and then dry down to a level 3 (water drips out when the media is squeezed.). By day three after sowing, you’ll see the seeds swelling before the root emerges, especially when using primed seed. By day five, they’ll all be off and going if you’ve gotten the moisture correct. Be careful not to water to a level 5 and then again at level 4 because you’ll end up with a “gel coating,” as seeds don’t want to die when conditions are too wet and oxygen can’t be taken up by the plant.
Once the radicles emerge, you can dial the water down and irrigate to a level 4, but allow the young plants to dry down to a level 2. This dry-down is critical. And be sure to look at the bottom of your trays to assure the moisture is flowing all the way down, drawing the roots down as well.
In terms of nutrition, Will suggests a fertilizer around 13-2-13 or 14-4-14 with complete micronutrients.
“We’ve learned over the years that micronutrients are critical for pansy crops,” Will said. “When we see uneven, abnormal or stalled crops, it’s usually related to micronutrient deficiencies.”
 Nitrogen is good, but phosphorous and micronutrients are most important. Phosphorous is needed for energy and a deficiency will look like purplish lower leaves and cotyledons. As for the micros, iron and manganese are important for chlorophyll, and boron drives shoot tip and leaf expansion, so be sure your fertilizer package is complete and on a constant feed at 75 to 100 ppm.
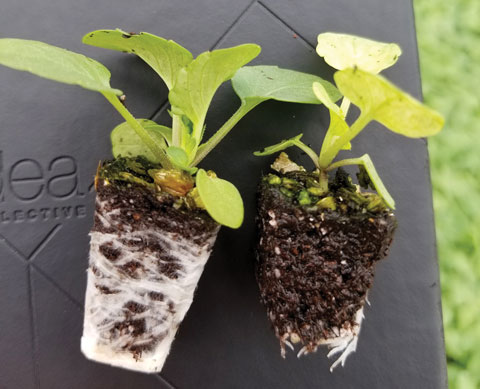
Pictured: Proper watering leads to complete root development. Roots growing to the edge of the cell from top to bottom ensures a strong plant.
Touching quickly on growth regulation in the prop phase, Will strongly encourages the use of moisture management as your first tactic. Keeping wet-dry cycles inline will solve most issues. DIF is also a great tool early in the crop. Be careful with B-Nine, Will says, because early applications can lead to crinkled leaves. He says many growers using chemical PGRs will employ tank mixes, such as B-Nine and A-Rest; B-Nine and Cycocel; and B-Nine and Florel (especially if early or excessive flowering is a concern).
Lastly, during propagation, stay vigilant on disease. The ones to watch for are Thielaviopsis, Pythium and leaf spots. Some regions in North America are prone to downy mildew, as well. Will says when trying to avoid Thielaviopsis and downy mildew, your approach must be preventative, while leaf spots and Pythium can be cured once encountered.
Receiving and transplanting
Whether you’ve started your own plugs or are receiving them from your plug suppliers, let’s look at your pansy crop from the time of transplant to establishment because a lot can go right or wrong here. Will reminds you not to just receive the trays and set them aside and transplant when your team has time.
“That’s when we tend to get the calls asking, ‘Why aren’t my pansies growing very well?’ and the problem usually can be traced back to improper care between the time plug production is done and the plants have rooted out,” Will explains.
 As soon as you receive plugs or move them into production, unpack the trays and space them out if you’re not planning to transplant within 24 hours. This is key to plant quality moving forward. (If you’re planning to hold your plugs for longer than seven days, take a look at Part Two of the pansy video series on Ball Seed’s YouTube channel starting at about 8:00 into the video for tips from Will.)
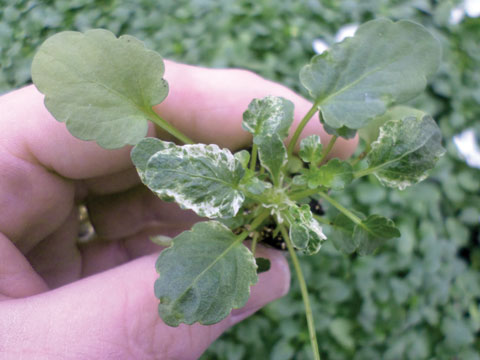
Pictured: Pansy Mottle Syndrome results in tip abortion, as well as white margins on young and mature leaves.
Will suggests keeping pansies off the floor and on an upside-down tray or on benches to minimize disease transmission and maximize root development. And keep a close eye on light intensity at this stage because high light leads to flower induction. Try to keep light intensity under 4,000 f.c. for best results, he says.
“If you’ve struggled with ‘stick-in-a-pot’ syndrome and not achieved full branching, lighting might be the issue.”
Irrigation at this stage needs to be carefully monitored. Water up to a “drip,” meaning just a small drip out of the tray. Will says if you water to saturation, you’re setting yourself up for all sorts of problems.
“You’ll also limit growth and restrict the roots if you water too heavily,” he said.
For fall pansy production, this tip can be challenging, but do your very best to keep night temperatures as low as possible and encourage good transpiration.
“Running fans over the crop will help reduce the ‘dead air problem,’ which is when you walk into the greenhouse and you can feel the humidity,” he says. “Dead air creates challenges for the plants taking up boron and will lead to tip abortion, Pansy Mottle and all sorts of other problems.”
Here are a few tips for protocols to follow prior to transplanting. Taking these steps will help with crop uniformity and overall success.
• Thoroughly clean your production area
• Avoid high temperature and relative humidity stress conditions
• Prior to planting, fertilize with an NH4-based fertilizer like 20-10-20 at 200 ppm or more
• Consider adding 50 to 100 ppm boron if relative humidity is higher than 90%
• Fully irrigate to load the soil ball with fertilizer
• Apply fungicide drenches and foliar sprays to protect plants
After transplanting your plugs into pots or larger containers, be sure to water-in to firm up the soil around the plug.
“Be sure not to fully saturate the pots, though,” Will says. “Make sure your conveyor is moving fast enough—you just want to encourage soil contact between the plug and the soil to drive good rooting.”
And don’t leave the newly-transplanted pansies sitting on carts out in the sun before they’re moved into the production area or outside because they’ll just dry out and you’ll fall behind on uniformity or the crops will just “die in transit.”
Once transplanted, maintain the soil below the plug at a level 4 in terms of moisture to help draw down the roots, but avoid a perched water table at the bottom of the pot.
“This is where water pools at the bottom and will discourage root growth,” Will explains. By day seven after transplant, roots should be to the bottom of the container and ready to explode in terms of growth.
“Fuzzy roots are happy roots,” Will says. “And resume watering from level 2 to level 4 and make the roots grow and search for water.”
Finishing
The final step in spring or fall pansy production is what Will calls “how to prevent good pansies from going bad.” Especially when finishing for fall, you’re trying to finish the crop in the worst conditions possible—hot and humid. You really need to stay on your game to avoid issues and ship the plants to retail or landscape customers with the best likelihood of success.
Let’s address the elephant in the room, a challenge most pansy growers have faced and one that always catches you off guard and appears out of nowhere: Pansy Mottle Syndrome. Will explains this has plagued growers for decades, from about the point in time pansies took off as a major crop. You’ll spot it when tips abort and the margins on mature and young leaves turn a creamy white and it occurs randomly in different varieties and within different plantings. The result? Plants have abnormal growth and stop flowering. The cause has been challenging to determine, but Will says, it almost always traces back to a major stress event.
“High relative humidity and wet roots when the soil is saturated is usually the case and it’s not corrected by boron application.”
The simple answer is: Don’t stress out your plants. Leave them alone.
“The one thing we know is it’s not disease,” he adds.
With the goal of reducing incidents of stress, continue to manage irrigation carefully. Don’t leave the plants saturated and continue water to level 4 and drying to level 2. You also need to be sure to eliminate grow-out issues. Be sure to use new, fresh soil in your finished production. Old media often loses its nutrient charge and wetting agent, so be sure to test your nutrient levels (pH and EC at the minimum) before using existing soil. Also, make sure your soil is dry at the time of planting, Will says. Knowing these factors ahead of time allows you to create a fertilization program that matches the plant need.
As the crop’s growth rate increases, you’ll need to apply nitrogen at the correct rate. Don’t just add the same rate of N throughout the entire crop cycle; adjust as the plants grow to avoid “runts,” Will reminds us. Along the same lines, as temperatures rise and the plants grow faster, the rate of drying changes, so be sure to adjust your irrigation as you go. PGRs also are consumed more quickly in higher temperatures, so keep a close eye on rates to avoid stretch.
If you’ve treated plugs with fungicides and continued to treat during production, don’t let your guard down as you move to finish. Thielaviopsis is still the major concern, and remember, there’s no curative solution.
Here are Will’s expert tips on post-harvest preparation:
• Feed before shipping with an NH4-based fertilizer at about 200 ppm
• Apply the appropriate fungicides to ensure a healthy crop for your customers
• Only use PGRs until one week before shipping
• Cool down the soil as much as possible before shipping to avoid many issues
For a much more complete look at all of the aspects covered above, check out the three-part Tech On Demand pansy series on Ball Seed’s YouTube channel and look for the “New Tricks for Pansy Production” playlist.