11/1/2021
Manufactured Blooms: Success With Cuttings
Bill Calkins
Producing a high-quality crop of spring annuals from vegetative cuttings is a combination of art and science. Developing careful protocols, communicating them with your team and following through day after day is critical. There will, of course, be plenty of opportunities to tweak the process based on unpredictable situations, but the core process is a lot like manufacturing.
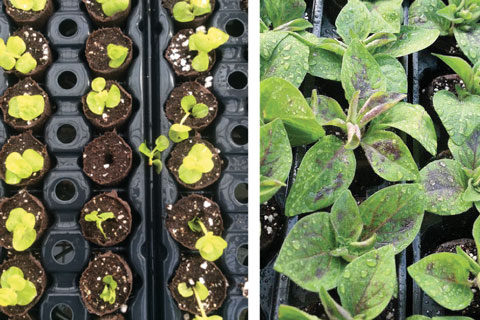
Pictured far left: Avoid young plants that look like this. Think of crop production as “manufacturing” and develop strict processes to achieve consistency and uniformity.
Left: When cuttings begin to show purpling, it could be a sign of phosphorus deficiency.
Here are the steps to take and the framework to put in place to have an optimal chance of success, beginning even before your cuttings arrive. Let’s take it step by step through Stage 4. (Note: This article is adapted from a presentation at Cultivate’21 by Dr. Todd Cavins and Dr. Nathan Jahnke, two of the technical service managers at Ball Horticultural Company.)
Sanitation and maintenance before arrival
This goes without saying (or at least it should), but taking a look at your different propagation houses and all of the mechanical parts should be on the to-do list well ahead of the dates you’ll receive spring cuttings. Check all of your equipment over top to bottom to be sure everything functions correctly. And check your water quality and equipment, as well. This isn’t an issue you want to deal with after your plants arrive. Best to get on it early.
Next, check all the surfaces your plants will come in contact with to make sure they’re clean. Sanitation is key at all stages in the game, but before plants arrive is the best time to deep clean your facility. Benches, carts, floors and just about any surface can harbor disease and pests, so take extra time to be extra clean.
Don’t forget about people, too, because they can vector plant disease easily as your team moves between greenhouses. Stock up on new footbaths, gloves and disinfectant because chances are they’ll still be in high demand going into the season.
Receiving and storing cuttings
Your cuttings have arrived! You paid good money for them, so don’t let the boxes sit out on the dock or in your warehouse. The longer they sit, the more they decline in quality. Chances are the weather is lousy outside when cuttings ship, so get them inside and start unpacking.
Using an infrared thermometer, check the temperature of the plants throughout the box and bag, and especially at the base of the stem. How is the overall health? Is there rot or disease evident? Knowing these factors at the start will help you make decisions on how to treat them.
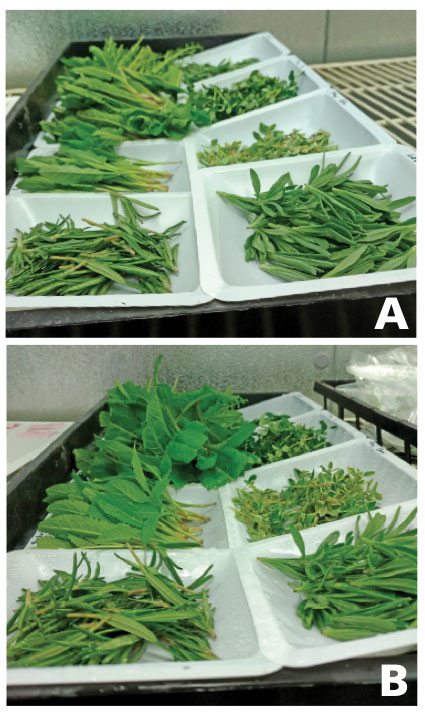 Pictured: With just 24 hours of added humidity in the cooler, these cuttings went from dehydrated (A) to hydrated (B) and this grower was set up for success.
Your goal is to minimize the time from box to bench. If you need to store them for a day or two, store them well. If they’re going in the cooler, make sure it’s the right temperature. Also, consider hydration in the cooler using a standard humidifier. Research has shown that the URCs can be up to 20% dehydrated when they arrive. A well-hydrated, turgid URC leads to significantly more uniform rooting and research trials prove this definitively. And uniform rooting reduces losses. As related to storage, try to avoid storage below 45F (7C), although some crops shouldn’t go lower than 60F (15C). Know your crops and how they need to be stored.
Sticking
Also related to storage is which crops need to come out of storage more quickly than others—your priority stick items. Some species are more ethylene- (or storage-) sensitive than others. A couple prime examples are geranium and lantana. Get these out of storage and onto the bench as soon as possible or you’ll be behind the eight ball before production even begins. Others to prioritize include thunbergia, euphorbia, purslane, heliotrope and high-essential oil crops like lavender, rosemary and mint.
When sticking, you want to do your best to minimize stress on the crop. Stress can lead to breakdown and loss. Pay close attention to temperature when sticking, as improper temperatures and durations will compromise plant health. Poor temperature management also allows for disease and physiological disorders like abnormal growth.
Propagation Stage 1
Now let’s move into the propagation house and tackle Stage 1 in the process. This begins at the moment your cuttings are stuck and ends when the cuttings form calluses. It can be anywhere from three to eight days, depending on the crop and conditions. Your goals during Stage 1 are to hydrate, optimize root generation and minimize nutrient loss. Much of the success or failure comes down to environmental management.
You and your team should be shooting for air and soil temperatures between 68 and 75F (20 and 23C) depending on the crop and low light intensity between 4 and 5 DLI. You want high humidity (low VPD) and minimal air movement. Soil should be at a Level 4 (not saturated) using fine mist or fog, and you can start feeding via mist in Stage 1.
Propagation Stage 2
Once calluses form on the cuttings, Stage 2 begins and continues until plant roots initiate and reach the edge of your propagation cell. In this stage, your goal is to develop roots and aggressively wean your crop from mist. Plants under mist too long will encounter delayed development. In fact, plants shouldn’t be under night mist during Stage 2. Mist in the morning and during the day when the sun is out, but as the plant gets older mist is only recommended as needed.
In terms of environment to minimize stress and grow roots, soil temperature can remain the same as Stage 1, but air temps can come down a few degrees. Light intensity can come up a bit to 6 to 8 DLI. Plants will need to be fed at this stage, shooting for 75 to 150 ppm nitrogen. Since roots are beginning to develop, you can rely on foliar, as well as root uptake. Just be careful with the ammonium-to-nitrate ratio in your feed of choice. Moisture at the presence of roots should be reduced in Stage 2. Pop some plants out of the cells and examine for roots at this stage. You might also want to consider a fungicide at this stage to reduce the risk of Botrytis and other diseases.
Here’s a quick reminder on what nutrient deficiencies can look like in Stage 2, leading to slow rooting, poor branching and overall low vigor. First off, your cuttings should be green. If you see yellowing, it could be an issue with nitrogen, sulfur, iron or manganese. If you see purpling, it’s most likely a phosphorus deficiency. Check your levels regularly, and as always, walk the crops because you can visually detect most fertility issues.
Propagation Stage 3
Heading into Stage 3, you need to begin thinking about the goals: building root mass, enhancing branching and toning growth. Environmentally speaking, air and soil temperatures start to decrease to around 68 to 70F (20 to 21C); light intensity increases to 8-plus DLI and your humidity continues to decrease.
Finally, you can begin to increase air movement with fans, which your staff will no doubt appreciate (as well as the plants). Keeping the air stirred up will reduce stratification and help roots build, but try to keep foliage from moving with the movement.
Stage 3 is where irrigation management becomes quite important. Watering up to a Level 4 (not saturated) and drying down to a Level 2 (not void of water) is the name of the game when it comes to driving root growth. In terms of fertility, feed is required, but be careful of your ratios again. Try a 13-2-13 or similar feed. Watch for pests and diseases in this stage, and here is also where many of you will begin PGRs. But remember your goal is to tone and prevent stretch, so don’t apply so much as to restrict the growth of your crop.
Propagation Stage 4
This stage is all about toning the plant and building the structure for safe transplanting. Remember, you’re manufacturing a crop using processes and protocols. Follow the checklist from the first three stages, continue to decrease temperatures and increase light to 10-plus DLI using supplemental lighting. Humidity continues to decrease and air movement can increase. Toning is improved with careful fertility (still limiting ammonium) and hitting your Level 4 to 2 watering plan.
PGRs become more critical in Stage 4. Remember you want to tone, reduce stretch and minimize overlap, which can lead to disease. If you apply too much, growth will be limited at the time of transplant and the crop will just sit there and not take off like you want. And if you plan to pinch the crop, perhaps hold off on the PGRs until after the pinch so you keep the branching intact. There are many excellent PGR resources available. (Check out the GrowerTalks Plant Growth Regulators for Annuals special edition for a comprehensive rundown.)
As you head into the 2022 production season and prepare to receive the first boxes of cuttings, start thinking through the steps you and your team will take to achieve success. It’s like the old adage: how do you eat an elephant? One bite at a time. Propagating plants might seem different, but think about it—it’s just like eating an elephant. GT