10/1/2020
Growing Know-How
Jennifer Zurko
Extend Your Lavender-Selling Season
By Karl Batschke, Darwin Perennials
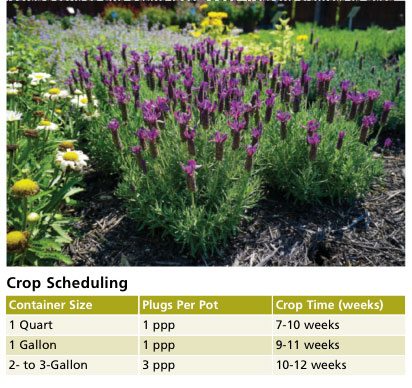
The new Primavera is a game-changing, breakthrough Spanish Lavender. It has a unique no-chill requirement that provides growers a lavender crop that can be scheduled as the earliest vegetative Spanish lavender on the market. It’s also ever-blooming: start it in spring and enjoy flowers even through the heat of the summer.
As for gardener appeal, Primavera is topped with large burgundy flags on purple flowers. They’re fragrant, vibrant and attractive to bees and butterflies. With the rise of the “lavender lifestyle” among today’s consumers, greenhouses can provide access to lavender plants all year long with this versatile variety.
Propagation
Upon receipt, unrooted perennials should be stuck as quickly as possible using a rooting hormone 500 ppm IBA with a media EC at 0.75 to 0.80 mmhos and pH at 5.8 to 6.2. Provide a root zone soil temperature of 70 to 72F (21 to 22C). L. stoechas prefer high humidity rather than mist, so keep mist settings low; do not oversaturate the rooting media. Start a 50 ppm N feed at Day 7. A pinch is recommended after roots are established, leaving four to five active internodes. Remove flowers in propagation to encourage plant growth.
Finishing
Transplant Primavera 42 to 56 days after sticking. Maintain media pH at 5.8 to 6.2 and provide light levels at 5,000 to 8,000 f.c. No vernalization is necessary—Primavera is daylength neutral. Use a balanced fertilizer at a rate of 100 to 125 ppm. Monitor humidity and moisture, allowing media to dry slightly between watering.
Temperatures for finishing Primavera Lavender—Day: 65 to 76F (18 to 24C); Night: 56 to 64F (13 to 18C).
Making a final pinch eight to 10 weeks before flowering will help increase Primavera’s flower count as you get it ready for retail. Plant growth regulators are generally not needed to control habit.
Groovy Series
Begonia boliviensis
By Jen Calhoun, Ernst Benary of America
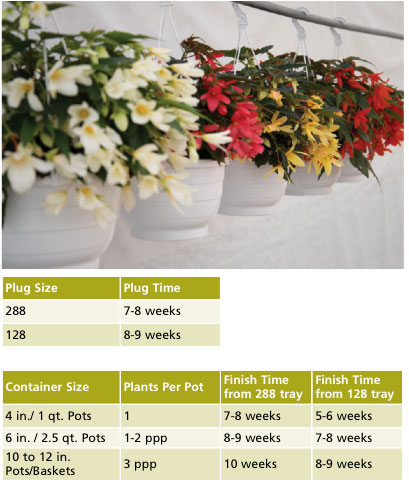
Begonia boliviensis are perfect for “novice” gardeners who want bold color that’s easy to grow in containers and baskets. Benary’s newly introduced Begonia Groovy Series takes it to the next level with vivid colors and a mounded, well-branched habit.
Groovy provides an amazing show of color all season and is easier to ship! Their huge, bell-shaped flowers rival vegetative varieties, yet Groovy Begonias are from seed, so you don’t have to worry about bringing in cuttings. Best of all, Groovy Begonias are low maintenance once established, so even the most novice gardener can be an instant success with them.
Groovy Begonias, like all tuberous begonias, are obligate long-day plants that require photoperiod of >13.5 hours (minimum 2 to 20 µmol·m-2·s-1) during germination, throughout production and for flowering. A five-hour night interruption (10:00 p.m. to 3:00 a.m.) can also be used. Warm nights (>57F/13C) are also important throughout production to avoid tuber formation.
Germination
Sow one Groovy pellet per 288 or 128 plug, uncovered in a well-drained growing substrate with a pH of 5.5 to 5.8 and EC<0.5. Use only tempered water (>64F/17C) to completely saturate substrate (moisture level 5) and maintain temperatures between 72 to 74F (23C) (70F/20C substrate temperature) until radicle emergence. Temperatures exceeding 80F (26C) will inhibit germination. If pellets start to dry out, they won’t crack open. Be sure to watch chamber, cover trays or run booms frequently to keep substrate completely saturated seven to 10 days until radicle emergence. Avoid too much water volume or pressure, which can dislodge seedlings.
Plug bulking & flower initiation
On Day 11, dehumidify to 60% and reduce temperature to 68 to 70F (20 to 21C), then start feeding at 50 to 60 ppm N, using more ammonium under higher light, but avoid high salts. Maintain a consistent wet (4) to moist (3) cycle, and by Day 21 (cotyledon expansion) dry out more between waterings with a wet (4) to medium (2) cycle. A good wet-dry cycle will aid rooting and prevent algae formation on the substrate.
DLI at this point can be increased to 8 to 10 mol·m-2·d-1 and fertilizer increased to 50 to 100 ppm N. Keep temperature around 68F until the four to six leaf stage when roots reach the bottom of trays and flower initiation occurs. Plugs are responsive to 2 to 3F DIF or a one-time spray of Cycocel (chlormequat chloride; 250 ppm) or B-Nine (daminozide; 500 to 750 ppm) if needed for control.
Scheduling
Total crop time from sowing is 14 to 18 weeks, depending on growing conditions and container size.
Growing on
When finishing Groovy Begonias, be sure to transplant with the leaf tips pointing outwards in their final container. Continue to provide long days (>13.5 hours) and warm nights (>57F/13C) throughout production to avoid tuber formation and keep plants flowering. An ADT of 67F (19C) after transplant will provide the fastest crop time, but temperatures can go as low as 65F (18C) for the first two weeks and down to 60F (15C) thereafter for toning without any crop delay. A DIF of 2 to 3F or Cycocel (chlormequat chloride; 250 ppm) can be sprayed one time two weeks after transplant for control.
Always ensure adequate spacing and airflow, and maintain 40% to 60% relative humidity with good ventilation and horizontal airflow. EC should be 1.0 to 1.5 during finish, alternating between calcium and ammonium fertilizers at 100 to 150 ppm N. Tall, stretched plants with few flowers indicate too much ammonium and stunted, chlorotic plants with marginal leaf burn indicate a lack of Ca and Mg. Potassium nitrate can help keep plants more compact and is also helpful to apply 100 ppm prior to shipping. Always keep EC at 1.5 or less to avoid root damage.
Daylength extension is required to keep plants above their critical photoperiod of 13.5 hours, until natural daylength exceeds this, which can vary greatly based on latitude. Only minimal lighting of 2 to 20 µmol·m-2·s-1 is required for a response. Ideal DLI for the highest quality and fastest crop is 10 to 12 mol·m-2·d-1. If light levels exceed this, signs of marginal leaf burn may begin to show. Always make gradual changes to light levels to avoid stress response.
Finished plants can tolerate higher light levels if heat and humidity aren’t too severe. In southern climates, it’s recommended to grow and display these in partial shade (50% to 60%), while in some dry northern and western climates, these plants can tolerate full sun all summer long. Any temperatures <57F (13C) will delay growth and stop plant from flowering, as all energy will be directed towards tuber formation.
Low fertilizer rates and high light can bronze foliage. Always water early in the day and avoid overhead irrigation.
F1 Artisan Collection: Elevating Seed Echinacea
By the PanAmerican Seed Tech Team
Finally! Individual colors in echinacea from seed are available thanks to the innovative Kieft Seed perennials breeding team. The Artisan Collection are the first F1 hybrids available for the industry and launches for retail 2021 with two varieties: Red Ombre has flowers that open in shades of red and scarlet that soften with age. Soft Orange opens deep orange and lightens as flowers mature. Both will have 3- to 4-in. diameter blooms that will last three to four weeks.
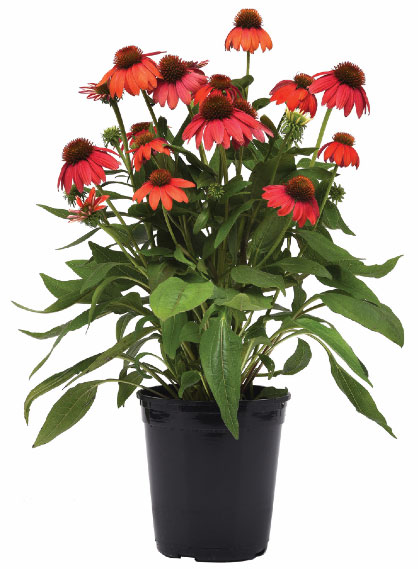 Comparing these introductions to award-winning Cheyenne Spirit, Artisan are consistently more uniform in production with fuller, well-branched plants. This means more flowers at time of sale. The winter hardiness is amazing, with exceptional overwintering in Zones 4a to 10b. Gardeners will appreciate the great selection of birds, insects, butterflies and other pollinators that will visit these amazing varieties in their perennial garden.
In production, you’ll see a more uniform development of the crop. PanAmerican Seed offers 85% germ standard minimum. Plug crop time is five to six weeks, while transplant to finish can be anywhere from 13 to 17 weeks after transplant (depending on the season being produced).
Plug culture
Artisan Echinacea are offered in an amplified seed form. Through PanAmerican Seed’s proprietary process, amplified (AMP) seed is enhanced for faster and more uniform germination. Sow 1 seed per cell in a recommended 288- or 72-cell plug tray and cover the seed. It germinates at 71 to 76F (22 to 24C) and takes four to 14 days for emergence. Light is optional. Maintain an initial media pH at 5.8 to 6.2 and EC of 0.75 mmhos/cm during plug production. Keep moisture high at Level 4 for Stage 1.
During Stage 2, provide moisture at Levels 3 to 4 with temperatures at 71 to 73F (22 to 23C). Set light 5 to 8 mol·m-2·d-1. Apply fertilizer less than 100 ppm N, less than 0.7 EC. Lower temperatures to 68 to 70F (20 to 21C) during Stage 3. Adjust light to 10 mol·m-2·d-1 and fertilizer at 100 to 175 ppm N. Set moisture between Levels 2 to 4.
In Stage 4, maintain moisture and fertilizer levels from Stage 3, but lower temperatures to 65 to 67F (18 to 19C). Provide light at 10 to 15 mol·m-2·d-1.
Forcing protocol
Produce plugs or liners to the two fully mature leaf stage, then begin short-day conditions. Continue short-day conditions (12 hours or less) until plants reach at least seven fully mature leaves. (NOTE: Our Perennials Forcing Guide offers additional notations on scheduling echinacea to meet various sales opportunities. Visit panamseed.com to download the guide.)
Growing on to finish
Finish plants in a trade gallon container with 1 to 3 ppp. Temperatures for finishing Artisan Echinacea—Day: 65 to 75F (18 to 24C); Night: 60 to 65F (16 to 18C).
The target media pH should be 5.8 to 6.5 with an EC of 1.5 to 2.0 mmhos/cm. Apply feed at a rate of 175 to 225 ppm N, 1.2 to 1.5 EC. The best plant structure comes with first short-day conditions to bulk the liners prior to long-day treatment after the mature leaf stage (natural or extended). Bulking can take place in the liner or finish container.
Vernalization isn’t needed, but is beneficial to echinacea. Too-wet soil during overwinter production can result in root rot and uneven plant development. Bark media is recommended for best drainage and to minimize powdery mildew.
Because they’re from seed, Artisan offers flexibility in production scheduling and labor management. There’s no need for special handling of seed that’s typically required for tissue culture to prevent input shipping damage. Seed is easy to store and accommodate for labor scheduling, too.
Seed offers flexiblilty in scheduling to meet a variety of market dates. Production can be based on when it fits with the grower’s schedule and retail sales dates—not based on when live material arrives. The uniform nature of the new Artisan Echinacea collection is also a huge plus for growers who bench-run first-year flowering perennials for easy shipping.
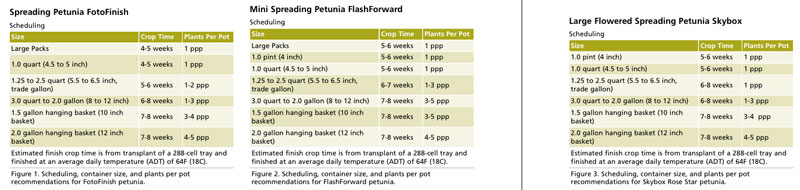
FotoFinish, FlashForward and Skybox Spreading Petunia
By Alicain Carlson, Ph.D. and Jamie Gibson, Ph.D., Syngenta Flowers, LLC
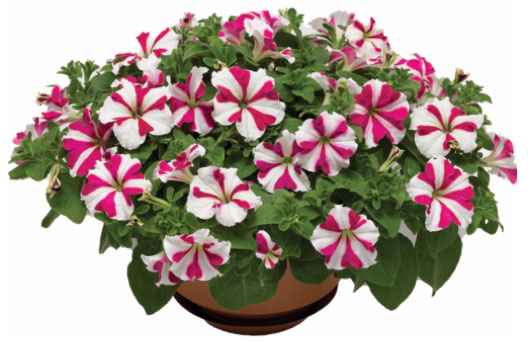
Syngenta Flowers has a spreading seed petunia for every need. FotoFinish, FlashForward and Skybox are the newest additions to the lineup and are proving to be MVPs. While they vary in their flower size, habit and vigor, they all have tremendous flower power, grower-friendly culture and outstanding garden performance that will keep your customers coming back for more.
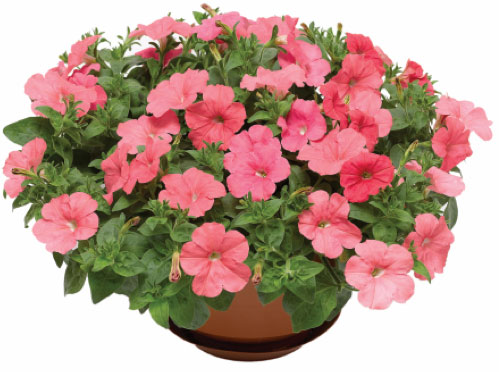 FotoFinish, FlashForward and Skybox are all spreading petunias, but they present themselves in the garden differently. FotoFinish and Skybox are mounded and well-branched petunias that have similar garden specifications of 10- to 14-in. (25- to 35-cm) tall and 24- to 28-in. (60- to 70-cm) wide; FlashForward, a more prostrate growing petunia, has a similar diameter to these petunias, but is shorter at 8- to 10-in. (20- to 25-cm) tall. Skybox displays the largest flowers (~2.5 to 3 in.), while FlashForward flowers are the smallest (~1.0 to 2.0 in.), FotoFinish flowers are in between at approximately 2- to 2.5-in. wide.
Propagation
All three of these series are propagated similarly, just like other petunias on the market. We recommend sowing seed into a 288-cell tray with 1 seed per cell. Water in the trays well to completely dissolve the pelleted coating on the seed. It’s always good to make sure you see it has dissolved.
During these germination stages 1 and 2, keep the substrate moisture at level 5—SATURATED: soil is dark brown and shiny, free water is present at the surface of the soil, water drips freely from the bottom of the tray, and trays are heavy with a visible bend in the middle. Media temperatures should be between 72 to 76F (22 to 24C). You should see germination in three to five days. Using a germination chamber is optional. Seed cover isn’t recommended, as light is required for germination of petunia, but a light vermiculite coating will help maintain moisture levels in drier climates while still allowing light penetration.
 During young plant production stages 3 and 4, the temperature can drop slightly to 66 to 68F (19 to 20C) average daily temperature. Petunias are facultative long-day plants, so day extension lighting up to 14 hours daylength is beneficial. Providing long days in the plug stage will reduce overall time to flower. A light intensity of 2,000 to 3,000 foot candles (400 to 600 micro mols) and daily light integral (DLI) of 10 to 12 mols/day is ideal.
Media should now be allowed to dry between irrigations. Alternate between moisture level 2 and 4, where 2 is MEDIUM: soil is light brown in color, no water can be extracted from soil, and soil will crumble apart. And 4 is WET: soil is dark brown, but not shiny, no free water is seen at the surface of the soil, when pressed or squeezed water drips easily, and trays are heavy with a visible bend in the middle. The media pH should be maintained between 5.5 to 5.9 and EC measured by SME between 0.9 to 1.3 mS/cm. We recommend feeding with 75 to 125 ppm Nitrogen. Low boron levels can induce tip abortion, so keep an eye on the nutrition of your plugs.
Some growth regulation may be needed. Petunia plugs are responsive to B-Nine WSG plant growth regular sprays at 1,500 to 2,500 ppm. Spraying an uneven plug tray with B-Nine WSG at 1,500 ppm may help even the growth in the tray. Pinching isn’t recommended during propagation. Your plugs should be ready to ship and transplant into the finish container in four to five weeks from a 288-cell tray.
Finishing
Finishing of these three petunia series is also very similar. Transplant plugs directly into the finished container. Place the rooting media slightly below the level of media in the container. (For plants per pot recommendations for each series and pot size, see Figures 1 to 3 for each series.) Pinching isn’t recommended or needed.
Petunias should be grown at an ADT of 64F (18C) with 68 to 70F (20 to 21C) day temperatures and 58 to 60F (14 to 16C) night temperatures. Early morning DIF treatments will help to keep plants more compact. Day extension lighting is beneficial to 14 hours. Providing long-day lighting during short days will shorten time to flower, as petunias are facultative long-day plants. Aim for light intensities between 4,000 to 6,000 foot candles and a DLI of 14 to 16 mols/day.
Media pH of 5.5 to 5.9 and EC of 1.5 to 2.1 mS/cm (via SME) or 2.3 to 3.2 mS/cm (via PourThru) values are optimal. Feed with 125 to 175 ppm Nitrogen. Media should be allowed to dry between irrigations by alternating between moisture levels 2 and 4. Common pests to prevent and scout for are thrips and aphids, and common diseases are Botrytis and Rhizoctonia.
It’s best to be proactive in applying PGRs on petunias. Anticipate changes in weather or other conditions that can cause plant stretch and apply PGRs before plant stretch begins. In general, petunias respond well to B-Nine WSG sprays. Do not apply B-Nine WSG after bud formation or flowers may reduce in size and/or become distorted. Bonzi drenches during later stages in the crop will reduce stretch and won’t affect flowering as much as B-Nine WSG. Providing cool temperatures, high light and “growing on the dry side” will help keep petunias more compact without reliance on chemistries. Early morning DIF treatments also help. See the following sections for rates specific for each series.
FotoFinish specifics
Use B-Nine WSG sprays at 2,500 to 3,500 ppm early on FotoFinish. Bonzi drenches at 1 to 2 ppm during later stages in the crop are effective.
FlashForward specifics
FlashForward is a genetically compact petunia, so will need less PGRs than the other petunias. It’s well-controlled with B-Nine WSG sprays at 1,500 to 2,500 ppm. Use Bonzi drenches at 0.5 to 1.0 ppm during later stages in the crop.
Skybox specifics
Similar to FotoFinish, Skybox Petunias respond well to B-Nine WSG sprays at 2,500 to 3,500 ppm. Bonzi drenches at 1 to 2 ppm during later stages in the crop will help reduce stretch as the crop nears finish. Skybox is the least daylength-sensitive petunia series of the three we covered in this article. It will flower consistently and reliably under very short days (9.5 hours daylength) to long days (13.5 hours daylength). The star pattern on Rose Star is also very stable across daylengths, which is a challenge for many other star-patterned petunias.
Postharvest
Petunias, in general, are notorious for their flower meltdown at retail due to the stressors of shipping. For best postharvest quality and longevity, apply Chrysal Alesco as flowers first begin to open to help protect plants from ethylene build-up during shipping, so they have more color at retail. If two or more weeks will pass between first color and shipping, apply Chrysal Alesco again one to two days before shipping for maximum protection. Protecting the flowers during shipping also helps to prevent secondary Botrytis infection that’s known to occur on the prematurely senesced flowers of untreated plants.
Cannova Canna: Cover it Up!
by Jessica Cudnik, American Takii
 Seeds are magical. They vary in size, but hold life in their teeny, tiny form. They’re the embryo of a new plant, they’re their own energy source and they remain dormant until certain measures are met to start germinating. Breeders, researchers and growers spend a lot of time and resources catering to and understanding the needs of seeds. We want them to germinate quickly, uniformly and robustly.
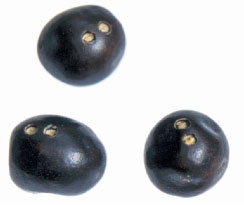
Pictured: Takii invented the process for laser scarification for our seed and you can see that through these two holes water imbibes more easily, leading to improved germination rates.
This was the motivation for running a seed germination test on Takii’s Canna Cannova. Part of the work of striving for the best technology and protocols for our customers are trials and experiments. We were testing for several variables ... but a funny thing happened along the way. One outcome that was revealed over all of the different treatments, was something re-learned from age-old practices—cover your seeds.
Covering seed isn’t something we recommend for all seeds (for example, if you know that the seed prefers light to germinate), but for Canna Cannova seeds … cover it up! As the saying goes, “you should cover your seeds two to three times their width or diameter.” For canna seeds that are black to brownish, large, round and average 1/3 in. (8.47 mm) wide, you’d want to cover two to three times that.
Takii invented the process for laser scarification for our seed and you can see that through these two holes water imbibes more easily, leading to improved germination rates. Covering the seed helps keep the surrounding area moist with the growing media. During our experiment, we took 500 seeds of Cannova Yellow and 500 seeds of Cannova Red Shades. We asked three locations (The University of Georgia, Raker Roberta’s Young Plants and Gro ‘N Sell) to do a covered and uncovered treatment, and to also do a bench and chamber germination. Counts were taken on Days 3, 5, 7 10 and 15 to calculate germination percentages and track the experiment’s progression.
The results from all three locations showed that no matter the difference in vigor of the color, or location of bench or chamber, covered had significantly better germination than uncovered.
We can see in the photos from The University of Georgia the difference between chamber uncovered and chamber covered. Chamber covered shows a higher percentage, more even and faster germination. Also, when large seeds like Canna Cannova are uncovered even if germination takes place, there could be more unusable transplants as the seedlings push out of the cell instead of being anchored securely in the plug cell. Having a solid planting and high humidity makes more usable transplants at the end of 15 days.
The Takii culture on Canna Cannova recommends chamber/covered for optimal outcome, but not every location has a chamber. It’s good to see that even bench germination works, especially if you cover the seed to the recommended depth. In these charts from data collected at Raker Roberta’s Young Plants, we can see that the average difference in germination percentage between covered and uncovered seed is 56%.
We’re still testing other techniques that will further help with optimum germination and plug growth, but at a minimum, covering the seed is still the way to get the best germination. We love new technology, and new protocols have led to some major breakthroughs with germination and plug production, but starting from a solid foundation of tried-and-true methods leads to a great base from which to jump off of into to new and noteworthy protocols.
Canna Cannova culture guidelines
Crop Time: 14 to 16 weeks from sow
Plug stage: Sow seed into large plug type—128-, 144- or 50- cell trays. Cover seed deep into cell cavity up to ½ to ¾ inch in depth.* For best results, place trays into warm chamber with a sustained temperature of 75 to 78F (23 to 25C) and 80% humidity for up to five days or until such a time that emergence is visible. Keep moisture levels high throughout the germination process. Once removed from the chamber, place trays onto bench and maintain good moisture levels.
(*Media cover is best.)
Plug finish time: 4 weeks
A special thanks to The University of Georgia, Raker Roberta’s Young Plants and Gro ‘N Sell for their part in conducting these trials.

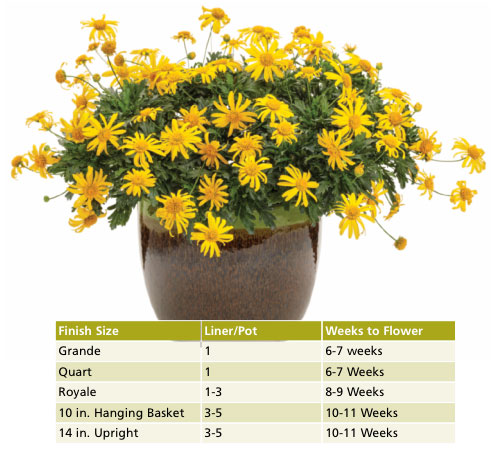
High Noon Euryops pectinantus
By John Gaydos, Proven Winners
To the majority of gardeners in North America, euryops is a completely foreign genus. Originating in South Africa, this genus is true to many characteristics of plants from that region. It’s sun-loving, drought-tolerant and can be quite shrub-like, growing 3- to 5-ft. high and up to 4-ft. wide in some cases.
 Euryops is grown as an annual in the majority of the U.S. and Canada; however, it’s hardy in Zones 8 to 11 and responds well to pruning, which means it can be maintained as a flowering perennial in warmer zone gardens, just as it is in its native land.
The gray-green foliage is deeply lobed, similar to that of a fern. And its common name, Golden Shrub Daisy, is quite fitting, since the plant is covered in bright yellow, daisy-like blooms with single petals around a large golden eye. Since its discovery, euryops has been distributed around the world and has found its way into North America due to its prized heat and drought tolerance.
Proven Winners has been trialing High Noon Euryops the past three years in multiple trialing sites and temperature zones. The improvements of High Noon over the existing common garden variety of euryops are extensive. High Noon is much more compact and has a better branched habit than the original form. Due to the improved branching, the flowers appear in a tighter and more colorful mass. The flowers are bright yellow and approximately 1.5- to 2-in. long.
Additionally, High Noon Euryops is daylength neutral, so it will bloom from the beginning of spring throughout the fall. Having its biological roots in South Africa, the nutrient demands of High Noon are low; it isn’t a heavy feeder and it does well in the landscape, as well as in hanging baskets as a thriller or in larger containers as a filler.
Cultural requirements
pH and EC: 5.8 to 6.4/0.6 to 0.9
Fertility rate: 150 to 200 ppm
Light levels: High
Watering: Moderate to moist to grow; in landscape, dry to moderate
Rooting temp: 65 to 72F (18 to 22C)
Growing temp: 65 to 72F (18 to 22C)
Holding temp: 40 to 50F (4 to 10C)
Pinching: 2 weeks after transplant
Vernalization: N/A
Natural dayflower: Daylength neutral
Growing tips
High Noon Euryops prefers as much light as it can get—the brighter the better. Air circulation and humidity control is important for disease management, and good leaf and bud expansion. As with most soft-foliaged plants in the greenhouse, aphids and mites could be problematic; constant scouting is advised. Although High Noon can be grown dry, this grower tactic will increase crop time, so we advise using this strategy only when holding the plant prior to sales. No PGRs are needed to produce a saleable flowering container, provided that the cultural tips above are followed.

Golden Sunset
Sorghastrum nutans
By Josiah Raymer, Emerald Coast Growers
You might know sorghastrum for the native’s classic sweeps and masses, but varieties like Indian Steel have made a new name for Indiangrass in the garden. Now, an even newer selection, Golden Sunset, caught our eye enough to take it to trial at both our south and north locations. Its performance went beyond even our expectations.
Golden Sunset shines for many reasons, but the main one for me is its extreme earliness—as much as four weeks before any other Sorghastrum nutans. Most start flowering in late summer, but Golden Sunset begins to show blooms by late spring. When it does, those blooms are large, densely packed, striking burnished bronze plumes held high and tight above olive-green foliage.
Which brings me to my next favorite feature of Golden Sunset—its upright, tight, columnar habit with no breaking or opening up. This Indiangrass reaches about 60 in. at maturity, but spreads to only 2.5 ft.
The best spot for Golden Sunset, like all sorghastrums, is the landscape. It would, of course, make a very showy, short-term statement in an extremely large planter, but you’ll get the most out of it as a vertical accent in the background, as a screen or in beds or masses. Like the species, it could also work well for erosion control.
Golden Sunset also offers a bit of winter interest, with leaves that turn slightly yellow starting in fall and panicles that mature to a paler bronze. A perennial and warm-season ornamental grass, it will flower in the first year without vernalization. Like most sorghastrum, it’s not a good candidate for forcing. Golden Sunset prefers full sun and is hardy in USDA Zones 3 to 10.
Planting: Plant one liner (size 38, for example) per 1 gallon trade pot using a medium with good drainage. (Can also be produced in 2 or 3 gallons if desired—increase by 1 liner per each pot size.) Apply a broad-spectrum fungicide drench at liner planting.
Finish time for spring sale: Sorghastrum Golden Sunset finishes in approximately eight to 10 weeks for a 38-cell liner.
Growing media: Choose a well-drained, fertile commercial growing medium.
Light: Provide high light levels (5,000 foot candles or more). Supplemental lighting generally isn’t necessary.
Growing temperature: Aim to keep greenhouse temperatures during the day at 65 to 75F (18 to 23C). At night, maintain temperatures in the range of 55 to 65F (12 to 18C).
Soil pH & EC: Maintain electrical conductivity (EC) at 0.8 to 1.2 mS/cm using the 2:1 extraction method. Keep pH at approximately 5.8 to 6.2.
Pinching and PGRs: No pinching is necessary and PGRs generally aren’t necessary.
Fertilizing: Provide a liquid feed at low levels of 100 to 150 ppm nitrogen or a slow-release fertilizer at 10 to 15 lbs. of nitrogen per yard.
Moisture level: Allow plants to dry between ample waterings. Sorghastrum has a medium tolerance to drought or dry soil, so keep soil evenly wet.
Pest and disease: Pests generally aren’t a problem for Golden Sunset. In trials at our Florida and Pennsylvania locations, we didn’t see disease or insect issues. Of course, we always recommend following a standard preventive and sanitation program—manage humidity levels, maintain good air circulation, scout and monitor carefully and regularly. Use a preventive program, including monthly broad-spectrum fungicide sprays as well.
Overwintering: Ratchet back your fertilizer as you get closer to dormancy, but don’t cut it completely. You want the plant to finish, but not push new growth, so that its root system can begin storing energy for the winter. Liquid feed offers the most flexibility for this. Prevent root rot with a quick preventive fungicide drench. Cut plants back before winter—they’ll grow back just fine and you won’t have as much of a mess to clean up in the spring. Grasses can overwinter in cold frames along with perennials or under cloth in southern locations.
The Perfect Couple: Surfinia Purple Heart and Heartbeat Improved Petunia
By Delilah Onofrey, Suntory Flowers
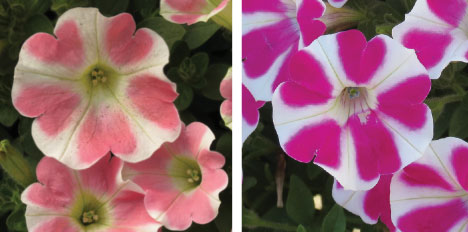 Heartbeat was a lonely heart petunia novelty in the Surfinia line for nearly five years. But now we have a companion, Purple Heart, and Heartbeat has been improved for overall performance, growth habit and five-heart pattern expression. Purple Heart brings new opportunities for patriotic sentiments and promotions. Both varieties lend themselves to Mother’s Day, but would require supplemental lighting for Valentine’s Day, a possibility for the south.
Both plants produce sweet, white flowers that are smaller than classic trailing Surfinias. Growth habit is more compact, mounding and then trailing, creating tidy hanging baskets. Combine the two together in the Surfinia Sweethearts Suntory Mixer, which is sold as unrooted cuttings kits. (I planted mine at home in early May and was still enjoying the baskets through September.)
When we introduced Heartbeat, we communicated how fluctuations in fertilizer and temperature affect the expression of the five-heart pattern. High temperatures and low fertility create whiter flowers and a reduced heart pattern. TLC tip: Consumers should fertilize throughout the summer to maintain their hearts.
 Sometimes, the first flowers are solid pink or purple. The next flush should show the heart pattern, unless there’s a sport or mutation, which can happen when thousands of plants are propagated.
We’ve also seen the effects of PGRs on the heart expression and no longer recommend Daminozide (B-Nine) within five weeks of the target finish date. Paclobutrazol (Bonzi) and uniconazole (Sumagic) are better options to retain the heart pattern. Bonzi is preferred, based on our trials.
General culture
• Surfinia Petunias are easy to root, three to four weeks on the bench.
• Rooted cuttings should be potted as soon as possible into 4- to 6-in. pots. One liner per pot is recommended using a well-drained peat/perlite mix.
• Surfinia’s branching habit makes an excellent 4-in. pot with a quick turn.
• Plants can be flowered easily and kept compact with PGRs. But Surfinia Heartbeat and Purple Heart are more naturally compact, and less vigorous and aggressive than the classic Surfinias.
Crop timing
• 4-in. pots: Four to six weeks from one liner with one pinch
• 6-in. pots: Seven to eight weeks from one liner with two pinches
• 10-in. baskets: 10 to 12 weeks with three liners and two to three pinches
Temperature: Crop temperatures should begin at 55 to 60F (12 to 15C). Then increase to day temperatures of 65 to 75F (18 to 23C) and maintain night temperatures at 55 to 60F.
Lighting: High light levels or full sun is encouraged.
Watering: Watering is key, as overwatering will lead to root rot. A little-and-often regime is encouraged when plants are young.
Feeding: Surfinias are heavy feeders and the use of slow-release fertilizer is recommended as they grow in addition to liquid fertilizer. Keep pH between 5.5 and 5.8. Maintaining adequate fertilizer is essential to create Heartbeat’s heart patterns. Too much fertilizer can lead to solid-colored pink or purple flowers, eliminating the white.
Growth regulators: Traditionally, Surfinia grows rapidly in high light and high heat. With Heartbeat being naturally compact, it will require less PGRs than other petunias. Bonzi is preferred to maintain the heart pattern. Sumagic is another choice. B-Nine is not recommended due to negative effect on heart pattern.
Pests and diseases: Key pests to monitor for include aphids, fungus gnats, shore flies, thrips and whiteflies. Diseases to prevent include Botrytis, Phytophthora, Powdery Mildew and Rhizoctonia.
Woodlander Series Phlox
By Jeff LaCourse, Dümmen Orange
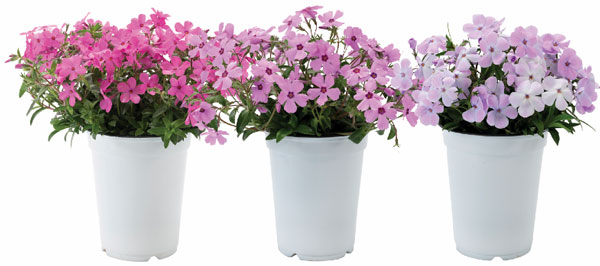 Dümmen Orange introduces the newest breakthrough in perennial phlox breeding to the North American market: the Phlox Woodlander Series. Woodlander varieties are a new interspecific hybrid that offers weeks of continuous flowering after traditional subulata types have finished and before the upright garden phlox come into the market. This series is the perfect bridge to provide consumers with phlox flowers from early spring through autumn and provide retailers with a groundcover phlox in color during the peak garden center months.
The innovative new interspecific series comes in four colors—Lilac, Pink, Rose and White, providing bright, fresh colors to enhance the garden for consumers in the spring season. The mounded and spreading evergreen plants are commonly used in mass plantings as a groundcover and border plantings. Individual plants also make stunning accents in rock gardens and water feature gardens. The evergreen foliage also provides an attractive groundcover look for the garden throughout the summer season.
Woodlander varieties are incredibly versatile and can take the harsh cold of a USDA Zone 4 environment, as well being grown in full sun or partial shade as an understory plant. The attractive evergreen foliage is covered with oversized flower clusters in spring, just as the traditional creeping phlox varieties go out of flower. This timing provides retailers with a full month of selling opportunities when garden centers are at peak traffic times.
Production scheduling
Woodlander varieties should be planted along with traditional subulata types in the summer months. Plants require vernalization or prolonged cooling to maximize flower power and performance. Woodlander varieties have enormous, oversized clusters of blooms for maximum impact at retail when given the proper chill.
Propagation
Phlox Woodlander roots very similar to Phlox subulata and only require one pinch in propagation. Use a well-drained media with an EC 0.75 to 0.80 mmhos and a pH of 5.8 to 6.2. Rooting is best with a soil temperature of 70 to 72F (21 to 22C). Using a rooting hormone is recommended at a 500 to 1,000 ppm IBA rate along with a moderate mist immediately after sticking. Provide plant nutrition 50 to 75 ppm N after roots are initiated. Liners are ready for transplant at approximately 35 to 49 days after sticking or about seven days after the first pinch.
Growing on to finish
Plants require a summer/fall bulking period of approximately seven to eight weeks prior to the area’s average first frost. Vernalization or extended cool period of growth is recommended for optimum flower development in the spring. Keep plants cool with an average daily temperature of 41F (5C) for six to eight weeks during the winter cooling period.
Recommended temperature for finishing in the greenhouse—Day: 55 to 60F (12 to 18C); Night: 40 to 50F (5 to 10C).
The finish container soil media should be pH 5.8 to 6.2, with light levels 5,000 to 8,000 foot candles. Plants will flower naturally in spring with no additional lighting requirements. Allow media to dry moderately between watering. Use a balanced fertilizer at a rate of 125 to 150 ppm.
If using pinched liners, no other pinching will be necessary for finishing. Woodlander varieties have a naturally dense habit, so PGR applications aren’t required. B-Nine or Sumagic may be used, however, for plant toning.
Crop scheduling
Best planted late summer to early fall outdoors in a 1-qt. or 1-gal. container, allowing plants to size up before the first frost. Plants should reach 70% of the ideal size outdoors before going into dormancy.
In greenhouse conditions, plants may be transplanted late fall to early winter and grown under cold conditions like Phlox subulata. Plants will finish in the greenhouse two to three weeks earlier than outdoors under natural conditions.
• 1 gallon—1 to 2 ppp recommended
• 1 quart.—1 ppp recommended
Cha-Cha Calibrachoa
By Laura Masor, Ball FloraPlant
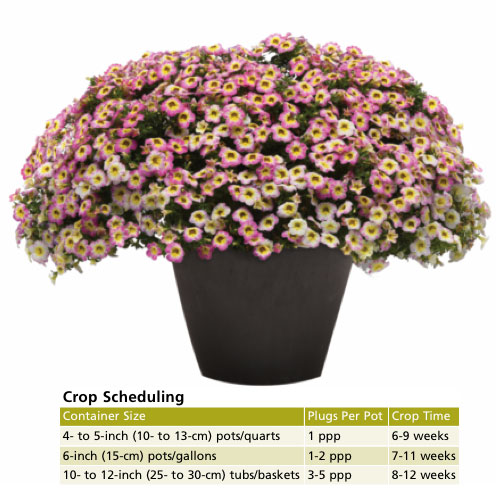
The new Cha-Cha series of calibrachoa from Ball FloraPlant meets your need for large-size hanging baskets and impressive mixed containers. The series launches with much excitement for spring 2021 retail sales with five varieties, including two novel, color-shifting types that are sure to be popular with consumers—Diva Hot Pink was the No. 1 variety among guests in The Gardens at Ball in West Chicago, Illinois this summer.
Cha-Cha is 25% more vigorous than Cabaret calibrachoa and features large, cascading blooms. This series is easy to produce and offers uniformity in size, plus an early flowering time.
 Propagation
Stick Cha-Cha cuttings into your cell trays (50, 72, 84 or 105 trays are appropriate) without the use of rooting hormone. Provide six to eight average days with mist, but avoid wide fluctuations in soil moisture for best results. Provide a pinch to the plants during propagation and apply a preventative fungicide drench at 18 to 21 days after sticking. Average propagation time is three to four weeks.
Growing on to finish
Temperatures for finishing Cha-Cha calibrachoa—Day: 71 to 76F (22 to 24C); Night: 50 to 58F (10 to 14C).
Maintain pH at 5.2 to 5.8 to optimize plant health and provide light levels at 5,000 to 8,000 fc. Apply a preventative broad-spectrum fungicide drench early (seven to 10 days after transplant) to minimize fungal growth. To assist its vigorous branching, Cha-Cha requires one to two pinches during the finishing stage.
Feed at a rate of 225 to 300 ppm N. However, avoid saturated media and excessive feed levels for best results. The cooler air temperatures and high light will reduce or eliminate any need for plant growth regulators as you finish Cha-Cha, but if plant growth regulation is required, use B-Nine 2,500 to 5,000 ppm; Bonzi (D) 3 to 8 ppm; or Florel (S) 300 to 500 ppm applied one time up to three times for large baskets to maintain habit as needed.
Crop times will be shortest as days lengthen in spring. GT