9/15/2010
Know & Grow
Various Industry Growers
Tips on Compost Tea
BY ROGER ROSENTHAL
Roger Rosenthal is managing grower for Elzinga & Hoeksema Greenhouses in Portage, Michigan.

Compost tea is a liquid solution or suspension made by aerating compost in water. It’s used as both a fertilizer and as a method to prevent plant diseases.
The use of actively aerated compost tea can be an effective tool in both an organic and conventional greenhouse. In an organic greenhouse using a living soil, compost tea supplies most of what is needed to grow and protect the plants. It’s not a practice that is limited to an organic growing program; it can also significantly augment a conventional spray program as well as reduce the need for other chemical usage.
One of the most important things when working with compost teas is to build as much microbial life into them as you can. The idea then is to spread that life throughout the greenhouse to cycle nutrients and suppress insects and disease. One of the first things to consider is the compost tea brewer that can supply plenty of diffused air evenly throughout the tank, since it’s the air cycling that forces the migration of microbes from the composted material into the tea water where they can begin multiplying exponentially. Sizing the brewer to the needs of your greenhouse is important. We send 250 gal. of tea per acre per week through our irrigation system. (You can find a lot of good advice about commercial brewers online and even instructions on building them from “scratch.”)
A high-quality compost or vermicompost is needed for the brew. Your tea will only be as good as your starting compost, so receiving a qualitative assessment of all the sets of beneficial organisms, as well as the range of diversity of the compost material is a must. It’s necessary to have the starting compost tested for how much and what types of microbes are present. Companies that do this type of testing are becoming more and more prevalent and can also be found online.
You also need to provide a food base, which will allow the microbes to multiply. Our recipe calls for 1 qt. of fish emulsion and 3 lbs. of kelp per 500 gal. of tea. With an organic system of living soil in the greenhouse, no additional organic fertilizer is needed; the tea acts as a stimulant for what is already in place. The actual brew time is dependent upon your needs. Brew time is usually no less than 24 hours. However, we have observed the addition of many more protozoa and beneficial nematodes when the brew time has been extended to 48 hours. This can have a fast-greening effect on your crops. Either way, it’s important that all tea be used no later than 4 hours after finalization of the brew process as the integrity of the microbial benefits begin to break down after 4 hours.
Once the tea is brewed, it’s then injected into the irrigation system and watered over the crops at a 3:1 water to tea ratio. It’s through this constant cycle of life that the nutrients the plants need are spun off. Also, with so many beneficial organisms and competition for space in and around the plants, insects and pathogens have a hard time taking hold and it keeps them from getting out of control.
A new idea we’re using to control specific pests is the use of biofungicides in our teas. For example, we can add the microorganism Bacillus subtilis to the tea at times of the year when powdery mildew and botrytis are prevalent. They will multiply with the rest of the microorganisms and can be irrigated over the entire greenhouse. This puts a specific organism out into the greenhouse working for us. Adding specific organisms to our compost teas also gives us options to proactively go after aphids, as well as root diseases.
The use of actively aerated compost tea has provided a cost effective and efficient way to grow greenhouse crops. Large numbers of microbes can be produced from relatively small amounts of compost or vermicompost. For example, a couple droplets of tea can contain as many as 3,000 to 5,000 microbes. Instead of a greenhouse being a sterile environment, which can allow pests to spread quickly, it can now be a fertile and biodiverse setting where beneficial life is abundant. This is what compost tea is all about.
GT
Pepper Pointers
BY STEVEN COURCY
Steven Courcy is a grower for D.S. Cole Growers in Loudon, New Hampshire.
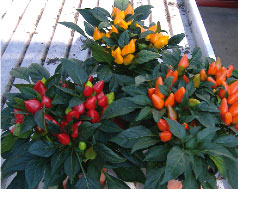
Ornamental peppers are a great summer and autumn crop. They are known for their bright, colorful fruit and sell well along with other ornamental vegetables, asters and mums. Here are some growing tips from our experience at D.S. Cole Growers:
Media. A fairly coarse, well-drained media will make it easier to keep the plants dry and help prevent fungal diseases.
Fertility/Irrigation. Ornamental peppers are moderate feeders. Constant feed with 200 ppm nitrogen. Maintain an EC between 1 and 1.5. Choose fertilizers to maintain a pH around 6.0. Overfeeding and overwatering peppers can result in excessive vegetative growth and reduced fruit set. We’ve had success with keeping peppers very dry to control their height. You’d be surprised to see the dry conditions a pepper can withstand!
Temperature. The trick to growing peppers is in the environment. They like high temperatures and high light levels. Temperatures should be kept above 70F (21C). Temperatures can be reduced to 60F (15C) to hold mature plants.
Light. Like any typical fruiting crop, ornamental peppers thrive on high light; it’s necessary to produce a high quality crop. One way to create the perfect environment is to grow the crop outside. This will provide high light along with cooler temperatures.
Timing. A crop of ornamental peppers fully colored will take 15 to 20 weeks from seed. A summer crop will finish three to five weeks earlier.
Diseases and pests. The biggest insect pest of peppers is thrips. A good thrips control rotation is essential for producing ornamental peppers. Peppers can also be targeted by aphids and by common greenhouse fungi like pythium and botrytis.
PGRs. A trial conducted at North Carolina State University shows good height control of ornamental peppers with Bonzi foliar sprays. Bonzi sprays under 20 ppm don’t reduce fruit number or affect finishing time. A foliar spray of Bonzi (10 to 20 ppm) can be used at five to 10 weeks into the crop to control tall and vigorous varieties. We find that applications of B-Nine can prevent flowers and fruit from emerging properly above the foliage canopy. PGRs cannot be used on peppers meant for consumption.
Varieties. Variety selection is an important part of growing any plant. Choosing a variety that matches your pot size and growing style can eliminate PGRs and the labor involved in pinching plants. Here are a few good varieties:
• Favorit series: A compact variety that is great in 4-in. pots. Fruits are medium sized and come in yellow, orange or red varieties.
• Calypso series: Similar to the Favorit series in fruit size and colors, Calypso is slightly larger and can be produced in 4- or 6-in. pots.
• Sangria: This is a unique variety with thin, upright purple fruits that finish red. It’s great for 4- and 6-in. pots. These varieties are also quicker to finish since the young fruit are just as attractive as plants with fully colored fruit. They have an interesting horizontal branching form.
• Calico, Black Pearl and Purple Flash: These varieties are unique because they have dark foliage. They are grown mostly for the foliage, but they do produce black fruits that eventually turn red. Calico has black foliage with a lot of white variegation, while Purple Flash has distinctly purple foliage and much less variegation. These varieties are much more vigorous than Favorit or Calypso and are more suited to 6-in. pots. These varieties may need a PGR to be produced in 4-in. pots. Many other good varieties are available, such as Salsa, Chilly Chili, Red Missile, Explosives and more. Just check the growth habit and match it with the pot size you need.
GT
Growing Leucanthemum hybrid Daisy May
BY DOMINIK NEISSER
Dominik Neisser is the head grower at EuroAmerican Propagators in Bonsall, California. For additional questions, Dominik can be contacted at dominik@pweuro.com.

The newest perennial to the Proven Winners line, Daisy May has loads of large, pure white flowers that cover the entire plant from spring through autumn, making a bold statement in the retail garden center. The generous branching and lack of strict vernalization requirements will please growers everywhere. Requiring night temperatures just under 40F (4C) when paired with short days to induce flowering, it’s a perennial that will be particularly advantageous for southern growers.
Crop scheduling. While Daisy May can be successfully planted for flowering throughout the year with the manipulation of light and temperatures, the ideal crop time begins in summer, when daylength temperatures still exceed 12 hours. Once daylengths begin to shorten past that point, the plants will begin to go into their vernalization stages, preparing for the next season’s flowering. This vernalization will be dramatically increased when night temperatures dip below 40F (4C).
If plants are brought in after the summer start date, they can be sized up in the greenhouse by keeping them in an artificial vegetative state with lighting (16-hour daylength) and night temperatures of 60F (15C). Growing plants in these artificial conditions may require the use of growth regulators to keep plants from stretching.
After plants are to size, the vernalization period of short days and low night temperatures will be required for four to six weeks. Bringing plants out of the vernalization state and putting them under long days for flowering can be staggered for a longer selling window. For ideal flower size and plant quality, bring plants out of vernalization with 16-hour daylengths (or 4-hour night interruption) and day/night temperatures of 75F/65F (23C/18C).
Using these scheduling techniques, Daisy May can also be brought into flower during autumn and winter months with the use of black cloth during the summer months and daylength extension in the winter.
Fertilization. As with all leucanthemum varieties, Daisy May is a heavy feeder and requires a constant liquid feed of 200 ppm N. During the vegetative bulking stages, it’s beneficial to use a nitrogen-dominated fertilizer. Prior to vernalization, an increase in potassium will help harden the plants for dormant conditions. During the vernalization period, it’s important to observe the salt levels in the soil medium. A proper EC should be between 1,800 and 2,400 microsiemens. After vernalization during flower production, move to a fertilizer with a higher phosphorus concentration.
Pests and diseases. During the hot summer months, leucanthemum is a target for aphids. Because of the overly dense habit of Daisy May, it’s better to use preventative drenches with systemic insecticides in late spring and early summer. Also, as with all members of the composite family, open flowers of leucanthemum will be a continuous aim for thrips. A frequent check during summer weather is advised.
Plant maintenance. The most important maintenance for leucanthemum is deadheading. This will extend the selling season for the plants and improve the quality of newly developing flowers. Removal of dead or damaged leaves is also important to avoid fungal infections in the plant. The rapidly growing habit will quickly cover areas that have been cleaned.
Grower’s tip. The roots of Daisy May are particularly bulky in the containers. Holding the plants too long or in the same container can cause root-bound plants, leading to root rot. After a sales season, leftover plants should be shifted into larger containers immediately.
GT
Growing Buzz-Worthy Black Velvet
BY JIM KENNEDY
Jim Kennedy is a sales manager for Ball FloraPlant based in West Chicago, Illinois. For more growing information, or to watch the latest culture videos, visit www.BallFloraPlant.com.
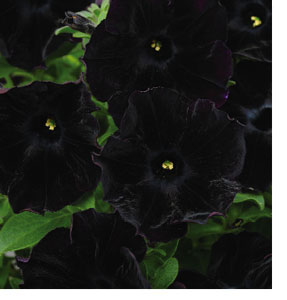
Home gardeners seeking the unique will find it with the 2011 introduction of Petunia Black Velvet from Ball FloraPlant. This first, true-black petunia—along with companions Phantom and Pinstripe—can increase the drama in mixed container applications.
Whether selected for its unique black color to stage a garden’s tone, or for its ability to make other plant colors pop off its velvety backdrop, providing the best plant habit and show of color are keys to success.
Best practices. For Black Velvet, Pinstripe and Phantom, as with other petunias, maintaining high light (5,000 to 8,000 f.c.) and a stable temperature regime offer the best growing conditions. Propagation starts with a well-drained medium with an EC of 0.75 to 0.80 mmhos and a pH of 5.4 to 5.8. Soil temperature should be kept at 68F to 73F (20C to 23C) until roots are visible.
Begin fertilization with 75 to 100 ppm N and increase to 150 to 200 ppm N as roots develop. Media should be kept moderately wet and never saturated, as this can cause iron deficiency and chlorotic foliage.
Follow a standard petunia PGR regime. Or, for low-energy production, appropriate water management, air and light levels in a cool-grown environment should eliminate the need for chemical plant growth regulators.
To minimize stretch, avoid low light conditions and move crops to cooler air temperatures during the last week of propagation. No pinching is necessary. Black Velvet, Phantom and Pinstripe should be ready for transplant three weeks after sticking.
Growing on. Petunia Black Velvet has a high feed requirement. Use constant feed with a balanced fertilizer at 225 to 300 ppm N with additional iron as needed. For pH management, periodic applications of acidic feed or drench applications of chelated iron product can be used.
In addition, after transplant, a low-rate, high-volume drench of Bonzi promotes excellent color on Black Velvet and Pinstripe. This is also effective on Phantom; however, late Bonzi applications will reduce its striping while B-Nine will accentuate the striping.
To control early growth, and improve flowering and habit, use one or more applications of B-Nine with rates starting at 1,500 to 2,500 ppm, ideally applying two applications prior to transplant on a 4-week propagation timeline. End any B-Nine applications once the flower buds appear, as striping in Black Velvet may occur. Mature plants approaching shipping size can be drenched with Bonzi (0.25 to 1.0 ppm) to slow vegetative growth while allowing flowering to continue.
With a high-light, stable temperature and standard petunia PGR regime, growers will provide ideal conditions to produce these unique plants, which are sure to catch the attention of gardening enthusiasts and home decorators.
GT
All About Aloe
BY JESSA FINDLEY
Jessa Findley is the succulent specialist at EuroAmerican Propagators in Bonsall, California. For additional questions, Jessa can be contacted at Jfindley@pweuro.com.
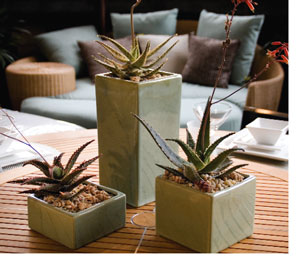
There are more than 450 species of aloes in the world, mostly native to Africa. They range in size from little miniatures like Donnie and Diego—ideally suited to small container gardens or even used indoors as accent plants—to massive aloe shrubs, such as Fire Ranch—a stunning landscape specimen.
Aloes come in an array of colors, sizes, shapes and textures. Making them a great choice for all types of garden applications. Extremely versatile plants, aloes can be used in the landscape as a screen, as specimens or on steep banks and rock gardens. They can also be grown as an indoor pot crop or mixed in with flowering plants in a classic garden setting. The flowers of aloe come annually in a variety of colors, and the nectar from the tubular flowers is a favorite food for hummingbirds. Many classic cultivars on the market, like the Aloe Gator, have more striking foliage patterns to allure retail consumers and collectors alike.
Hardiness zone. Aloes are hardy outdoors in areas where there is no chance of freezing (USDA Zones 9 to 11). In colder regions, they make excellent interior plants when they are given sufficient light. After overwintering plants indoors, they can be placed back outside after any danger of frost has passed.
Moisture levels. Aloes, like most other succulents, prefer a well-drained media. Growing media should contain 30% of a draining agent, such as perlite or pumice.
Plants should be well watered during irrigation, but more importantly, allow media to dry completely between waterings. Plants go dormant in the winter, thus take up water at a much slower rate, and less frequent irrigation will be required.
Light. Most aloes can tolerate strong, bright light once they are acclimatized, but also do quite well in part shade. If aloe plants are moved to direct sunlight too quickly, sunburning or white bleached spots can occur. Aloes such as Pink Blush and
dorotheae Sunset have coloring that deepens and becomes more vivid in full sun, whereas aloes such as the hybrid Grassy Lassie change color dependent on light levels; a crisp green in the shade and a bronzy orange in full sun.
 Fertilization.
 A well-balanced fertilizer, such as 15-5-15, is recommended at a rate of 150 ppm N during the active growing months, but with intermittent breaks to avoid a buildup of salts. For example, provide a constant liquid feed during the months of March through May, break from July through August, and then resume feed from September through November and break again for the dormant months of winter, December through February.
Pests and disease. Aloes are subject to some pests and diseases that are preventable for the most part by keeping clean growing conditions and not overwatering. The Eriophyid mite, also known as the aloe wart mite or aloe gall mite, causes unsightly galls and is spread by water splash. Diligent scouting and elimination when detected best control this pest. Plants can be treated with a miticide or Pylon, but due to the rosette form of aloes, it is hard to ensure that all the crevices are treated. The preferred treatment is to immediately destroy all infected plants and remove from the nursery.
Grower’s tip. As with all succulents, it’s essential that aloe be never allowed to sit in stagnant water. Your plants should be monitored closely for signs of overwatering, such as the presence of fungus gnats or other fungal infections.
GT
The Pleasures of Pineapple Lily
BY ALICAIN S. CARLSON & JOHN M. DOLE
Alicain Carlson is a graduate research assistant at North Carolina State University researching eucomis, among other projects. John Dole is a professor in the Horticultural Science Department at NCSU.
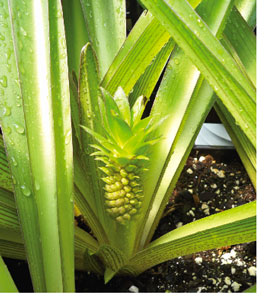
Eucomis, commonly known as pineapple lily, is a beautiful specimen plant for every garden or container planting. The flowers have the potential to stay fresh and attractive on the plant or in a vase for months. As the flowers age, they become greener and colored seed pods form, which are also attractive and will last into the fall.
Eucomis is an easy-to-produce bulbous herbaceous perennial, native to South Africa, and a member of the
Hyacinthaceae family. The flower spikes are a dense column of waxy, star-shaped flowers with a tuft of leaf-like bracts on top, from which the common name is derived. Long, strap-like green to burgundy leaves form a rosette around the inflorescence, adding to its exotic tropical look.
The scent of the inflorescence can vary with the species. For example,
E. comosa has a very pleasant light lily-like scent, whereas
E. bicolor has a slightly disagreeable odor, which, thankfully, fades.
Eucomis is pollinated by wasps and flies, which are attracted by the smell.
Flower, stem and leaf color varies from white to green, pink, purple or burgundy. The eucomis genus has about 11 species including,
E. comosa,
E. bicolor,
E. autumnalis and
E. pole-evansii. Breeders are working with eucomis, so many new and exciting cultivars are appearing on the market.
Cultural requirements
Planting and propagation. Bulbs should be planted in the spring for midsummer flowering. Use one 2- to 2 ¼-in. size bulb per one gal. container or two to three 1¾- to 2-in. size bulbs per 7- to 8-in. pot. Bulbs should be planted 1 to 2 in. below the media surface. Plants can also be started from plugs with two to three per 1 gal. To overwinter extras in the garden center, store the containers dry at 55F to 68F (12C to 20C). Bulbs in the ground will overwinter to Zone 6. Eucomis is easily propagated from leaf cuttings and seed. Plants propagated by these methods usually take three to five years to flower. Number of flowers per bulb depends on bulb size.
Water, fertilizer and media. The substrate should be kept evenly moist. Like most bulb crops, eucomis is more susceptible to bulb rot if routinely overwatered. Light to moderate fertilization is best from shoot emergence to flowering. When the flower can be seen developing in the center of the plant, a Hi-bloom fertilizer may be used. Clear water leaches should be done to reduce salt build up. Typical peat-based substrate blends work fine, though plants are top heavy when in full flower, so plan accordingly. Foliage will persist until frost.
Light and temperature. Eucomis should be grown in high light, which makes leaf and stem color more vibrant. For example, the cultivar Sparkling Burgundy in full sun in the garden will have darker burgundy foliage, while those in part sun will be greener and have longer stems. For commercial container production, grow plants outdoors for all or part of the crop cycle. The warmer the temperature, the faster eucomis will flower. Night temperatures around 60F (15C) work well. Planting bulbs in January will give May/June flowering, while bulbs planted in May will flower in July. Flowering may also be enhanced by high light levels. Eucomis does not require plant growth regulators if proper cultural techniques are followed.
Pests and diseases. There are no major pests or diseases that commonly harm eucomis, but watch out for pythium, phytophthora, cut worms, leaf miners, mealybugs and botrytis.
Pineapple Lily as a cut flower
Eucomis does well grown in the field, or in standard lily crates in the greenhouse or in a high tunnel as a cut flower. Stems should be harvested no sooner than when a quarter of the florets have opened. No clippers are required—just grab as close to the base of the stem as possible and give it a twist and pull. As long as the plants are properly hydrated, the stem should detach right from the bulb. This harvesting method prevents the leftover stem “nub” from rotting away on the plant, attracting fungus, disease, etc. Taller-stemmed cultivars will fall over, especially if not kept well hydrated, so a layer of netting might be useful.
Harvested stems do best held in tap water and generally last a month or longer. Properly hydrate stems upright in a bucket of tap water in a cool place. If eucomis stems are in a mixed bouquet with flowers that need floral preservative, the vase life could be reduced by approximately a week; however, it will probably still outlast anything else in the vase!
GT
Sun Parasol Mandevilla Hybrids
BY SUNTORY FLOWERS LTD.
Suntory Flowers Ltd., the developer of the first vegetative petunia and calibrachoa
21 years ago, now breeds and licenses new varieties in 24 countries They are based in Tokyo, Japan. www.suntorycollection.net
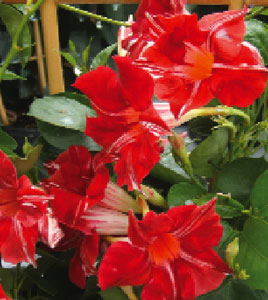
Sun Parasol is an exciting introduction bred by Suntory of Japan and brings to the marketplace a new range of colors that are all evergreens. Ideally suited for use on the summer patio, a conservatory plant and—using the correct varieties—a hanging basket.
Sun Parasol is a tender perennial and, therefore, needs frost protection in cold climates during the winter months. Flowering should occur from April through possibly November, depending on the climatic conditions. Light is a key factor as well as temperature (a minimum of 50F to 55F/10C to 12C) to maintain flowering. Combined with a daylength of 11 to 13 hours depending on the variety, daylength extension will enhance early flowering in areas of short days.
General culture
The initial potting should take place in a 4-in. pot. Ideal growing air temperature is a minimum of 65F to 70F (18C to 21C). For the first two to three weeks, keep the plants on the dry side; this will encourage the roots to grow out of the plug. Thereafter, the temperature can be lowered to 60F to 65F (15C to 18C). Temperatures lower than this can be used, but the plants will take longer to achieve the required production timing.
Some three to four weeks after potting, depending on the time of year, the leading shoot will begin to grow quickly; the plant will then require a pinch to encourage a bushy habit. Flowering will occur six to eight weeks after the last pinch with correct daylength.
The recommended pot size is from 6 in. to 12 in. A smaller pot will not provide the end product required, as the Giant types are far too vigorous.
As the plant grows vigorously, the shoots should be trained around a trellis or support as much as possible until the desired canopy has been reached. The shoots will grow 4 in. to 6 in. per week from March onwards at 65F to 70F (18C to 21C) and these shoots will provide the flower buds.
Watering is critical and a dry regime is more suited than a wet one. In the winter months, make sure not to apply water that is less than 45F (7C).
The Sun Parasol collection is bred for their exceptional branching habit and early blooming, and need only one liner per pot as growth.
Feeding. Moderate fertility is required with 200 to 300 ppm of constant liquid feed using a soluble fertilizer of 20-20-20.
Temperature. Sun Parasol needs a minimum temperature of 50F (10C) to allow for continuous flowering and requires full sun or partial shade. Ideal growing temperature is 65F to 70F (18C to 21C), otherwise production timing will be affected.
Sun Parasol will tolerate temperatures down to just above freezing, but will not continue to flower; flowers/buds will abort.
Growth regulators. The best way to control growth is with water retention, especially where the White variety is concerned.
Varieties. Presently, the large-flowered Sun Parasol varieties available are called Giant types, with a flower size of 3 in. to 4 in. and available in White, Pink, Giant Crimson and Carmine King. The Giants are the most heat tolerant among the three types. The Original type has a medium-sized flower of 2 in. to 3 in. and is available in Crimson (a top seller), White, Cream Pink, Pink, Dark Red, Burgundy, Stars & Stripes and Lush Crimson. The original group is not as vigorous and, in areas of high light, will be more compact in habit. Finally, the Pretty group—medium-sized flowers also 2 in. to 3 in. in size—has a compact but vigorous habit and is well suited for hanging baskets. This type is the most cool tolerant.
GT
Growing Rudbeckia Denver Daisy
BY DANNY BROOKS
Danny Brooks is product support specialist and culture advisor for Ernst Benary of America.

Rudbeckia Denver Daisy has quickly become one of Ernst Benary’s most popular introductions because of its earliness (blooming two weeks earlier than other rudbeckia of its type), extreme heat tolerance, summer-long flower power, and ability to stand up to extreme weather conditions. The strong, dense flower stems that grow to 18- to 20-in. (45- to 50-cm) tall ensure that Denver Daisy won’t fall over in the landscape. But, this vigorous plant can also be treated to make a habit that is good for smaller pot sizes and easy rack shipping.
From our recent discussions and grower trials, we have learned more about how to keep Denver Daisy more controlled during production while still maintaining their quick crop time and huge flower size. Here are some cultural tips and PGR recommendations that we’ve found to be successful for growing Denver Daisy in any sized pot.
Plug production. The best thing a grower can do on a practical scale is to keep plug trays under short days until all plants being transplanted have at least seven true leaves. As much as 11 hours of light is sufficient to achieve short-day conditions. Once they’ve achieved seven true leaves, the plant has sufficient maturity and will initiate flowers under long-day conditions. Accomplishing this before transplanting and applying long day conditions will assure a full plant with better branching and more blooms.
Flower buds can be initiated earlier with fewer true leaves, but research has shown that less than seven true leaves at this stage, prior to transplanting and long day conditions, will result in low flower power and small plants.
Watering and fertilization. Denver Daisy prefers moderate but consistent watering, so avoid overwatering and drought stress. Drought stress can cause necrosis of leaf edges. Avoid overhead irrigation and watering late in the day to reduce the risk of botrytis, especially under cool growing conditions.
Denver Daisy requires only moderate fertilization. Fertilize the crop weekly with 100-150 ppm nitrogen with a well-balanced fertilizer mix.
Spring production
Photo period/light. Denver Daisy, like most rudbeckia, is a long-day plant. A minimum of 13 to 14 hours of light (daylength) is recommended for flower initiation. More than 15 hours of light (daylength) can cause stem elongation and make it difficult to control height. High light levels throughout production will improve the plant quality and stem elongation. In winter and in early spring, additional assimilation light—long days—is required for pot plants. Because it’s less daylength responsive, Denver Daisy will flower faster than other tall rudbeckias on the market by up to two weeks.
Denver Daisy is responsive to night interruption and short days can be used very effectively to control the plant growth and habit. Initiate short days (optimally 10 hours) two to five weeks after transplant for seven to 10 days, then return to long day conditions (14 to 16 hours) again. This will result in a nicely compact plant with no PGRs. Cooler temperatures during the finishing stages also improve plant quality.
Summer production
Production of rudbeckia in the summer months can be challenging. High light levels will help reduce stem elongation. Unfortunately, high temperatures—especially night temps—cause stretching. Longer daylengths (more than 15 hours) also cause stem elongation and make it difficult to control height. Growth regulators are the most recommended for controlling this.
Plant growth regulators. Denver Daisy is responsive to many different PGRs and treatments. The trick is not what to apply, but when to apply them. If you apply too soon you can delay the bloom by as much as two weeks. The best time to apply is just after the bloom has initiated but a bud has not yet formed. When applied correctly, the result is beautiful! Nice short peduncles, beautiful, well-branched habit, and the flower size and finish time will be completely unchanged.
Sumagic—10 ppm spray
Bonzi—30 ppm spray to glisten
Configure—200 ppm spray to glisten
B-Nine—2,500-5,000 ppm spray
Bonzi drench at 1-5 ppm about four to six weeks after transplant.
Other cultural tips. Keep humidity low and provide good ventilation.
GT
Success With Tissue Culture Echinacea
BY CHRIS FIFO
Chris Fifo is part of technical services for Swift Greenhouses, Inc. in Gilman, Iowa.
Coneflowers (
Echinacea sp.) have long been a common component of landscapes, both public and private. Native from the Midwest to the East and South, their ease of growing, cold hardiness, heat tolerance and relatively long bloom time have made them a favorite in the perennial garden. Their popularity has led them to become a focus for many top breeders. These efforts have led to a variety of new colors and, sometimes bizarre, new flower forms. Unfortunately, this breeding has also led to some changes in the growth habit of these echinacea that can make them challenging to propagate.
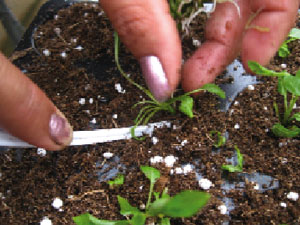
Traditionally, echinacea have been easily propagated from seed. Today, many of the new, patented varieties are supplied as tissue culture (TC) propagules that need some extra care and attention to produce a well-bulked liner. Here are some tips that we have learned at Swift Greenhouses that can help you have success with tissue cultured echinacea.
Receiving and planting. Since it’s best to vernalize echinacea for maximum flower power, they should be started early in the summer—June or July. Depending on the lab, the plantlets will be either separated and packaged in bags, or still in Petri dishes with nutrient agar. Either way, all of the agar should be removed from the roots by gently shaking or rinsing. Carefully stick the plantlets into a well drained, preferably peat-based, media with a pH of 6.0 to 6.2. A small stake or other tool can be used to push the roots into the media. A tray no smaller than a 50 cell should be used to allow for maximum root development before vernalization. Maintain a soil temperature of at least 68F (20C).
Moisture and nutrition. Good water management is necessary to get TC established. Some of the plants can be very small, so care must be taken to cover the roots but not bury the crown when they’re watered in. Intermittent mist is beneficial for the first seven to ten days—depending on temperature and humidity—until new roots are initiated. Keep the media moist until the roots reach the bottom, then provide good wet/dry cycles, avoiding the extremes.
Echinacea requires moderate nutrition. Begin feeding the liners once they are established, about Day 21, with 100 ppm nitrogen, increasing to 200 ppm one to two times per week by Day 35. A fertilizer high in calcium and magnesium and low in ammonium, such as 15-5-15, is beneficial for strong root growth and controlled shoot growth.
Avoid premature flowering. Many of these new echinacea varieties have a very strong will to flower. In fact, many flower so early it’s difficult to get them to bulk properly. Lighting is a critical factor to avoid premature flowering.
When they arrive from the lab, most TC have been under 14 to 16 hours of long day lighting and have not yet initiated flowering. Immediately after planting, echinacea should receive 24-hour lighting, not just the standard long day/night interruption lighting of 10:00 p.m. to 2:00 a.m. or day extension. (This is the key factor for producing TC echinacea!) An HID light will do the job, or one 150W incandescent bulb placed 6 ft. to 8 ft. above the crop covers 100 sq. ft. Turn the lights on at dusk and off at dawn throughout production and you’ll have no, or very few, flowers. Also, since tissue culture plants have never seen natural sunlight, shading is beneficial for the first three weeks to help acclimate them to the greenhouse environment.
Growth regulators. PGR application is another excellent tool that can be used to encourage bulk in your TC echinacea. Configure is a PGR that can be used to increase basal branching and reduce overall height. Use 300 ppm as a foliar spray around Day 28, then again 10 days later. If additional height control is needed, a Cycocel/B-Nine combination spray can be used at 750 ppm and 2,500 ppm, respectively. I would not recommend using Sumagic, as this tends to be a bit strong.
By following these production tips, you should have a well-bulked, mature echinacea plug ready for cold treatment by the end of October. After eight to 12 weeks at 32F (0C), they can be potted up and forced into bloom.
Growing on. When forcing TC echinacea from liners, again the key is lighting. It’s challenging to get a full-finished container, instead of just a few leaves on top of the soil and a single flower stalk.
After planting the vernalized liners, provide warm temperatures of 70F (21C) or more, especially at night, to break dormancy quickly. Provide 24-hour lighting to obtain sufficient bulk and leaf count before flowering. Twenty-four hour lighting does not work as consistently after vernalization to prevent flowering, so pinching the buds when they are 6-in. tall will help fill out the pots. When you’re ready to finish the containers, switch the lighting program to long-day lighting (10:00 p.m. to 2:00 a.m. or 2:00 a.m. until sunrise) and let the buds go to flower. Use PGR and nutritional programs similar to liner production and you’ll have a beautiful crop of finished TC echinacea.
GT
Succeeding with Snow Princess Lobularia
BY DR. RICK SCHOELLHORN
Dr. Rick Schoellhorn is director of new products for Proven Winners. He can be reached at rick@provenwinners.com.
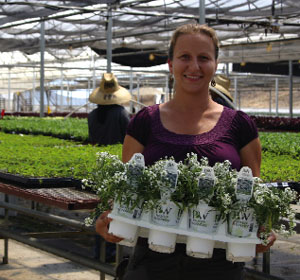
While the new Snow Princess Lobularia variety from Proven Winners may be a breakthrough in breeding and there may be consumer demand, it has been generating some questions from growers who are trying to produce the plant. What’s the problem? In essence, the plant is simply too vigorous, and what makes consumers happy can often pose issues for growers.
Here are some tips on how to grow this new crop.
Vigor. Snow Princess is extremely vigorous! It’s not just a little bit more than seed type sweet alyssum, but a lot more vigorous. As such, it will need more water and constant fertilizing than other crops to support that vigorous growth.
Combination plantings. Plan ahead and only mix Snow Princess with the most vigorous companion plants (like ipomoea, spreading petunias, etc.). It will overgrow most moderate-vigor companion plants, so fewer plugs per combination can be used. Another solution would be for Snow Princess to be added after other companion plants have had a week to establish, or to do a liner drench with plant growth regulators in order to restrain Snow Princess while the combo grows in.
Controlling growth
Temperature. Once plants are established, they can be grown cool, as low as 40F (4C). But don’t expect this to last long as they do continue to grow, so temperature is a short-term solution.
Plant growth regulators. If you use these, try a liner treatment before planting using Bonzi at 1 to 2 ppm. Or later in production, use Sumagic spray at 3 to 5 ppm, three weeks after transplant.
Do not use reduced water to control growth. Reducing watering with Snow Princess only will cause inner leaf drop and reduces overall quality. Foliage turning grey and yellowing from the inside of the plant is a clear indication that plants have been drought stressed.
Don’t grow this plant in small pots. Snow Princess is a different animal than old-fashioned seed alyssum and really is a better crop in 5- or 6-in. containers than it is in a 4 in. It also helps you to keep Snow Princess separate from the cheaper product. A larger pot helps to capture the higher retail price!
Let it snow. Many growers have said that the falling petals from Snow Princess cover the benches and other crops below. So, again, plan ahead. These spent flowers are tiny and will fall and sift through open benching systems, but can cause issues in ebb and flood systems. Do not plant crops beneath Snow Princess baskets that are sensitive to this. Practice good hygiene and keep the benches clean. Snow Princess is a breakthrough crop with huge popularity among consumers who immediately see the benefits of a plant that has great landscape vigor, incredible heat tolerance and sweet fragrance. Please don’t let some growing issues keep you from having great sales on this wonderful new plant. Most issues just require a little bit of planning and some forethought to make Snow Princess an easy-to-grow crop—and one that will give you a higher profit than traditional alyssum.
GT
Quick and Easy SimplySalad
BY ROBIN SCULLIN
Robin Scullin is the global product manager for new crops at PanAmerican Seed.
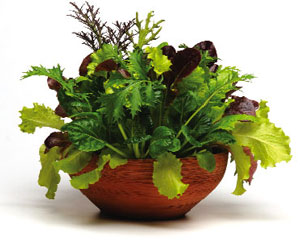
A fun and exciting new product from PanAmerican Seed is making it easier than ever for growers to fulfill the demand for vegetables and edible ornamentals. SimplySalad is a multi-seed, multi-species pellet that, when sown and grown, provides a truly fresh and delicious salad for consumers—and a quick-and-easy product for growers for early spring or fall programs.
This innovative multi-pellet is efficient to sow using a seeder or direct-sown into the final container. The pellet ensures varieties won’t separate in the seed hopper and results in a well-balanced mix in the following three blends:
Alfresco Mixture. Red and green leaf lettuces with arugula, endive and radicchio give a true Mediterranean flavor and feel.
City Garden Mixture. A traditional mix of red and green leaf lettuces that is easy on the palate.
Global Gourmet Mixture. Red and green leaf lettuces along with Asian greens, make a nice mix of flavors great in salads or stir-fry recipes.
Sowing SimplySalad
When sowing SimplySalad, whether it’s in a plug tray or direct sow, we recommend using a light cover of coarse vermiculite for the best germination. This helps maintain Quick and Easy SimplySalad continued
moisture levels while letting light pass through to the seeds for improved germination. When producing a plug tray, we recommend using a 105 tray.
Stage 1
Germination takes approximately two to three days.
Germination temperature. 65F to 73F (18C to 22C). Avoid temperatures of 75F (24C) or above.
Light. Light is required for best germination.
Media moisture. Keep the media medium wet (level 4) during germination.
Relative humidity. SimplySalad can be germinated on the bench as long as the soil is kept evenly moist; high air humidity is not required for germination.
Stage 2
Temperature. 68F to 70F (20C to 21C)
Light: Can be up to 2,500 f.c. (26,900 Lux)
Media moisture. Keep the media medium (level 3) to medium wet (level 4) during
Stage 2.
Fertilizer. Apply fertilizer at rate 1 (less than 100 ppm N/less than 0.7 mS/cm EC) with a nitrate-form fertilizer with low phosphorous. Maintain a media pH of 5.8 to 6.2 and EC at 0.5 to 0.7 mS/cm (1:2 extraction).
Stage 3
Temperature. 65F to 67F (18C to 19C)
Light: Can be up to 2,500 f.c. (26,900 Lux)
Media moisture. Moisture level can be reduced to medium to medium dry (level 3 to 2). Do not allow the seedlings to wilt.
Fertilizer. Increase the fertilizer rate to 2 (100 to 175 ppm N/ 0.7 to 1.2 mS/cm EC). Maintain a media pH of 5.8 to 6.2 and EC at 0.7 to 1.0 mS/cm (1:2 extraction).
Stage 4
Temperature. 62F to 64F (16C to 17C)
Light. Can be up to 5,000 f.c. (54,000 Lux)
Media moisture. Moisture level can be reduced to medium to medium dry (level 3 to 2). Do not allow the seedlings to wilt.
Fertilizer. Keep the fertilizer rate to 2 (100 to 175 ppm N/ 0.7 to 1.2 mS/cm EC). Maintain a media pH of 5.8 to 6.2 and EC at 0.7 to 1.0 mS/cm (1:2 extraction).
When finishing SimplySalad, we recommend you either grow cool or finish cool. When grown warm and finished warm, the colors of the lettuce varieties can become muted. However, when grown cool or finished cool, much deeper, richer colors will be produced and will be more appealing at retail.
No growth regulators or pinching is needed. Light should be as high as possible, while maintaining moderate temperatures. Provide shade to reduce temperature under warmer conditions.
For consumers, SimplySalad can be found at retail ready to harvest. They’ll cut 2 in. above the soil line to enjoy a diverse mix of salad blends. If they wait two to three weeks more, they can harvest fresh salad again and again.
For growers, SimplySalad is a fast and easy product to produce. For retailers, it’s a great addition to early spring and fall programs. And for consumers it’s fun and delicious! For more information, visit panamseed.com.
GT