9/1/2024
Culture Study Guide
Jennifer Zurko
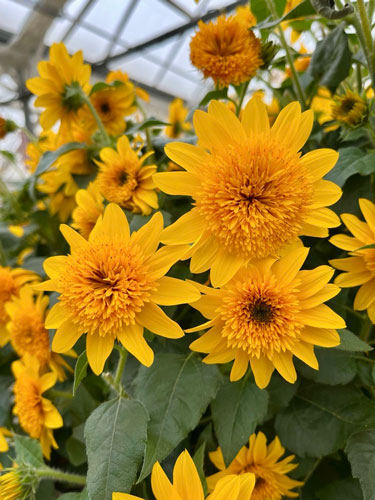
Helianthus Sunfinity Double Yellow
By Alicain Carlson & Jaime Gibson—Syngenta Flowers
Sunfinity Double Yellow is a naturally free-branching and re-blooming sunflower that’s truly unique from any other annual sunflower. This vegetative variety complements the seed Sunfinity Yellow Dark Center and is great to grow for spring and early fall sales, while the seed Sunfinity shines brightly in summer retail programs. Sunfinity Double Yellow has long-lasting flowers. Even when the ray petals fall off the “poof,” the center remains, making it even more attractive to pollinators.
Put some roots on it
Sunfinity Double Yellow should be stuck just after the first priority unrooted cutting species. It’s recommended to use 105-cell trays (30 mm) or larger for propagation. The propagation timing for a 105-cell tray is typically three weeks, with larger tray sizes requiring additional rooting time. To hasten rooting, it’s recommended to apply a heavy overhead spray of water-soluble K-IBA (potassium salt of indole-3-butyric acid) at a concentration of 250 to 300 ppm to the cuttings and the rooting media within 24 to 48 hours after sticking. Maintaining bottom heat temperatures between 70 to 74F (21 to 23C) for the first two weeks is crucial. Once roots are well developed, the temperatures can be lowered to hold and tone the cuttings.
Within 24 hours after sticking, the cuttings should be hydrated and in a non-wilted state. To aid in rehydration, CapSil (a spray adjuvant) can be applied at a rate of 2 to 4 oz./100 gal. within one to two days after sticking. After three to four days and once the cuttings are fully hydrated, misting should be reduced to prevent potential Botrytis infections.
Maintain day temperatures between 72 to 74F (22 to 23C) and night temperatures between 70 to 72F (21 to 22C). Use day extension lighting as necessary to provide a 14-hour photoperiod—this will enhance rooting and branching vigor. During the first two weeks after sticking or until root development occurs, provide a light intensity of 200 to 250 µmol·m-2·s-1. As rooting increases and cutting matures, light levels can be increased up to 600 µmol·m-2·s-1. Sunfinity Double Yellow is a facultative long-day plant, meaning it’ll flower faster under daylengths >12 hours. A daily light integral (DLI) of 4 to 6 mol·m-2·d-1 is recommended for the first two weeks after sticking or until root development occurs then can be increased to >12 mol·m-2·d-1.
Maintain a media pH of 5.8 to 6.2 and substrate EC (SME) of 1.5 to 2.1 mS/cm or a Press or Squeeze Method EC of 2.3 to 3.2 mS/cm.
Begin fertilization at 100 ppm nitrogen when roots become visible and increase rates up to 200 ppm N (nitrogen) after roots are well-developed. Use primarily Cal-Mag (calcium nitrate + magnesium nitrate) fertilizers with lower phosphorus to prevent unwanted stretch.
Disbudding during propagation causes excessive budding and reduces branching and vigor. Do not remove flower buds in propagation. To control growth after rooting, sprays of B-Nine WSG (2,500 to 3,500 ppm) are usually sufficient. Bonzi (paclobutrazol) media sprenches at 0.5 to 1.0 ppm can be applied two-and-a-half to three weeks after sticking to control internode growth.
The finishing touches
During finishing, maintain day temperatures between 70 to 72F (21 to 22 C) and night temperatures between 66 to 68F (19 to 20C), with an average daily temperature of 69F (20C). Day extension lighting is beneficial, providing a 14-hour photoperiod, though not critical if the liners were given long days. Aim for a light intensity of 800 to 1,200 µmol·m-2·s-1. A DLI of 14 to 16 mol·m-2·d-1 is recommended for optimal growth and flowering. For earliest flowering, provide long days, high light levels and warm temperatures.
To pinch or not is dependent on your desired result. Pinching delays finish by seven to 10 days, but also helps to control plant height and increase branching. Sunfinity Double Yellow shoot tips can be sheared in the full tray just before transplant or pinched at transplant. Maintain a media pH of 5.8 to 6.2 and a substrate moisture (SME) EC of 1.5 to 2.1 mS/cm or a PourThru EC of 2.3 to 3.2 mS/cm. Fertilize plants with 200 to 250 ppm N.
Sunfinity Double Yellow has good vigor and generally requires some PGRs to manage growth. Sprays of B-Nine WSG (2,500 to 5,000 ppm) or Sumagic (20 to 30 ppm) can be used to control growth. Apply a Bonzi (paclobutrazol) drench at 1 to 2 ppm three to four weeks after transplanting, and if needed, another drench at 1 to 2 ppm a week or 10 days before finish. Insecticides such as Avid and Mainspring are effective against common pests.
For additional information on spring and late summer production protocols, GO HERE.
For questions or support, please reach out to the Syngenta Flowers Technical Team.
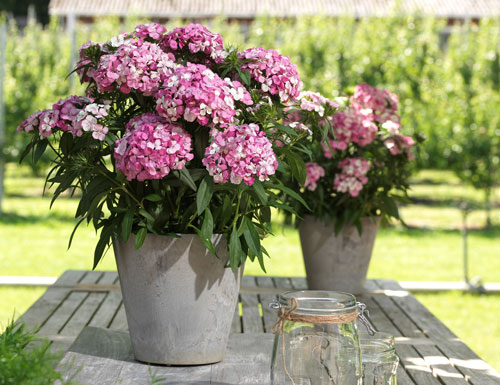
Dianthus Dart
By Steven Engel, Regional Account Manager—PanAmerican Seed
While producing colorful plants for early spring, your greenhouse is bound to run into additional costs—from heating and energy to lighting and labor. You might be wondering if there’s a better way to meet the needs of early bird retail sales without breaking the bank.
Get ready to hit the mark with an innovation from PanAmerican Seed. The new Dart Dianthus series requires no heat for spring production while still boasting flowers one to two weeks earlier than the competition.
In addition, Dart has a naturally compact habit, so more plants can be grown per square foot. This means more layers can be transported on a rack fitted with a range of pot sizes, saving growing space—and using less PGR chemicals—while making shipping easier.
In terms of appeal, the Dart series shows plenty of color at retail and has the potential for more seasonal blooming. It launches with five options: White, Red White Picotee, Purple, Pink Magician and Scarlet. They fit nicely into retail programs due to their versatility in all pot sizes, plus a uniform flowering window (Scarlet is one week later to flower).
Here are a few production guidelines to help you produce dianthus color for early spring sales:
Germination & plug production
Dart Dianthus seed is pelleted. Sow 1 seed per cell in a 288-plug size. Seed germinates at 64 to 68F (18 to 20C) and takes five to seven days. Cover the seed; light is optional for germination. Maintain media pH at 5.8 to 6.2 and EC of 0.75 mmhos/cm during plug production. Keep moisture high at Level 4 until radicle emergence.
During Stage 2, lower moisture levels slightly to 3 to 4 and provide temperatures of 65 to 70F (18 to 21C). For light, aim for a DLI of 5-8 mol·m-2·d-1. Apply fertilizer less than 100 ppm N, less than 0.7 EC. Lower temperatures during Stage 3 to 60 to 65F (16 to 18C) and decrease moisture to Levels 2 to 3. Fertilizer should be applied at 100 to 175 ppm N (0.7 to 1.2 EC). Provide Stage 3 light at 8-10 mol·m-2·d-1. A paclobutrazol spray at 5 ppm can be applied to control growth.
In Stage 4, maintain the same moisture levels as Stage 3 and decrease temperature even further to 55 to 60F (13 to 16C). Increase light to 10 mol·m-2·d-1.
Finishing key tips
Dart is lightly sensitive to daylength, though it’s classified as facultative long day. Temperature and light intensity have higher impacts on flower timing/crop time than daylength.
Temperatures for finishing:
Day: 65 to 75F (18 to 24C)
Night: 43 to 60F (6 to 16C)
The target media pH should be 5.8 to 6.2 with an EC of 1.5 to 2.0 mmhos/cm. Starting a week after transplant, apply fertilizer at a rate of 175 to 225 ppm N once a week, from nitrate-based fertilizer with low phosphorus.
Dart is a naturally compact series. It responds well to paclobutrazol (Bonzi) when necessary. Dart will benefit from being grown under high light levels for promoting plant branching and flower color and quality. Plants grow bigger and fill pots easier under higher DLI. Providing high light will also keep plants compact and will reduce the need for PGRs. Plants will develop faster and will be earlier to flower when temperatures increase.
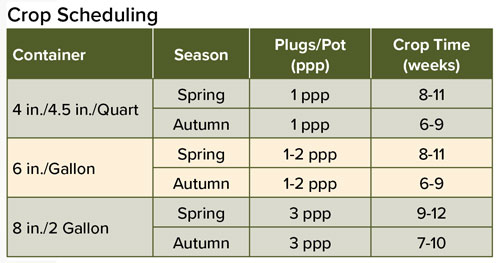 Total crop time will be around two weeks faster when average day temperatures (ADT) change from 62F (16C) to 68F (20C). Dart can be grown cool in outdoor containers, field or in cool tunnels after transplant at 40F (5C) night temperatures.
Autumn finishing is possible as well. Plants will finish faster because of higher average day temperatures. For southern areas with mild winters, winter and early spring production can be done. Lower average day temperatures increase flower shelf life. Pinching is not required or needed.
Dianthus seasonality chart
The excitement is high for gardeners that enjoy early season living color and it continues through the beginning of the summer. By timing your dianthus program from PanAmerican Seed, you can have fresh color ready for retail from March through June for the core season, and dianthus options for autumn and winter, too. Check out our full Dianthus Seasonality Chart.
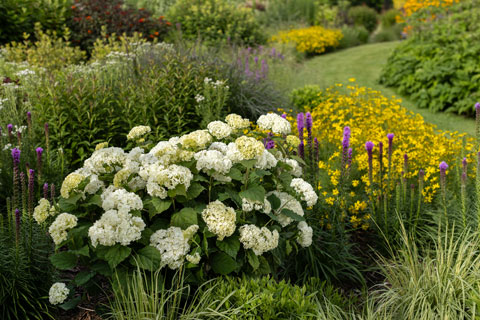
Hydrangea First Editions FlowerFull Smooth
By Matt Olson, Trade Communications Specialist—Bailey
As more hydrangeas enter the market, we want to make sure each variety is distinctly unique and provides an advantage for each segment of the industry. FlowerFull Smooth Hydrangea from First Editions Shrubs & Trees checks those boxes in every way, starting with abundant flowers that don’t flop, even in wind and rain. But that’s just the beginning. FlowerFull has two to three times more flowers than other Hydrangea arborescens, allowing the blooms to fill the plant from top to bottom. The disease-resistant, lush foliage remains clean late into the season while providing wonderful contrast to the blooms. From production to retail and the landscape, FlowerFull requires less touch points to deliver a quality plant.
In 2016, Bailey began a new breeding program focusing on Hydrangea arborescens and the goal was clear: Improve and elevate this garden staple. Over the next eight years, FlowerFull would be rigorously tested in production and landscape trialing across North America. Trials also took place at several licensee sites throughout the United States, allowing growers to give us feedback on their experience with FlowerFull.
From liner to sale, FlowerFull offers several benefits for growers. It blooms the first year in production, allowing you to increase sales and cycle crops in a shorter time. You can also stage prune FlowerFull late into the season and supply retailers with extended color and a longer shipping window. In the field, those strong stems hold the flowers upright until they’re ready to ship, making it easy to transport the plants. As the season progresses, the foliage remains clean, reducing the need for fungicides and creating fresh crops for fall sales.
At retail, those flowers and upright stems encourage impulse sales and look great on the sales floor. It’s a great addition for displays to show consumers how they can pair it with other plants in the landscape. With the strong stems and clean foliage, consumers are receiving a durable plant that doesn’t need special treatment.
In residential and commercial sites, FlowerFull is a low-maintenance marvel that requires less work to look good all season long. No more staking blooms or cleaning up floppy stems! As summer continues, the lush green foliage provides wonderful contrast to the blooms and surrounding plants. From small groups to mass plantings, the versatility of FlowerFull makes it easy to use on its own or paired with other plants.
As you’re growing FlowerFull Smooth Hydrangea, these guidelines will help you be successful.
These recommendations are based on our own experience at Bailey Nurseries and will vary depending on region, climate and growing practices.
Media and fertilizer
■ Maintain a media pH of 6.5 to 7.0 and an EC of 1.0 to 2.0. Media pH will vary by region.
■ Fertilization requirements will vary by region. In Minnesota and Illinois, we incorporate eight month 17-3-10 at 10 lbs. per yard at planting time. During the second season, we top dress with four month 22-3-8 at 15 grams per one gallon.
■ In the Pacific Northwest, we incorporate a seven to eight month 18-6-11 at 10 lbs. per yard at planting. During the second season, we top dress with a six to seven month 22-6-10 at the high manufacturer suggested rates.
Water
■ FlowerFull has medium water requirements, especially when the canopy gets large. During summer, 1 in. of water should be applied daily.
Pest and disease management
■ A bacterial spray rotation is recommended in spring.
Overwintering
■ In Minnesota, we prune in fall, then consolidate pot-to-pot and cover with poly and Sudan grass.
■ In Illinois, plants are consolidated into poly houses and temperatures are maintained above 10F (-12C).
■ In the Pacific Northwest, plants are consolidated and overwintered outdoors with temperatures in the 20 to 25F (-6 to -3C) range.
Special note
■ When FlowerFull is actively growing in early spring, give a hard prune down to 6 to 8 in. and there will be dime-sized flower buds after seven weeks.
Finishing times
■ Growers have several options to finish FlowerFull Smooth Hydrangea with bareroot, JumpStarts and JumpStarts 5.5 potted liners from Bailey.
■ A #1 bareroot liner planted in a #2 container will finish in 10 weeks.
■ A #1 bareroot liner planted in a #5 container will finish in 10 to 12 weeks.
■ A spring planted JumpStarts liner planted in a #5 container will finish in 12 to 14 weeks.
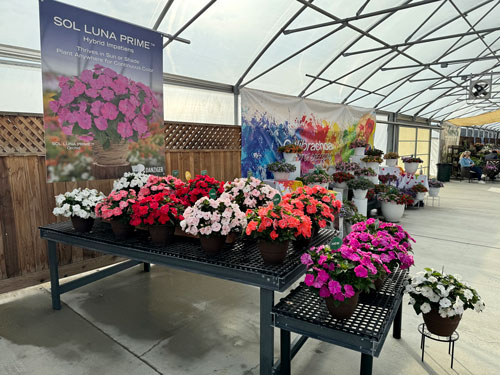
Impatiens Sol Luna Prime
By Mike Fernandez, Market Manager—Danziger North America
The main goal of our breeding programs at Danziger is to create varieties that are more efficient for growers while still maintaining a beautiful, retail-ready plant that draws home gardeners in. We don’t take the term “breakthrough” lightly. That’s why we’re so excited about Sol Luna Prime Hybrid Impatiens. This series truly embodies breakthrough genetics. It’s revolutionizing the hybrid impatiens growing experience by offering a shorter cycle, earlier bloom and outstanding uniformity across the colors. Best of all, it delivers the wow factor and flexibility home gardeners need to encourage purchase.
Sol Luna Prime blooms up to seven days earlier. Finishing early gives growers shipping flexibility and a jump start on the season. This series is also exceptionally uniform across all six colors. In addition to shipping advantages, this means garden centers can create stunning displays in a rainbow of colors that will stand out at retail. It also adapts well to varying weather conditions with outstanding wilting recovery, which can prolong its shelf life.
This series features a mounded, well-branched and uniform habit. It performs well in quarts, gallons or hanging baskets, flowering abundantly in six colors, including Light Salmon, Orchid, Peach, Pearl, Red and White.
Sol Luna Prime’s flexibility and adaptability also brings great performance to home gardeners. This series thrives in both sun and shade, taking the guesswork out of where to place it in the garden. Its mounded habit keeps it from getting leggy and bare, creating beautiful containers, hanging baskets and landscape displays that look good all season long.
Propagation tips for Sol Luna Prime Hybrid Impatiens
It’s recommended to stick Sol Luna Prime Hybrid Impatiens on priority. This series is priority number 3 out of 4 categories. We recommend spraying Adjuvant at sticking. To reset flower response, spray Ethephon at 300 ppm the day after sticking. One hour of Ethephon on the leaves is sufficient. Maintain an average daily temperature of 70F (21C).
Average growth time is four weeks. Be sure to monitor and keep pH levels between 6.0 and 6.5
Rooting tips
Week 1
Keep temperatures between 72 and 74F (22 and 23C). EC level should be at 0.50. No feeding is required this week. Apply fungicide the day of sticking.
Week 2
Similar to Week 1 be sure to keep temperatures between 72 and 74F (22 and 23C). No feeding is required at this time. Apply your second fungicide application.
Week 3
Keep temperatures between 72 and 74F (22 and 23C) and plants should be off mist by this time. EC should be 0.50 to 0.70. Feed if necessary at 80 ppm N.
Week 4
Drop temperatures to between 70 and 72F (21 and 22C). Keep EC levels at 0.80 to no more than 0.90 and fertilize at 80 ppm N in mist. Pinching is not recommended.
Finishing tips
Average finishing time from liners is seven to eight weeks. We recommend maintaining a low EC level for proper growth and sizing of each Sol Luna Prime variety. Liners can be transplanted when plants are rooted and actively growing.
As with all hybrid impatiens, Sol Luna Prime responds to temperature to grow and flower. Grow warm to finish faster at an average of 72F (22C) for maximum growth. Growing cooler can be done, but will add time. Sol Luna Prime doesn’t require any pinching and is daylength neutral. From Weeks 7 to 8 fertilization should be at 80 to 125 ppm N to maintain EC at no more than 1.0.
Growth regulators
If you require a plant growth regulator, we recommend 0.10 or 1 tenth of 1 ppm Paclobutrazol as a light drench application early. A Paclobutrazol drench can be used at 0.25 to 0.5 ppm as needed for finishing.
Soil & water
Be sure to maintain a pH of 6.0 to 6.2 in irrigation water. Water and feed as needed.
Monitoring your water is key for just about any crop. Knowing the pH of your water can help you make the right decisions about additives.
Impatiens transpire readily (cool themselves). Added humidity at night can help them perceive the correct temperature and finish on schedule. This can be achieved by watering later and wetting walkways in the evening. A dry environment can lead to added grow time.
Light
Sol Luna Prime is daylength neutral.
Pest & disease control
If you’re experiencing aphid or thrips concerns, pests can be controlled by common insecticides. For aphids, we recommend applying Acetamiprid, Flonicamid, Imidacloprid or Dichlorvos. For thrips, Methiocarb, Acrinathrin, Abamectin, Dichlorvos or Spinosad can be used.
For Botrytis, Cyprodinil+Fludioxonil, Iprodione or Polyoxin can be used. Pythium and Phytophthora can be controlled with Propamocarb.
We recommend spraying a broad-spectrum fungicide after transplanting.
As with any crop, paying attention to the small details with hybrid impatiens can make a big difference. More details can be found on DanzigerOnline.com.
Glory Days Geranium
By Kelly Nicholas, Head of Technical Services—Dümmen Orange
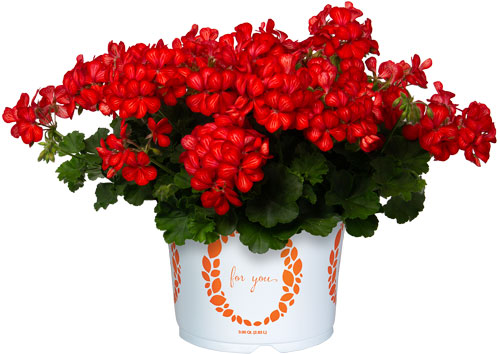
The vibrant new series Glory Days of interspecific pelargonium from Dümmen Orange has two bicolor varieties (Red-Orange and Pink) with medium-vigor green foliage. This series has loads of consumer appeal with its recognizable traditional zonal-type habit and summer-long performance with the heat and humidity tolerance and flower look of an ivy geranium. The Glory Days lineup boasts single flowers that are self-cleaning and a trailing habit, making them an ideal choice to add lustrous color to high-impact containers and hanging baskets.
Upon arrival, the boxes should be unpacked, sorted and cuttings stuck immediately. If that isn’t possible, sorted cuttings should be placed with bags open on disinfected carts or shelves in a cooler at 38 to 40F (3 to 5C) for no longer than 24 hours. Mist cuttings in the cooler if they’re dry or wilted. Long storage durations can cause excessive leaf yellowing and loss of cuttings. When temporary storage isn’t available in a cooler, the cuttings should be laid on a bench and frequently misted to keep them hydrated until they can be stuck.
Propagation
Stick the cuttings in a typical well-drained media that’s suitable for propagation with a pH of 5.8 to 6.2.
32, 50, 72 and 102 (spaceable strips) are all suitable for rooting geranium. Apply enough mist to regain and keep the cutting turgid. The morning after sticking around sunrise, ensure the cuttings are turgid and dry and apply Capsil at 3 to 4 oz./100 gal. with a fungicide to protect against Botrytis or, if there were shipping concerns that can cause yellowing, instead apply Capsil at 3 to 4 oz./100 gal. with Fascination at 2 ppm. Apply only to wet the foliage, but not to run off.
During propagation, apply only enough mist to keep the leaves turgid. Look for some leaves to start lightly curling as a sign for your next mist application. Wean the liners off mist as quickly as possible once roots begin to form (a little stress can speed rooting). Apply a preventative fungicide for Botrytis in the first week after stick, especially if early signs of Botrytis appear. Maintain soil and air temperatures at 68 to 72F (20 to 22C). Keep light intensity between 700 to 1,200 f.c. (7,500 to 12,900 lux) during callus formation, gradually increasing between 2,000 to 4,000 f.c. (21,500 to 26,900 lux) for root initiation and toning.
Once roots form, begin to feed at a moderate rate (100 to 150 ppm N) with a balanced fertilizer. Rooted liners should be ready for transplant within three to five weeks (consider direct-stick with callused cuttings to reduce production time by one to two weeks). Florel (Ethephon 3.9%) at 350 to 500 ppm spray can be utilized for bud removal and to encourage branching (only if the crop isn’t stressed) once the liners are beginning to root at 12 to 21 days following stick. B-Nine (Daminozide 85%) spray at 1,500 to 2,500 ppm can be used to reduce stretch and tone liners in the propagation tray.
Growing on
Transplant into a well-drained media. Aim to keep the pH during the finishing phase of growing at 5.8 to 6.2 checking often, as pH drops can be common in geranium production. During early stages of plant growth keep both day and night temperatures between 70 to 75F (21 to 24C). Gradually adjust temperatures so the day is 70 to 75F (21 to 24C) and the night is 65 to 70F (18 to 21C).
Glory Days should be grown in full sunlight 4,500 to 7,000 f.c. (48,400 to 75,300 lux). Ensure adequate spacing, as low light penetration will slow flowering and cause weak, stretched growth. Keep the crop moderately moist with no very wet or dry cycles. Apply periodic fertilization at a rate of 200 ppm N aiming for an EC as measured with SME of 2.0 to 2.5 mmhos. Fertilizer formulations that are low in phosphorous and ammonium will help control stretch and increase branching. Use of Ca/Mg fertilizers will help create good form, increase shelf life and promote profuse flowering.
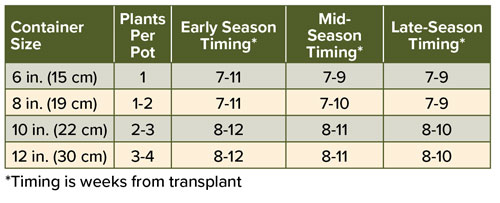 Glory Days has medium vigor and may require PGR applications. Use Cycocel/Citadel (Chlormequat 11.8%) spray at 750 to 1,500 ppm as needed. An additional spray application of Florel (Ethephon 3.9%) at 250 ppm after transplant will help improve branching and control growth. Florel (Ethephon 3.9%) will delay flowering and its use should be discontinued eight weeks prior to finish.
To prevent Botrytis once the plants are flowering, maintain adequate light levels, ample spacing and provide good air circulation. Avoid wetting foliage and flowers immediately before and during shipping and completely avoid overhead irrigation on flowers if possible. Removal of spent flowers will also reduce the risk of disease and poor performance at retail.
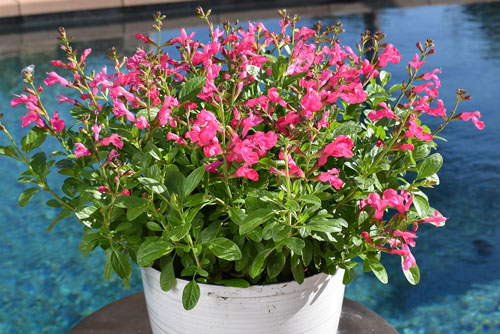
Salvia Tanami Series
By Bart Hayes, Sales Manager—Westhoff
Salvia has been one of the most prolific genera of plants in the landscape for decades. With bright vivid colors available from seed, vegetative or tissue culture, some are annuals, some are perennials, and it’s a very diverse and successful crop category for growers. Salvia has also represented some of the best-performing plants in the landscape for home gardeners with most species used in ornamental breeding sharing characteristics for heat and drought tolerance, as well as being ideal for attracting pollinators to the garden. This year, Westhoff has entered the market by introducing our own breeding: the Tanami series.
The Salvia Tanami series is a hybrid, but tends to most closely resemble Salvia greggii, a species native to the Mountains of north-central Mexico, up into western Texas. Naturally, given its native habitat, this species is very drought and heat tolerant, as well as impressively cold tolerant. But heavy selections were made for varieties that exhibit early, continuous flowering and prolific branching, making for full, rounded plants. And with six colors to start with there are plenty of opportunities for adding an intense pop of color to any summer landscape.
Propagation
Vegetative URCs of Tanami Salvia varieties are available for the 2024-2025 growing season from Plant Source International (Mexico) and Vivero International (Mexico). Unrooted cuttings should be stuck into a 102-cell liner tray or equivalent, grown at 68 to 72F (20 to 22C), placed under intermittent mist shortly after arrival, and treated with a broad-spectrum fungicide and 100 ppm KIBA to aid in rooting uniformity and speed. Considering that Tanami Salvia are naturally a sub-shrub from a drier climate, mist should be reduced as soon as cuttings have formed a callus ring, and then reduced again, once root initials are formed.
Total rooting time will be between 28 and 35 days. A mechanical pinch, once new growth has begun, is recommended to encourage branching and control height, but Daminozide at 1,500 ppm has been shown to be effective at restricting growth and chemical branching agents (ethephon, et. al.) can also be used, following label recommended rates and based on grower trialing. If starting from an established, well-rooted young plant is preferred, please contact your sales representative to help you find the best rooted liner supplier.
Growing on
Transplant young plants into final containers and allow new roots to grow into the fresh soil before mechanically pinching (if not done in propagation) and gradually reduce temperatures. While warm days encourage vegetative growth, cool night temperatures will help ensure healthy, toned plants, therefore a temperature range of 65 to 68F (18 to 20C) days and 55 to 58F (15C) nights is best. Managing drier soil moisture conditions is also recommended to encourage healthy root growth and to prevent the preferred conditions for soilborne pathogens. Tanami Salvia do not need high fertility, so maintaining a pH between 5.6 and 6.4 and EC of 0.9 to 1.2 (using 1:2 extraction method) with moderate fertilizer levels (150 to 200 ppm N) results in the best growth.
 Recommended uses
Tanami Salvia will fit just about any pot size, from 4 in./quarts to 12-in. patio pots. Their managed growth and early blooming make their scheduling for small pots relatively easy, while their upright mounding habit makes them well suited to larger containers and in the ground, too, with a maximum height in the landscape of 15 to 18 in. They can be mixed with each other (Red, Blue and Salmon is my favorite), as well as with other summer-performing annuals like scaevola or portulaca for a colorful late spring/early summer combo that will look great all season long.
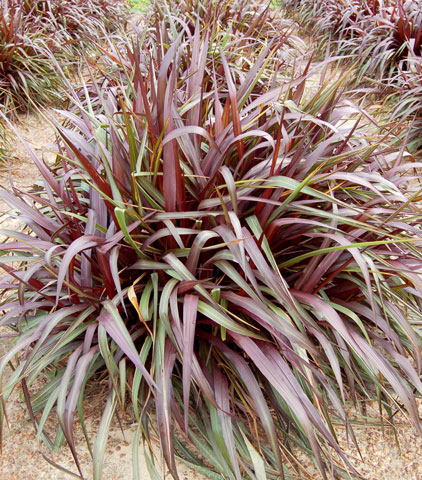
Pennisetum Royal Collection
By Kerstin Poehlmann, president—Pen & Petal, Inc.
When it comes to making a statement in the garden, few plants present as stately and regal as the Royal Collection of pennisetum from Emerald Coast Growers. Bred and selected by Dr. Wayne Hanna from the University of Georgia, these selections of ornamental Napier grass are sure to impress.
What started with the introduction of Prince and Princess more than a decade ago has now grown to a collection of six varieties, ranging in height from 3 to 7 ft., thereby offering something for nearly any location. Commonly known as ornamental Napier grass, all of them feature vibrant, dark foliage in nuances from medium intensity to nearly black. In temperate climates, the larger varieties in the Royal Collection can be used as statement plants and specimen in gardens and landscapes, while the smaller varieties are excellent for the middle part of plantings.
Due to their limited frost tolerance, colder climates turn to ornamental Napier grass for annual plantings. And, of course, they’re trusted stars in container plantings everywhere, regardless of climate. Thanks to their quick-growing and robust nature, the Royal Collection easily keeps up with the vigor of fast-growing annuals to create the most stunning container garden designs!
Pennisetum First Knight—The deepest, darkest, blackest purple of them all with sword-like, very upright leaves in the center and arching around the edges. Up to 5 ft. in certain environmental conditions, but generally 4 to 4.5 ft. in height. Zones 8(7) to 11 and disease resistant.
Pennisetum Majestic—Purplish-red with long and broad leaves, it’s the tallest of the Royal Collection, reaching 6 to 7 ft. in certain environmental conditions and a width of 4 to 5 ft., but generally 5- to 6-ft. tall. Zones 7 to 11 and disease resistant.
Pennisetum purpureum Prince—Deep-purple foliage color intensifies with summer with wide blades and upright habit. May flower in frost-free winters; 5-6 ft. Zones 7 to 11.
Pennisetum purpureum Princess—A smaller and petite form of Prince with deep-purple foliage that intensifies with summer. Typical height 3 to 4 ft. Zones 7 to 11.
Pennisetum Princess Caroline—Brilliant burgundy foliage that turns dark purple in summer. Falls in size between Prince and Princess with 4 to 5 ft. and equal width. Zones 8(7) to 11 and disease resistant.
Pennisetum Regal Princess—Dark purple, almost black foliage. Similar to Princess with improved purple color and enhanced disease resistance. 3 to 4 ft. Zones 7 to 11.
Liner transplants
Pot size: 1 to 3 gal.; plant one 38-cell liner per pot
Media: Porous to coarse with CRF incorporated
Growth initiation
Media pH: 5.5 to 6.6
Media EC: 0.80 1.5 mS/cm
Watering: Requires consistent moisture through the early stages. Control moisture as it finishes to reduce root rot and low fertility.
Fertilizer: Depending on the program, incorporate a 10-3-12 (six- to nine-month release) or something comparable into soil before transplant. As a top dress, apply accordingly to the edge of the inside pot area, refraining from application around stem of plant. As a liquid feed, apply 50 ppm every week for four weeks, then 100 ppm the next four weeks, followed by 150 ppm until finish. A constant liquid feed at every watering can be applied at 100 ppm.
Supplemental lighting: Using HID in greenhouses during November through April is recommended to enhance foliage color and extend daylight hours. Three extra hours in the morning before sunrise and three extra hours after sunset are usually sufficient.
Temperature: Grow in heated greenhouses when night temperatures fall below 60F (15C). Heater thermostats should range from 60 to 70F (15 to 21C) during this time.
Common pests: If moisture levels remain high in dense canopy, spittlebugs can become an issue. Snails are also present at high moisture levels. Watch for aphids, mealybugs and spider mites.
Common diseases: Can develop leaf diseases during high humidity and high moisture in the greenhouse. Watch for root and crown rot. Follow a monthly broad-spectrum fungicide control program.
Crop maintenance: Trimming to half the plant’s height can encourage lateral branching while maintaining compact size and form.
Growth regulators: Generally not needed, but a foliar application of Uniconazole (Sumagic, Concise) at 7 ppm (2 oz./gal.) will help control the overall height while promoting lateral branching, greater leaf thickness and darker colors. Height control will start to diminish within four to six weeks.
Finishing guidelines
Transplant a 38-cell liner into 1- to 3-gal. pots. Finishing time in a 1 gallon is approximately six to eight weeks and eight to 12 weeks in a 3-gal. container. Requires long days, high temperatures and full sun for the finishing requirements. Night temperatures above 70F (21C) are recommended. Cooler temperatures will delay finishing times. A three-week preventative rotation of a fungicide/insecticide is recommended if environmental conditions are favorable for disease and insect development.
For more information, visit ecgrowers.com or call (877) 804-7277.
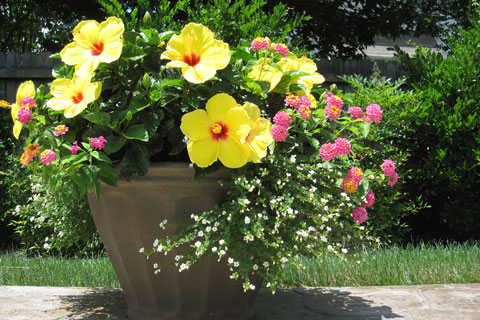
Tradewinds Hibiscus
By Dave Ogle, Director of Sales—Aris Horticulture, Inc.
The genetics behind Tradewinds Hibiscus provide vibrant flowers and foliage that will add a tropical sensation to patios, gardens and landscapes. Tradewinds continues to actively breed new varieties with incredible colors and foliage that usher in a warm breeze and the true spirit of the tropics. Tradewinds’ blooms are so large that you can sail into the summer season with the wind at your back.
Tradewinds Hibiscus are great products for summer-long color on the patio, ideal for season extenders after spring sales have slowed down. As a single potted plant or used in a beautiful combination planter, you won’t be disappointed with the vast bloom power of Tradewinds Hibiscus.
Tropical hibiscus are energy driven. They require high light and warm temperatures for the fastest crop time and full, quality potted plants. Northern and Canadian growers should start production March through June for the best results. Southern, Southwest and Southern California growers can mostly produce year-round with their higher light and temperatures.
Uses
Tradewinds Hibiscus liners can be used as houseplants or flowering plants for patios, window boxes and landscape applications. Tradewinds Hibiscus are offered in 4.5-, 6-, 8-, 10- or 12-in. pots. Although Tradewinds aren’t winter hardy in Northern climates, they’re meant to be enjoyed all summer long. Tradewinds will thrive outdoors in Southern locations where winter temperatures rarely drop below 50F (10C).
Clean start
Tradewinds Hibiscus liners and Quick Starts are produced from virus-tested stock for healthier plants, faster growth and less crop time. Growth regulators are applied to our liners, ensuring you have a quicker take off, fuller growth and more branches.
Planting one and two cutting liners: Remove the Ellepot Tradewinds Hibiscus liners by holding the strip and pushing the liner up from the bottom of the strip. Plant just deep enough to cover the surface of the liner with media. Water thoroughly and apply water directly to the Ellepot Tradewinds Hibiscus liner to keep wet until new roots are established. Monitor the liners for moisture for a minimum of three to four days after transplant.
Quick starts: A great option for transplanting into a larger pot or generating a quicker turn. They’ll have four cuttings and plants will be pinched 3 in. above the rim of the pot one to two weeks prior to shipment. Quick Starts are a great choice for that quick-turn, larger pot or in a high stress growing environment.
Media and irrigation: Use a well-aerated mix, but be sure that sufficient moisture can be retained since plants should never be allowed to wilt. Soilless media pH should be 5.5 to 6.2. As with all potted plants, water quality (e.g., alkalinity, nutrient content, etc.) should be known and monitored for optimal growth.
Fertilization: In order to give Tradewinds Hibiscus liners a great start and maximize breaking action, start with a constant feed of 300 to 400 ppm N for one to two weeks, then cut back to 200 ppm. Use a balanced fertilizer that has the majority of the N as nitrate and contains extra micronutrients as in “peat-lite specials.” During periods of rapid growth after startup, 400 ppm N may again be needed to maintain proper leaf color.
Light and temperature: These two factors greatly impact the crop size and timing. Hibiscus requires max available light with 65 to 75F (18 to 23C) night temperatures and 75 to 85F (23 to 29C) daytime temperatures for best production and best quality. Lower temperatures will slow plant growth. Higher light helps with better branching and more bud set.
Pinching and early bud removal: Pinching is used to create that perfect rounded shape. The first pinch is made once the plant is established, usually 10 to 17 days after transplant. Under ideal growing conditions, there will be three to four weeks between pinches.
For more information, visit ArisHort.com or contact (330) 745-2143. GT