10/1/2022
The Dynamics of Growing Media
Bill Calkins
As a greenhouse professional, you certainly have knowledge and experience when it comes to spotting and correcting the inevitable problems encountered with your crops. You most likely have a team that keeps an eye on things and addresses production issues as they see fit.
But when issues are left up to assumption, the diagnoses aren’t always accurate and can lead to wasted time and money. Trial-and-error can solve problems, but isn’t usually the best approach. Many greenhouse diseases and nutritional issues start in the root zone and work their way up, so addressing what’s going on in your growing medium is where accurate diagnoses begin, and this involves accurate testing, sampling and interpretation of results.
Troy Buechel, one of the knowledgeable horticultural specialists on the grower services team at Premier Tech, has been working with growers for a couple decades, focusing on plant nutrition, water quality and, of course, solving plenty of growing media challenges. It’s fair to say that he’s seen just about every crop issue and understands the science behind it.
The importance of testing
Think about this common scenario: Your crop is yellowing and not growing. Everyone on the production team has an idea of what the issue could be and a solution that’s worked in the past when they visually spotted the yellow foliage. The problem is yellowing can be caused by a wide range of different things. Before starting down the row of growers with ideas for how to address the problem, your first step should be conducting some in-house tests. As Troy explains, “Without testing, there’s no true starting point.”
The topic of testing can be complex and does lead to some extra work in the greenhouse, so let’s look at why your team needs to take a step back before jumping to conclusions. You might run tests when there’s a problem, and you should, but it’s even more beneficial to test regularly throughout the year and within production seasons.
“Scheduled testing of water and growing media allows you to track trends related to plant culture,” Troy says. “Understanding trends in pH and nutrients make finding solutions much easier.”
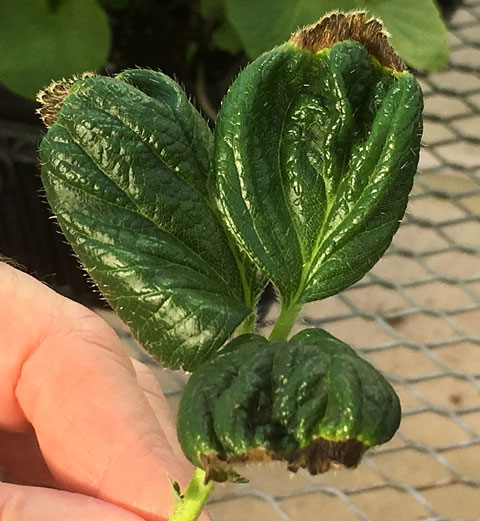 Pictured: The new leaves of a strawberry plant are showing brown edges. Could this be watering, pesticide toxicity, insect damage, nutritional deficiency or toxicity? Testing will help narrow down the problem. In this case, both tissue and media testing will help identify that this is a calcium deficiency. Source: Premier Tech.
Once you have a plan in place to test regularly, you’ll begin to create a clear overall picture, using data. The three areas to focus on are water, media and plant tissue. Each of these components will give you knowledge to plan for and prevent future issues. Troy recommends testing water before spring and before fall, as nutrient levels can change throughout the year.
Knowing your water quality allows you to pair fertilizer to the water and this results in overall better nutrition for all crops. It also indicates issues with fertilizer rates and helps you determine if your specific fertilizer is the best choice or if your injectors need maintenance. Media testing identifies pH and EC as well, and helps you understand what your plants are taking up or have access to in terms of N, P, K and micronutrients. Plant tissue testing (most often done by a professional lab) shows you the nutrient levels in the plant and looks back to what the plant had available a few weeks ago, letting you know if you made the correct adjustments and giving you information to make future changes more accurately.
You can always send samples off to independent labs, suppliers with such capabilities or university extension services, but there are some in-house tools you should probably have on hand so you can quickly generate data. Troy suggests at the bare minimum a pH and EC meter to test water quality and nutrition.
“And don’t go cheap,” he says. “High-quality meters lead to more accurate results, helping you make the best decisions and not waste time.”
Additionally, regular calibration of meters is critical and poor calibration can lead to devastating results, he says. Calibrate EC and pH meters daily or with each use. Troy also recommends a water alkalinity test kit as a must-have.
Effective sampling
Sampling is a critical piece of the puzzle and one that requires focus and consistency.
“Junk in, junk out,” Troy says. “Sampling random plants with different container sizes and different watering and fertilization schedules only results in a muddy picture.”
He says to sample with a high level of consistency. When sampling media and plant tissue, choose from the same house and pick one size pot in one crop with the same plant date and crop culture. Furthermore, collect separate samples from good plants and bad plants for comparison.
Some tips from Troy:
• You’ll need to sacrifice half a tray when sampling bedding plants. Shear off the top half of the plants to use as a tissue sample and use the bottom two thirds of the root ball for a growing medium sample.
• For larger containers, collect at least two cups of media (total) from six to 10 plants. DO NOT use medium from the top half inch of the root ball. Put this medium into a big Ziploc bag and mix it around.
• For plant tissue testing, rinse any residues from the foliage. Select healthy, not diseased, leaves. Recently matured foliage is best using two to three leaves per plant—and as many as 25 to 50 leaves in total, depending on leaf size.
• For tissue testing of seedlings, rinse any residue from the leaves and then shear the tops off plants in trays (or use the tops removed from the soil sample discussed above).
• When packaging plant tissue to send to a lab, dry it off first and then place in a paper bag.
 Pictured: Notice the upward leaf curling in the newer leaves of these poinsettias—could this be a sign of Pythium, temperature extremes or furnace fumes? Testing of the growing medium reveals that this is a symptom of high fertilizer salts in the growing medium. Source: Premier Tech.
Sampling water and fertilizer solution in-house is also a task that requires consistency and accuracy. Troy recommends sampling water from the end of your irrigation system or hose, not stagnant water. For your sample, fill a clean 4- to 8-oz. bottle all the way to the top, allowing no room for air. When looking into your fertilizer solution or rates to determine how injectors are operating, let the system run for at least two minutes and collect 4 oz. or more directly from the end of the hose.
Successful analysis & interpretation
Once your in-house tests are done or lab results are returned, it’s time to look at the results and find out what you should continue or change in the future. You’ll no doubt have pages of information or long lists of data points, but what’s most critical?
“You’ll be looking for trends in pH, EC, macronutrients and micronutrients,” Troy says.
In terms of pH of growing media, Troy explains that the level you’re shooting for is somewhere between 5.5 and 6.2 for most crops, and that pH is most important for micronutrient uptake.
“If your pH is too high, certain micronutrients—especially boron, copper, iron, zinc and manganese—become insoluble and cannot be taken up by plant roots,” he says.
And with a huge range of crops really needing micros, if you see yellowing in the new growth across many crops, it’s usually a sign of high pH and you should test to confirm. On the flip side, Troy explains that when media pH is below 5.5, that’s when you start to run into toxicity issues because the same micros mentioned above are too easily taken up.
When analyzing EC numbers, here are a few general guidelines from Troy: If your readings come back at the lower end of these ranges, it’s time to feed, and if you’re on the higher end, it’s time to back off. But like always, you want to watch for trends. If your numbers keep climbing each time you take a reading, you’re either fertilizing too much or something is accumulating in the plant that cannot be absorbed.
• Young plants from seed or cuttings: 0.5 to 1.5 mmhos/cm
• Plugs or liners: 0.7 to 1.7 mmhos/cm
• Larger containers (light-feeding crops): 0.7 to 1.7 mmhos/cm
• Larger containers (heavy-feeding crops): 1.0 to 2.2 mmhos/cm
Micronutrients are certainly something to keep a close eye on when testing and analyzing the results of media and tissue tests, but macronutrient analyses also are critical. Troy says he sees growers having issues with phosphorous and ammonium. Ammonium toxicity is more common in cooler times of the growing season when microorganisms within the growing media slowly convert ammonium to nitrate. Colder temperatures slow biological activity, causing accumulation of nitrites in plant tissue that induce toxicity.
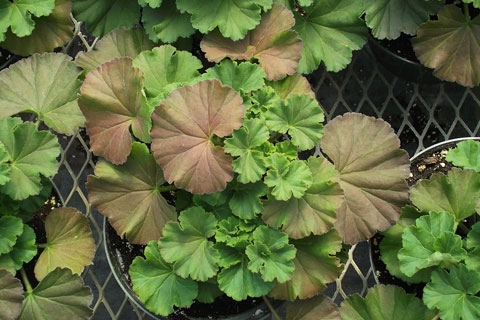 Pictured: Notice the lower leaves of these geraniums are showing reddening. What’s causing this? Testing the growing media and tissue will reveal that this is likely a nitrogen deficiency. Source: Premier Tech
Phosphorous, on the other hand, is key for causing stretch in plants, he says. Even using the best standard fertilizers, many crops just can’t take up all the phosphorous and it accumulates, leading to stretch. Look carefully at your phosphorous numbers when analyzing media samples, especially if you’re having issues with stretch.
Troy also mentions that when you get your test results it can be a good time to look at your key nutrient ratios. Calcium to magnesium, nitrogen to potassium, and nitrogen plus potassium to phosphorous are all ratios to consider. The optimum ratios for these and other nutrients will change throughout crop stages, highlighting the importance of regular testing. Often, a simple EC test will set you down the correct path to correct problems when your gut or past experiences might send you in the wrong direction.
One more thing to look for in tests is contaminants, usually coming from the water, and specifically, sodium and chloride. If sodium or chloride levels in the water test higher than 50 to 80 ppm, it’ll compete with beneficial nutrients within the growing media, Troy says.
“High sodium in water will accumulate in the growing medium, which is taken up by plant roots in place of calcium, potassium, magnesium and other elements. It is the same with chloride, but it will be taken up in place of nitrate and phosphorus.”
When this is realized, growers will often bump up the fertilizer rate a little bit to give the plants healthier nutrient options, he advises.
Go much deeper
Many tests can be performed in-house using basic tools, while once or twice a year, or when critical problems emerge, you might want to engage an independent lab or professional testing service. No matter how you approach testing, having the correct information in hand will arm you to solve problems and make the best decisions. GT
Click on the links to hear my full discussion with Troy in a three-part Tech On Demand podcast, brought to you by GrowerTalks and Premier Tech.
Dynamics of Growing Media (Part 1): The Importance of Testing
Dynamics of Growing Media (Part 2): Effective Sampling
Dynamics of Growing Media (Part 3): Successful Analysis & Interpretation