9/1/2021
10 Ways to Reduce Nursery Weed Control Costs
Dr. Chris Marble
Surveys have revealed that nursery weed control is expensive. Very expensive. Weeds are a continual issue and hard to control because like many pests, they don’t increase linearly, but exponentially. While it’s a hard job, it’s not impossible.
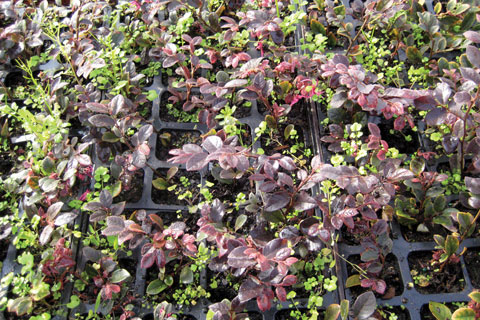
Figure 1. Starting out with weedy liners will result in a lot of hand-weeding going forward. The small weeds that are missed when the liners are weeded will be missed by the first preemergence application after potting the plants.
Here are the 10 ways to improve nursery weed control and reduce weeding costs:
1. Start clean and stay clean. The “mantra” of nursery weed control is start clean and stay clean. Using weed-free liners, clean pots, avoiding “recycled” potting soil and keeping key production areas like propagation, bark piles, over-wintering houses and propagation areas weed free will dramatically reduce weed pressure throughout the nursery (Figure 1).
2. Know your weeds. It’s likely that the weed spectrum in container yards, non-crop areas, greenhouses and in field-grown crops will all be slightly different. Also, know that although there’s often some overlap, different nurseries will also likely have different weed problems based on their production practices. So just because a particular herbicide or tactic worked at Nursery A doesn’t mean it’ll work at Nursery B. It’s going to be important to be able to identify the weeds you’re dealing with and also keep track of when different species start to become problematic at your nursery each season. This will help you to select the best herbicides for your nursery, plan ahead and build a better weed-control program.
3. Make sanitation a priority. One of the cleanest (weed-free) nurseries I’ve ever visited was in central Florida at a nursery where they made three or four preemergence applications per year. That might not sound crazy to some people, but having a clean nursery in Florida on four applications per year is remarkable. They were able to do this by placing a huge emphasis on sanitation (starting clean and staying clean). Everyone was trained to immediately pull any weeds that broke through, while roadways, aisles and ditches were all kept weed free, reducing the weed pressure and allowing great results from just a few preemergence herbicide applications every year.
 4. Calibrate your application equipment. The No. 1 cause of herbicide failures (poor weed control or crop injury) are related to improper application and it’s not uncommon to see rates ranging from 25% to 400% of the intended dose. Herbicides are designed to work within a narrow window where if they’re applied at too high of a dose, injury can result while a low rate won’t provide control or will only provide control for a short period of time. Making calibration a priority will ensure you’re getting the most bang for your buck out of your herbicide applications.
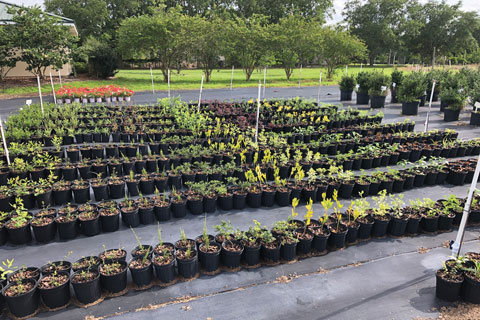
Figure 2. Herbicide crop tolerance testing at the University of Florida. At nurseries, groups of plants can be grouped together and treated with new herbicides to see if they’re safe before wide-scale application.
5. Rotate your herbicides. No one herbicide will control all the weeds. If the same herbicide (or mode of action) is used over and over again, eventually some weed will take over. This can also lead to resistance development. Your weed spectrum will change each season—so should your preemergence herbicide applications. To develop a rotation, first figure out what all your options are crop safety-wise.
Next, determine what your top weed problems are each season. Pick the best herbicide for that weed from your “safety list” and time the application to coincide with that weed issue. Then use another effective option with a different mode of action for the next application. A good step-by-step guide, along with example rotations, can be found in the “Southeast Pest Management Guide for Nursery Crops” at tinyurl.com/SEPestGuide.
6. Test new or different herbicides. Many ornamentals aren’t listed on any herbicide label, but it’s likely that there are herbicides that’ll work. Or there might be a case where an herbicide might be a strong option for a particular weed problem, but your crops aren’t on the label. Luckily, most preemergence herbicides have “open” labels, meaning that even if an ornamental isn’t listed on the label, you can usually test it on your crop mix to see if it’s safe. This practice is recommended regardless because it’s always best to make sure a new herbicide performs well in your specific
conditions (Figure 2).
7. Consider adding liquid (or granular) options to your program. Many growers exclusively use either granular or liquid herbicides. Both have advantages and disadvantages. There are more (over-the-top) options in terms of active ingredients with granulars and they can be applied with simple application equipment, but they can’t be used on wet foliage and are difficult to apply accurately. Liquid formulations are less expensive and easier to apply, but chances of crop injury increase in some cases.
Consider the advantages of incorporating a new formulation into your program. There might be advantages in terms of efficacy by being able to use a different active as a granular that can’t be applied as a liquid. Or you might see advantages of adding liquids formulations to give you a wider application window because they can be applied to wet foliage while also saving on chemical costs.
 8. Use non-chemical options. Some ornamentals simply do not tolerate herbicides well at all, but that doesn’t mean you have to resort to just hand-weeding. Using mulch such as rice hulls, pine bark nuggets, weed mats or other materials really can offer great weed control. While these products can be much more expensive than preemergence herbicides, don’t compare the cost of mulch to herbicides—compare the cost of mulch to hand-weeding crews.
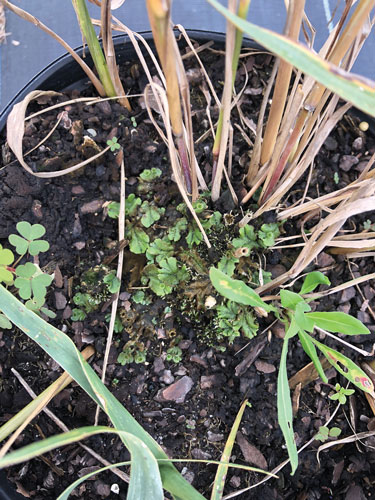
9. Don’t ignore the greenhouse (or other enclosed structure). Herbicide options are limited inside greenhouses or other enclosed structures, but good options are available. Glufosinate (Finale XL), diquat (Reward), pelargonic acid (Scythe) and several other postemergence herbicides are non-volatile and can be used while crops are in the house. Additionally, indaziflam (Marengo) could be applied to provide preemergence control. Focusing on sanitation in these areas and scouting regularly for weeds like liverwort (Marchantia polymorpha) will help more than anything (Figure 3).
Figure 3. When this pot is moved back inside a greenhouse for overwintering, this liverwort will spread and begin to infest all of the pots in that house.
10. Hand-weed more frequently. Many weeds can start to produce seeds in as little as 30 days after germinating from seed. If pots are weeded only every eight to 10 weeks right before the next preemergence application, the weeds that broke through have already started throwing off thousands of seeds. Weeding every two weeks ensures weeds don’t mature and dramatically reduces weed pressure over time.
Labor costs are also reduced. First, the pots can be weeded faster as you don’t have to pull very small weeds since you’ll pull them next time around in two weeks. Secondly, because the weeds don’t go to seed, the pressure decreases dramatically, reducing future weeding. Research out of North Carolina State University has shown this method reduces labor costs by about 40%. Similar results were seen in Florida and Virginia.
See “Frequent Hand Weeding Saves Money” at content.ces.ncsu.edu/frequent-hand-weeding-saves-money for more information on how to employ this strategy. GT
Dr. Chris Marble is Assistant Professor—Ornamental, Landscape and Invasive Weed Management at the University of Florida Mid-Florida Research and Education Center in Apopka, Florida.