7/1/2021
Putting Your Media to the Test
Ed Bloodnick & Troy Buechel

Comparative product evaluations, product demonstrations and product trials are important for growers when evaluating new products, plant varieties and even growing media. This is the best way of determining what new product can benefit your business. But there are certain protocols that should be followed to ensure products are evaluated properly and the results can be replicated should you decide to move forward with a new product.
Here are some helpful tips for setting up a comparative product evaluation for growing media, although these guidelines can be applied to plants and other products.
Determine the objectives
First, determine the objective(s) or goal(s) you wish to achieve with the product being evaluated. The basic questions that should be asked are:
1. How does this product work?
2. What does the product offer me?
3. How will the product perform in my situation?
4. What’s the return on investment (ROI) to use this product?
Before moving forward to evaluate a product, there are other points to consider. Time of year must be considered, commitment to have a team member conducting the evaluation properly and ability to provide a dedicated area for an evaluation are just a few requirements for a proper evaluation.
Setting up a product evaluation
Any product evaluation requires precision, consistency and commitment by individuals that are conducting it. For example, with growing media, the existing growing medium and the new growing medium to be evaluated must be used to fill the same size containers and then planted with the same plant type, cultivar and size into both growing media on the same day. All plants should be marked and labeled to clearly identify that plants in the flats or containers are being monitored for an evaluation (untreated/treated, standard/new, etc.).
Once this is completed, all plants can then be moved to the dedicated evaluation “grow zone” within the greenhouse or nursery. The growing zone should provide uniform growing conditions for all plants and provide adequate light intensity and air movement. Plants placed in the grow zone should be placed next to each other to allow for a visual side-by-side comparison. The only difference is that each growing medium should be set up on separate irrigation/fertigation systems since each may have different water retention and dry-down characteristics.
Often, evaluations of new growing media and new plant cultivars fail due to over- or under-watering because treated plants receive the same care as the standard product. Therefore, irrigation scheduling may be different for each growing medium and adjustments may be needed. If plants aren’t constantly fed, adjust the fertilizer schedule so the plants in the new growing medium receive proper nutrition.
Once pots/containers are planted and placed in the evaluation grow zone, plants should remain at that location until the conclusion of the evaluation. They shouldn’t be moved to other locations in the greenhouse where the plants could be lost.
Monitoring
It’s important to properly monitor the progress of a plant growth evaluation over the duration of the plant grow cycle. Fast-growing crops (e.g. annuals) that finish in three to eight weeks require weekly monitoring compared to long-term crops (e.g. poinsettias) that can be monitored every two weeks. Because every crop is different, determine the parameters to be measured and the monitoring intervals prior to planting any crop.
It’s best to prepare a schedule with the manufacturer’s technical representative to determine what data will be collected, whether it’s improved overall growth, better rooting, healthier plants, more prolific flowering, more cutting production and/or shorter crop time. Allow for sacrificing of some plants at each monitoring interval for testing of plant dry weights, root ball grading, testing of growing media nutrient analysis and plant tissue analysis. Then you can determine what parameters and different growth effects are important to measure. If large groups of plants are potted up, tag and label a minimum of 12 random plants from each group to collect data from each visit. Data can be collected with the technical representative at the predetermined dates. Determine the targeted planting date, harvest date and set a schedule for weekly/biweekly monitoring.
When monitoring and collecting data, a list of parameters should be measured, which can range from physical measurements, counts and grading. Pictures of plants from each group are necessary each time and should be taken on a solid white background with a tape measure or yard stick in the background. Allow for sacrificing of some plants at each monitoring interval for testing of plant dry weights, root ball grading, testing of growing media nutrient analysis and plant tissue analysis. Each monitoring interval should include any cultural notes, such as day/night temperatures, application of any chemicals (growth regulators, pesticides or change in fertilizer program) and any environmental changes (e.g. shade applied to greenhouse, etc.).
With monitoring, it’s necessary to have a devoted staff member who’s responsible for plant care and oversight for all inputs and record any observations. Remember that if a technical representative is monitoring and collecting data each week or two, staff and management needs to know who it is and when they’re expected to be on site. Also, keep in mind that data collection can take some time to gather plants, measure parameters and record the results, therefore the data collector will often need several hours to record data.
Do’s & don’ts
• Restrict access to your plant grow zone evaluation area. Often when new products are evaluated, plants grow better and faster than their standard counterparts, then magically disappear before the conclusion of the evaluation.
• Be honest in your product evaluation. If the timing isn’t right or you don’t have a person to assist, it’s better to wait for a more convenient time.
• Be committed to a product evaluation. Set the dates, assign the location in the greenhouse and be committed to a product evaluation. Devote a dedicated person to oversee the grow zone and properly monitor the evaluation for the entire duration. After all, the results can benefit your business.
• Don’t call it quits! Wait for the final report summary. Data and laboratory analysis are very helpful in determining benefits.
 Determining payback
At the end of any product comparative evaluation, the technical representative should provide a report of the findings. The report should include all the data collected, pictures and laboratory analysis (if applicable) with a summary of the results. The purpose of the report is to review all the data and determine the value of the parameter(s) that is/are important to you.
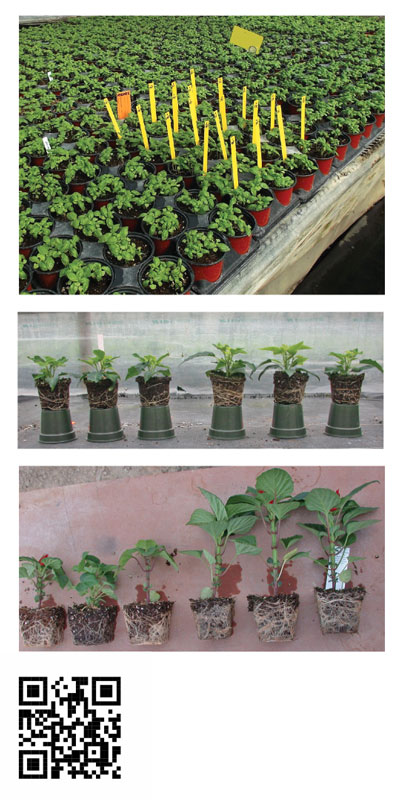
Pictured: An example of basil plants that are properly tagged in the greenhouse for a side-by-side plant growth comparison.
When taking pictures of a plant growth evaluation, it’s suggested to take representative plants from each group. Remove them from the pot so top and root growth can be seen simultaneously.
Root growth and top growth differences are easy to see when pictures are taken of side-by-side plants removed from their containers. This picture shows the benefit of using a new growing medium as seen in the three plants on the right versus the conventional product on the left.
For example, if the crop finishes a week early, what is the value of cost savings for less time on the bench? This can be translated into cost per square feet per week applied to the crop. If the product evaluated reduces the cost of pesticide applications, or crop loss is reduced, and the quality of the crop is better, determine the overall cost savings and gains. If the product reduces labor and reduces crop management, determine the cost savings. These are some examples of cost savings that can be applied to determine the real value of a product. Cost savings can be used for determining the return on investment (ROI). To calculate ROI, take the net profit or total returned gained minus the initial investment.
In some cases, you can use the difference in the cost of the standard product you’re currently using as the investment. Often a new product or technology may cost more because it provides added benefits. This is where you can plug in the dollars gained (see above), then subtract the initial investment cost for the new product. If the value obtained is positive, then there’s a return on investment.
Conclusion
Whether you evaluate a new plant variety, new chemical, fertilizer or growing medium, it’s important to prepare ahead of time, dedicate a specific grow zone area, and devote people to properly monitor and collect data. By following a set protocol, you can verify if a new product provides the desired benefit for your growing environment. Then determine if these benefits provide a return on your investment. Doing so will provide the information needed to know if switching to a new product makes sense. GT
Ed Bloodnick is Director of Grower Services, and Troy Buechel is Horticulture Specialist—Mid Atlantic U.S. for Premier Tech Growers and Consumers.