10/1/2019
Info, Know & Grow
Jennifer Zurko
Sincerity Dahlia
By Dr. Alicain Carlson & Dr. Cecilia Guo, Syngenta Flowers
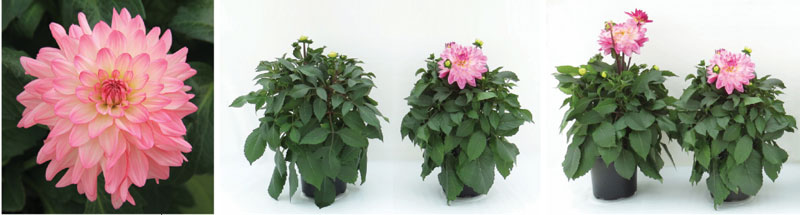
There are three words to describe Sincerity Dahlia: big, bold and beautiful. Noted for its large pink and white bicolor flowers, Sincerity is truly eye-catching. Dense, well-branched plants make a shapely backdrop for the showy blooms. Sincerity is a perfect choice for the landscape and high-end patio containers.
Figure 1, below center: Sincerity Dahlia pinched two weeks after transplant (left) vs. unpinched (right). Photo taken eight weeks after transplant in a 1-gal. (2.5-qt.) container. Note the delay in flowering after pinching. (Gilroy, California; March-June 2019.)
Figure 2, below right: Sincerity Dahlia with no PGRs after transplant (left) vs. the plant on the right which received two Florel sprays of 250 ppm 10 days apart starting when visible buds could be seen. Photo taken eight weeks after transplant in a 1-gal. (2.5-qt.) container. Note the reduction in peduncle stretch on the treated plant. (Gilroy, California; March-June 2019.)
 Propagation
Stick cuttings of Sincerity into 105-cell propagation trays or larger. You should expect root emergence in eight to 10 days. Rooting hormone is not recommended, but bottom heat for the first three weeks will help to ensure good rooting. Media temperatures of 70 to 74F (21 to 23C) are recommended and then temperatures can be lowered to hold and tone cuttings. Air temperatures between 72 to 74F (22 to 23C) during the day and 70 to 72F (21 to 22C) at night are recommended.
Apply just enough mist upon stick to rehydrate the cuttings and keep them from wilting—they should rehydrate within 24 hours of sticking. Cuttings that are allowed to wilt heavily after stick will callus unevenly and rooting will be delayed. CapSil (spray adjuvant) can be sprayed on the cuttings at a rate of 2 to 4 oz./100 gal. within one to two days of sticking to help rehydration. Misting can be reduced after cuttings have rehydrated.
Dahlias are facultative short-day plants so during propagation it’s important to provide long days (14 hours) either through daylength extension or night interruption to prevent premature budding that can delay rooting. For the first two weeks after sticking or until roots form, a daily light integral (DLI) of 4 to 6 mols/day is recommended and then light levels can be increased to greater than 12 mols/day after root formation. Sincerity should be fully rooted in about four weeks in a 105-cell tray.
Recommended media pH and EC is 5.8 to 6.2 and 1.4 to 2.0 mS/cm, respectively (PourThru). Fertilization should begin at 100 ppm Nitrogen when roots become visible. Rates can be increased up to 200 ppm Nitrogen after roots are well developed. It’s best to use primarily Cal-Mag (calcium nitrate + magnesium nitrate) fertilizers in propagation to prevent unwanted stretch. Pinching is not recommended.
Sincerity has a moderately vigorous habit and may require a PGR treatment in propagation. If needed to control growth after rooting, sprays of B-Nine WSG (1,500 ppm) are usually sufficient. A tank-mix spray of Florel (350 to 500 ppm) + B-Nine WSG (1,500 ppm) can also be used to control growth and improve branching. Do not spray Florel on stressed or weak cuttings. For all sprays listed above, the mist should be off for a minimum of one hour for the PGR to absorb into the leaf
tissue.
Finish
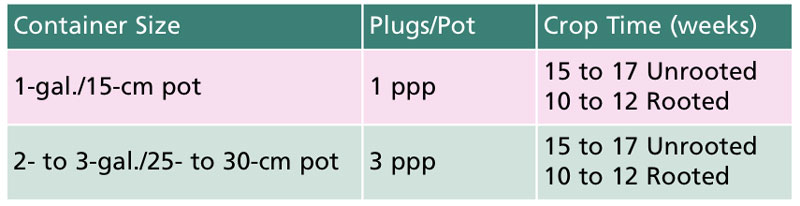
Transplant directly into the finished container. We recommend 1 ppp in a gallon (2.5 qt.) container and for larger containers, such as 10 in. or 12-in. baskets, use 3 to 4 ppp. Plant the rooted cutting and rooting media relatively deep in the container. Dahlias need deep and sturdy planting to provide good support and balance in the pot for the maturing plants.
Provide warm temperatures early on in finishing to allow plants to establish after transplant. Sincerity grows best under moderately warm temperatures. Avoid extreme heat stress, especially under relatively high light intensities. Day temperatures between 64 to 66F (18 to 19C) and night temperatures between 66 to 68F (19 to 20C) are recommend. Average daily temperature is ideal between 69 to 71F (20 to 21C).
Day extension lighting is beneficial to 14 hours or use night interruption. The ideal photoperiod during finishing to provide the correct balance between vegetative growth and flower formation is between 13 to 14 hours. Growing under very short natural days (< 12 hours) will result in short plants, fast flowering and root tubers since dahlia is a facultative short-day plant. Recommended light intensity during finishing is 4,000 to 6,000 foot candles and a DLI of 16 to 18 mols/day.
Using PourThru method, root media EC and pH should be kept between 2.3 to 3.2 mS/cm and 5.8 to 6.2, respectively. We recommend fertilizing with 200 to 250 ppm Nitrogen. Pinching is not necessary and will delay flowering by one week (Figure 1). Without pinching, Sincerity still produces lots of buds for fast secondary flowering. The long-lasting flowers will cover plants with color.
Sincerity has a sturdy, well-branched habit and will need moderate PGR treatments during finishing. Sprays of B-Nine WSG at 2,500 ppm are recommended at four weeks and six weeks after transplant to help control growth. Sprays of Florel at 250 ppm at four weeks and five and a half to six weeks after transplant will also help to control growth and can be used instead of the B-Nine WSG sprays.
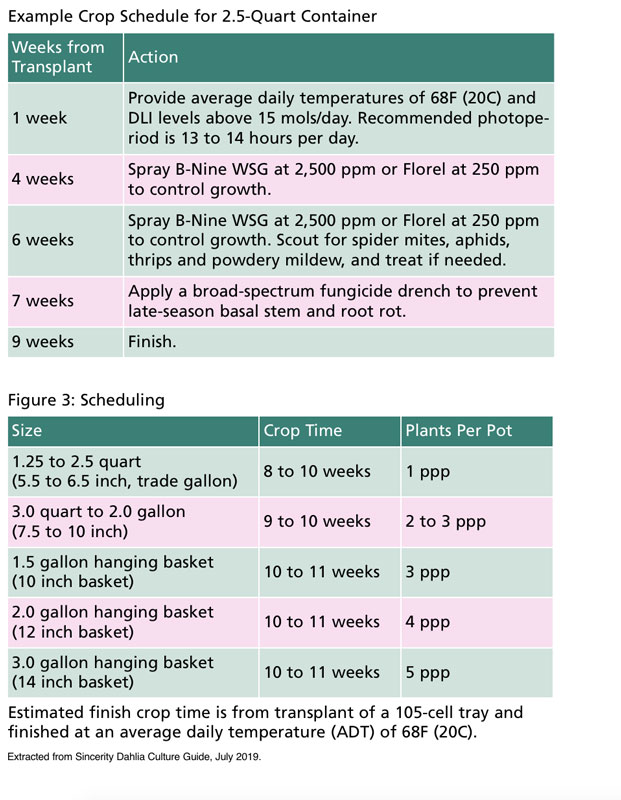
The Florel sprays will also help prevent late-season flower peduncle stretch (Figure 2). A Bonzi drench at 2 to 4 ppm can be used to hold plants for sale at the end of production. On average, Sincerity grown in 1-gal. containers finish in eight to nine weeks after transplant. Larger containers require longer finish time (Figure 3).
Scout and treat for a range of common insects, including aphids, spider mites, thrips and leaf miners. Apply preventative controls for diseases, including Botrytis, powdery mildew and basal stem rot. For postharvest protection from ethylene damage during transport, we recommend spraying Chrysal Alesco two days before shipping finished plants to delay senescence and keep dahlias looking fresher longer.
Galaxy Geranium
By Luís Muñoz, Ball FloraPlant
New Galaxy Zonal Geraniums will be your new vigorous green-leaf geranium of choice. Not only will Galaxy Geraniums meet and exceed garden performance needs, but they’ll also be easy to grow and produce. Adding Galaxy to your program will make growing a breeze and give the consumer more bang for their buck. Customers will be looking to fill, color and create interest within their landscapes and Galaxy Geraniums will attract as much attention as the Milky Way. However, we won’t have to wait or go looking for perfect night conditions to be able to glimpse and appreciate the wonders of our Galaxy.
Galaxy Geraniums were trialed in various regions to obtain the best data and cultural recommendations that will make growing these high-vigor geraniums in #1 containers and out in the landscape much easier than trying to see the Milky Way on a clear night. Based on culture trials completed in West Chicago, Illinois and California, we have specific growing recommendations for both North and South regions.
These recommendations will be most successful under normal growing practices from stick to finish. That means propagating like a normal geranium, which involves ensuring cuttings are stuck as soon as possible upon arrival, providing sufficient space to maximize airflow, reducing disease pressure and having adequate misting conditions throughout propagation. You can expect to mist approximately six to nine days and be ready for transplanting in three to four weeks.
When finishing zonal geraniums, be sure to maintain soil pH levels between 6.2 to 6.6, light levels between 3,500 to 6,000 foot candles (fc), day temperatures of 65 to 76F (18 to 24C) and night temperatures of 62 to 67F (17 to 19C). Providing this environment and growing conditions will maximize growth and quality.
Be sure to use proper pest management if symptoms and signs of fungus gnats, thrips, aphids and mites emerge. No pinch will be necessary to finish a quality plant and crop time will vary depending on container size and growing conditions. Be sure to maintain adequate air circulation and keep foliage dry, especially going into the evening.
Although Galaxy Geraniums can be easily grown, culture trials were done to confirm and explore beneficial cultural practices. In California, trials stuck Week 1 and transplanted Week 4 were successfully finished by Week 13, giving us a 12-week total crop time. We successfully grew Galaxy in 1-gal. containers with little to no PGRs.
As the crop developed and approached finished size, a late B-Nine 2,500/Cycocel 750 ppm tank mix spray was applied seven weeks after transplant (Week 11). This application was applied to hold for retail. Although this is a vigorous product, the natural mounded habit allowed for a successful production with little PGRs. We also found that Florel spray application rates of 200 to 300 ppm at 14 to 21 days after stick and three weeks after transplant produced a more toned plant. This was also followed by the before-mentioned B-Nine 2,500/Cycocel 750 ppm spray application for hold during retail.
In Northern regions, trials stuck Week 5 and transplanted Week 9 were successfully finished by Week 18, leading to a 13-week crop time. Under West Chicago growing conditions, Galaxy were responsive to spray applications of Florel 300 ppm or Cycocel 750 ppm. These applications were applied twice, 14 to 21 days after stick and four weeks after transplant to produce nicely toned plants.
Part of growing out new vigorous cultivars is like our galaxy—when first discovered, it requires some exploring to identify their limits and possibilities. So it’s good to know that Galaxy Geraniums have the potential to fill large containers and landscapes, but can be easily controlled under greenhouse conditions.
It’s important to always explore far beyond what can be seen. For this trial, we explored many options, whether it was to reduce labor by making Florel applications that could possibly limit having to return to manually deflower or B-Nine applications to limit and control growth. For full details on this trial, visit Ballfloraplant.com.
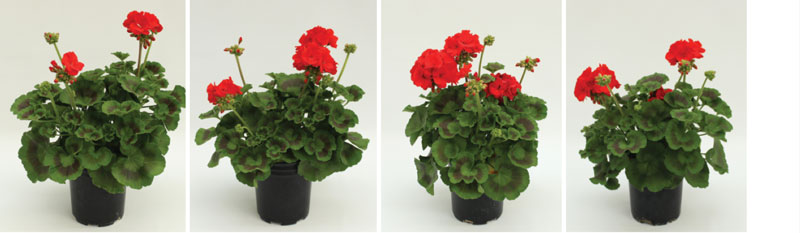
Pictured below: Galaxy Red Geranium trials from left to right: Control (no PGRs), Florel 200 ppm, Florel 300 ppm and Cycocel 750 ppm.
Silver Treasure Begonia
By Chuck Pavlich, Terra Nova Nurseries
Begonia Silver Treasure caught the imagination of growers and buyers alike at Cultivate’19 in Columbus, Ohio. Not only was it the most favored plant at the Terra Nova Nurseries booth, but it was also an award winner in trials across the United States.
A fourth-generation hybrid, Silver Treasure was bred for the potted crop and perennial market. Silver Treasure and its sibling, Begonia Silver Lace, are by far the most cold-tolerant and hardy begonias Terra Nova Nurseries breeds. This is, in part, due to our sourcing of materials mostly from the Yunnan region in China and its Mount Lijiang, famously known as Snow Dragon Mountain.
 The parentage is mostly B. grandis spp. Evansiana, which gives Silver Treasure a good amount of hardiness, though other species played a role in this trait as well. B. grandis is USDA Zone 5 hardy, but it’s not very ornamental and can sometimes grow too tall and flop over in cultivation.
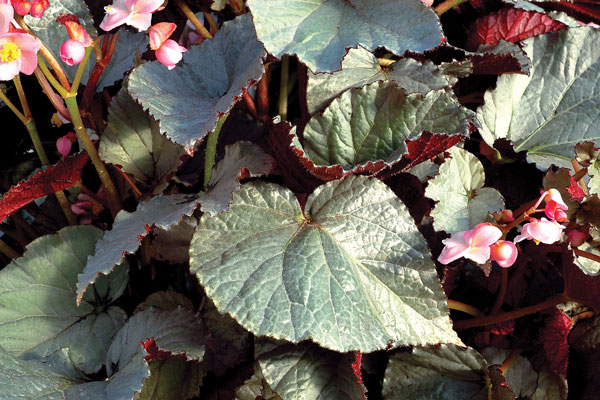
In breeding Silver Treasure, we knew it had to overcome the bad habits of B. grandis while also keeping the hardiness. The habit of Silver Treasure is nothing like its majority parent; it’s compact, beefy and well branched. The almost mirror-silver top surface contrasts with the rich burgundy back and is the perfect foil for the foliage. Its flowers are relatively insignificant and held mostly below the foliage, but are never a bother and don’t need to be constantly cleaned up.
The rhizomatous root habit is extensive and adds to the hardiness of the plant overall. If the root mass were bulbous, the possibility of freezing is greater. Fine-fibered roots are less likely to rot in wet soils as well.
Silver Treasure is a multi-use plant; in a mixed container, it’s a marvelous blender, uniting a broad range of colors. Impatiens, fuchsias, coleus and heuchera are great companion plants for begonias, as are ferns and azaleas. As an in-ground plant, Silver Treasure brightens a shady spot, reflecting light and colors unlike any perennial before, and is quite stunning.
When planted as an understory plant, perhaps under rhododendrons or azaleas, it adds another dimension to the garden, making the understory the showpiece when the rhododendrons have finished blooming. Mixing Silver Treasure with subtropical plants like fatsia or ferns will add an unrivaled eye-catching pop of color and texture. As a solitary plant in a container, Silver Treasure is a classic look that bridges shabby chic to ultra-modern and beyond.
Culture for Silver Treasure is relatively easy. From a Stage 3 plant out of tissue culture, Silver Treasure forms a well-rounded plant with excellent branching. It needs no pinch and PGRs are neither required nor recommended.
For Silver Treasure to reach 4 in., expect the liner to finish time to be four to six weeks. Additionally, a Silver Treasure liner can reach 2.5 quarts in eight to 10 weeks.
Silver Treasure holds exceptionally well on the shelf and shipping is easy because of its cold tolerance. Additionally, the variety can ship earlier and stay on shelves later than virtually any other begonia on the market. They respond well to slow-release fertilizers as a potted crop and should be fed well at about 150 to 200 ppm.
Silver Treasure is a very healthy plant, rarely visited by disease or insects. Shade is still essential for success; morning sun is fine, but not required for good growth.
Marketing this plant is quite easy and opportunities for sales are extensive. For example, spring annual and perennial sales are a given, not to mention winter houseplant and holiday sales, as it can give holiday poinsettias an exciting option for a companion.
Silver Treasure marks a new era in begonia breeding and has the ultimate hardiness, habit and ease of cultivation wrapped into one. Our goal at Terra Nova Nurseries has always been to be the first and best in breeding and this begonia doesn’t disappoint.
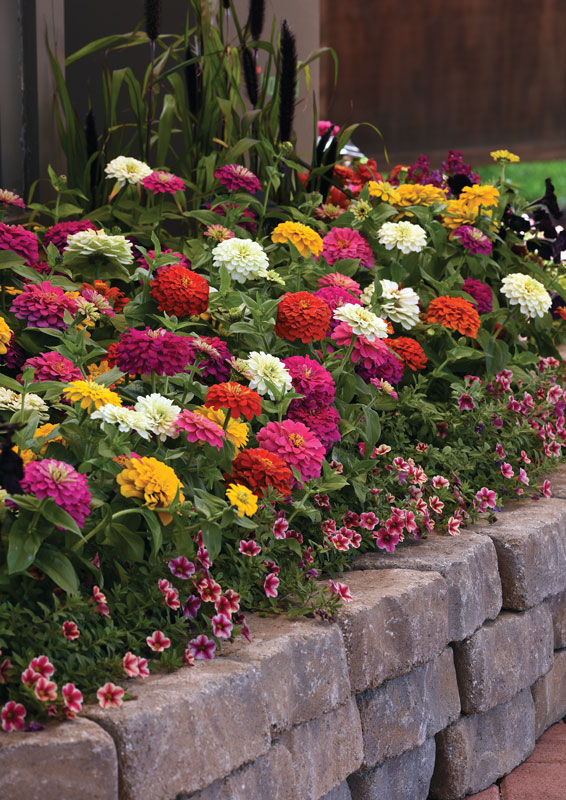
Zesty Zinnia
By Kelsey Fletcher, Ball Ingenuity
When you need that “50 mph color” to catch the eyes of customers, choose the new Zesty Zinnia series to make them stop and take notice. Bred by PanAmerican Seed and offered exclusively through Ball Seed, Zesty has extraordinary garden appeal with uniform growth that fills in large planting areas, yet it’s also remarkable in containers and mixed combinations.
The five varieties and one mix offer non-fading color in attractive double-flower blooms—the perfect form to attract butterflies! The plants are well-branched and full with intense, saturated color, including a purple that’s unique to this series.
Follow our recommended guidelines below to produce an outstanding crop for your customers.
Plug culture
Zesty Seed is offered in coated form. It germinates at 68 to 73F
(20 to 23C) and takes about two to three days. Cover the seed with a medium layer of vermiculite after sowing to maintain uniform moisture around the seed during germination.
Maintain the media pH at 5.8 to 6.2 and EC of 0.75 mmhos/cm during plug production. Bottom heat during production can increase yield potential and decrease crop time. Lighting is optional, yet not required.
During Stage 2 and 3, provide moisture levels of 3 to 4 (medium to medium-wet) with temperatures at 68 to 75F (20 to 24C). Set light at 1,000 to 2,500 f.c. (10,800 to 26,900 Lux). Apply a fertilizer less than 100 ppm N, less than 0.7 EC. Temperatures and light are maintained through Stage 3. Even moisture is preferred, as excessive media and foliage wetness can lead to instances of disease.
In Stage 4, before growing on to finish, increase light levels to 2,500 to 5,000 f.c. (26,900 to 53,800 Lux), applying fertilizer at 100 to 175 ppm N to 0.7 to 1.2 EC. When finished, do not hold onto the plugs too long, as this may cause delay in flowering.
PGRs
Start applying PGRs in Stage 3. Apply Daminozide/2,500 ppm/spray, then repeat the application again in Stage 4.
Growing t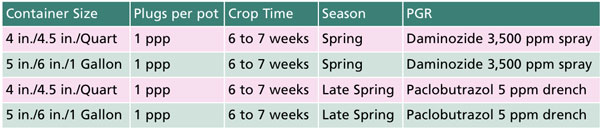 o finish
Maintain growing temperatures (day: 70 to 85F/21 to 29C; night: 60 to 68F/16 to 20C). Provide plant nutrition during finishing: 225 to 300 ppm N to 1.5 to 2.0 EC.
Creating a Formula for Optimum New Guinea Flowering
By Mike Fernandez, Danziger
No matter what crop you’re growing, chances are you’re continually searching for the optimum growing conditions. Time can be a precious commodity and taking the time for multiple trials isn’t always realistic. That’s where relying on research and growing tips from breeder trials can help. At Danziger, we know that being able to confidently program flowering time creates efficiencies in your operation and can help make your business more profitable. That’s why we trial our varieties around the world, then pass on the most effective growing tips and techniques on to you.
 Our stick-to-flower trials for New Guinea impatiens have found that temperature and humidity, not light, are key factors in flowering time. In fact, finish time from sticking the unrooted cutting to flowering plant can be calculated using these two markers. By monitoring temperature and humidity, you can create a formula for optimum growing conditions and have better control of your finish times.
Perfect temperature
Our trials found that the optimum temperature for New Guineas is 72F (22C). New Guineas will have different finish times depending on the variety, from 10 to 15 weeks at 72F. These different finish times make the trial important; it allows you to group the varieties by weeks to finish and vigor, categorizing by small, medium and large. The data allows you to ship the finished varieties together.
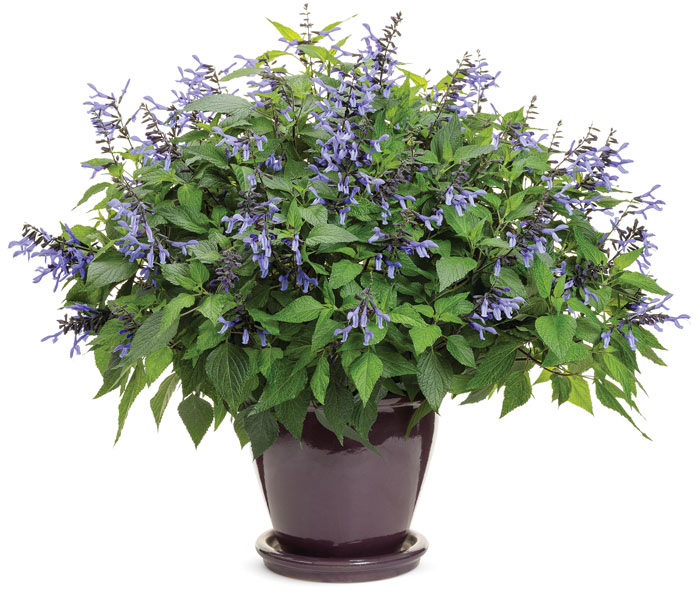
Pictured: Sun Harmony New Guinea Impatiens.
Cooler or warmer temperatures can drastically increase completion time from sticking the URC to flowering plant. In our trials, when the temperature dropped to 68F (20C), production took two weeks longer. When the temperature was increased to 75F (23C), additional time was required for the plants to finish.
Adding humidity
New Guinea impatiens need humidity to thrive. Research at Michigan State University found that low humidity levels caused plant temperatures to drop. The plants, especially when young, have low resistance to water loss. Low humidity levels force water to evaporate from the plants, dropping their leaf temperature. The effects of water loss are especially noticeable at night, as NGI only transpire at night. This transpiration cooling effect adds time to plant growth.
In our trials, consistent humidity levels of 80% were ideal. At this level, the plants won’t transpire at all. Adding water vapor to the greenhouse or watering later in the day can take care of the issue. We’ve found that even just the simple task of watering the sidewalks at the end of the day can help keep humidity at the correct level.
More control
Knowing the correct temperature and humidity level for your preferred finishing time, from sticking the URC to flowering plant, gives you better control of when your crop will be ready to go.
It’s important to note that all New Guinea impatiens varieties are different. Our tests were conducted on several varieties, including Danziger’s Sun Harmony series. Do you want more control of your New Guinea crop? We’re happy to help you create the best formula for success!
Additional Sun Harmony growing tips:
• Spray with Florel at 300 ppm the day after sticking unrooted cuttings into liners; this application helps reset the flower timing
• Apply Daconil or similar chemical the day of sticking, second application in Week 2
• Maintain pH levels between 6.0 and 6.5
• New Guineas are day neutral
• Feed 50 ppm N in mist in Weeks 1 and 2, 65 to 80 ppm N in Weeks 3 to 14
• Apply Bonzi or Sumagic as needed, drench Bonzi if needed at ¼ of 1 ppm at Week 6 through 14
• Pinching is not necessary
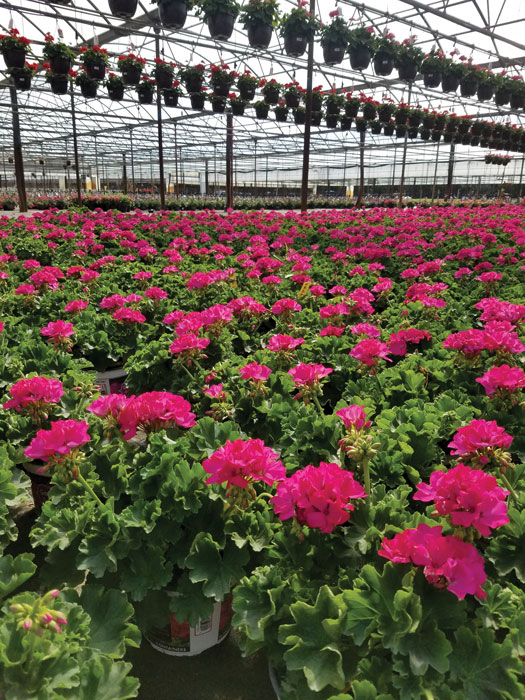
Big EEZE Geranium
By Kelly Nicholas, Dümmen Orange
The highly uniform Big EEZE interspecific Pelargonium series from Dümmen Orange is known for its enormous umbels, saturated colors, semi-vigorous green foliage and “EEZE” production requirements. This series has loads of consumer appeal with its easily recognizable, traditional zonal-type habit, plus performance they’ve never before experienced with the heat and humidity tolerance of an ivy. The Big EEZE lineup boasts gigantic blooms and robust weather tolerance, making them an ideal choice for high-impact containers and landscapes.
Upon arrival
Upon arrival, the boxes should be unpacked, sorted and cuttings stuck immediately. If that’s not possible, sorted cuttings should be placed with bags open on disinfected carts or shelves in a cooler at 38 to 40F (3 to 5C) for no longer than 24 hours. Mist cuttings in the cooler if they’re dry or wilted. Long storage durations can cause excessive leaf yellowing and loss of cuttings. When temporary storage isn’t available in a cooler, the cuttings should be laid on a bench and frequently misted to keep them hydrated until they can be stuck.
Propagation
Stick the cuttings in a typical, well-drained media that’s suitable for propagation with a pH of 6.0 to 6.4. Liner sizes 32, 50, 72 and 102 (spaceable strip) are all suitable for rooting geranium. Apply enough mist to regain and keep the cutting turgid. The morning after sticking, around sunrise, ensure the cuttings are turgid and dry and apply the following:
* Fascination, 2 ppm (apply to wet the foliage, but not to runoff)
* CapSil, 3 to 4 oz./100 gal.
During propagation, apply only enough mist to keep the leaves turgid. Watch for leaves to start lightly curling as a sign for your next mist application. Wean the liners off of mist as quickly as possible once roots begin to form (a little stress can speed rooting). Apply a preventative fungicide for Botrytis in the first week after stick, especially if early signs of Botrytis appear.
Maintain soil and air temperatures at 68 to 72F (20 to 22C). Keep light intensity between 700 to 1,200 f.c. (7,500 to 12,900 Lux) during callus formation, gradually increasing between 2,000 to 4,000 f.c. (21,500 to 26,900 Lux) for root initiation and toning. Once roots form, begin to feed at a moderate rate (100 to 150 ppm N) with a balanced fertilizer.
Rooted liners should be ready for transplant within three to five weeks (consider direct-stick with callused cuttings to reduce production time by one to two weeks). Florel (ethephon 3.9%) at 350 to 500 ppm can be used for bud removal and to encourage branching once the liners are beginning to root at 12 to 21 days following stick. B-Nine (daminozide 85%) spray at 1,500 to 2,500 ppm can be used to reduce stretch and tone liners in the propagation tray.
Growing on
Transplant into a well-drained media. Aim to maintain a pH of 6.2 to 6.8 during the finishing phase of growing, checking often as pH drops can be common in geranium production. During early stages of plant growth, keep both day and night temperatures between 70 to 75F (21 to 24C). Gradually adjust temperatures so the day is 70 to 75F (21 to 24C) and the night is 65 to 70F (18 to 21C).
Big EEZE should be grown in full sunlight levels of 4,500 to 7,000 fc (48,400 to 75,300 Lux). Ensure adequate spacing, as low light penetration will slow flowering and cause weak, stretched growth. Apply periodic fertilization at a rate of 200 ppm N, aiming for an EC as measured with SME of 1.5 to 2.0 mmhos. Utilize fertilizer formulations that are low in phosphorous and ammonium to help control stretch and increase branching. Use of Ca/Mg fertilizers will help create good form, increase shelf life and promote profuse flowering.
Cultivars of Big EEZE are relatively vigorous and will likely require PGR applications. Use Cycocel/Citadel (chlormequat 11.8%) spray at 750 to 1,500 ppm as needed. An additional spray application of Florel (ethephon 3.9%) at 250 ppm after transplant will help improve branching and control growth. Florel (ethephon 3.9%) will delay flowering and its use should be discontinued eight weeks prior to finish. To prevent Botrytis once the plants are flowering, maintain adequate light levels, ample spacing and provide good air circulation. Avoid wetting foliage and flowers immediately before and during shipping, and completely avoid overhead irrigation on flowers if possible. Removal of spent flowers will also reduce the risk of disease.
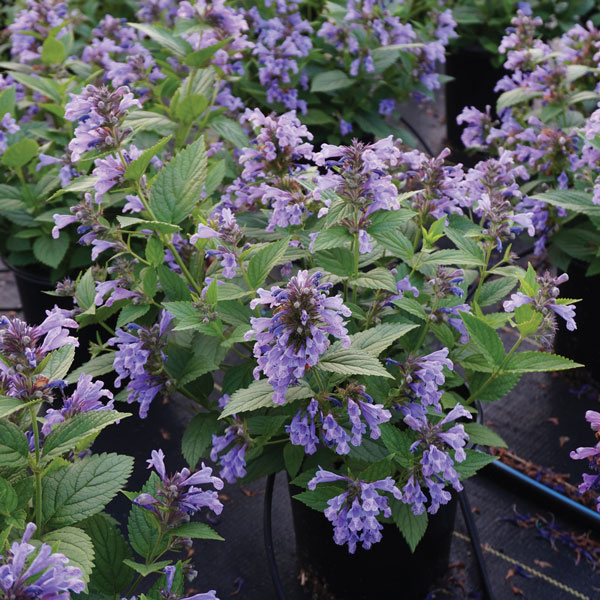
Blue Prelude Nepeta
By Karl Batschke, Darwin Perennials
The new Nepeta hybrid Blue Prelude is a first-year flowering bred by Darwin Perennials. It’s perfect for the landscape with its large, attractive flowers and appealing blue bloom color. It offers a medium-controlled habit during production and while at retail, yet it scales to 3 ft. (91 cm) in its second year.
The robust plants have pest and disease resistance with a long flowering season from March through September, and it attracts pollinators with its fragrant blooms and minty-scented foliage.
Blue Prelude is ideal for 2.5-qt. and 1-gal. pot sizes. It’s a recent Retailer’s Choice Award winner at this year’s Farwest Show in Oregon and is a perennial hardy in USDA Zones 5a to 9a. Here are a few production details to help you get the most from your plants.
Propagation
Blue Prelude roots quickly; plan to pinch it in the liner tray. Stick the vegetative inputs into a well-drained media with an EC 0.75 to 0.80 mmhos and a pH of 5.8 to 6.2. Rooting is best with a soil temperature of 70 to 72F (21 to 22C). Use a rooting hormone 500 to 1,000 ppm IBA on a moderate mist. Provide plant nutrition 50 to 75 ppm N. They’re ready for transplant 35 to 42 days after sticking.
Growing on to finish
Temperatures for finishing Nepeta Blue Prelude:
* Day: 60 to 80F (15 to 27C)
* Night: 55 to 70F (13 to 21C)
The target media pH should be 5.8 to 6.2 with light levels 5,000 to 8,000 foot candles. No vernalization of Blue Prelude is required; it’s a long-day facultative plant. Allow media to dry moderately between waterings. Use a balanced fertilizer at a rate of 125 to 150 ppm.
For growth control, pinching is not necessary after transplant if it was pinched in the liner. Use B-Nine/Cycocel 2,500/800 ppm to control height.
Crop Scheduling
Rockin’ Salvia
By Dr. Rick Schoellhorn, Proven Winners
Salvia plants are known for their ability to provide constant color for spring through fall. They’ll fill in a nice spot in the landscape and will also do a great job as a thriller in a mixed container. Salvias will easily help you satisfy the consumer’s ever-increasing interest in pollinator gardens and nature gardening by attracting both insects and hummingbirds to their nectar-rich flowers.
 Whether you grow in the north or the south, there’s a salvia for your climate and growing conditions, with a bonus of being easy to produce. Salvia are in the mint family, which means they’re fast growing and quick to come into flower. Depending on where you are in the season, they’re vigorous enough to grow in larger containers. But if you want to quick-crop them, they can make a simple, fast crop for 4.5-in. containers as well.
Proven Winners has a variety of salvia depending on your production needs. The Color Spires series is a northern perennial line, best with vernalization, and hardy in USDA Zones 3 to 8. In addition is the Rockin’ series, which with the 2020 addition of Rockin’ Blue Suede Shoes now stands at four options—each with a unique, eye-catching color that calls to the hummingbirds who are yards away.
Rockin’ Salvia have the same production needs as other forms of annual salvia, so they fit well into any bedding plant production calendar. With each successive improvement in the Rockin’ series, the overall plant size has been reduced and the energy that used to go into stem length is diverted into more flowers. Rockin’ Blue Suede Shoes is more compact than the other forms and a bit earlier to bloom, but retains all the color, ease of production and tolerance to lower frequency watering. The flowers delight with dense, upright spikes. This line of salvia delivers shorter, faster, easier and excellent performance for your landscape, as well as retail customers.
The single most important production aspect with any of the salvia is light levels. High light is essential to building the best plant structure and getting the earliest flowers. Warmer production temperatures can help speed a crop along, but high light is required. Low light and cold, wet conditions will delay a crop or reduce the quality very quickly.
Salvia prefer evenly moist conditions, and while many—including the Rockin’ collection—are quite drought tolerant once established in the landscape, avoid drought stress in production, as it will cause lower leaf drop. A balanced bedding plant blend of fertilizer is all that’s required. However, using fertilizer high in ammonia content can cause stem stretch and lack of flowers, so a balanced nitrate ammonium blend is preferred. High pH levels can lead to chlorosis—check pH levels regularly, especially if you have a very alkaline water supply.
Basics of production:
• pH: 5.8 to 6.2
• EC (2:1 Extraction Method): 0.6 to 0.9
• Fertilization: Medium rates = 150 to 200 ppm
• Light requirements: High
• Water categories: Moderate to moist
• Growing temperature: 65 to 72F (18 to 22C) or warmer
• Holding temperature: 50 to 60F (10 to 15C)
• Planting and timing information: Spring to fall finish
• 1 liner/gallon or 4.5 in., 3 liners/10 in. or 14 in. upright
Finishing times:
• 4- to 5-in. and quart pot: 4 to 5 weeks
• 6-in. and gallon pot: 6 to 8 weeks
• 7- to 9-in. pot: 8 to 10 weeks
• 10- to 12-in. and 2-gallon pot: 8 to 10 weeks
Pinching and growth regulators
For small pot production, pinching isn’t needed; for larger containers, pinch as needed. Use of cold temperatures can also help control growth.
As with most salvia, and most other members of the mint family, there are few pests or diseases in production. Simply follow good sanitation practices, including keeping greenhouses clean at all times, eliminating weeds and debris, disinfecting equipment in greenhouses as often as possible and keeping hose ends off of the greenhouse floor. Good water management practices are critical for good, healthy plant growth.
All of the Rockin’ Salvias will be excellent additions to your annual crop portfolio. For growers across the southern tier of the U.S., these plants may also be sold as temperate perennials, depending on the location. However, they make outstanding landscape color and have a long retail shelf life anywhere in North America. Easy to grow and easy to sell—don’t forget to promote these tough, reliable and drought-tolerant plants as pollinator friendly to your customers as well. GT