9/26/2012
Production Junction
Compiled Jennifer Zurko
 Rev Up for Hot Rod
By Josiah Raymer
Panicum virgatum
Rev Up for Hot Rod
By Josiah Raymer
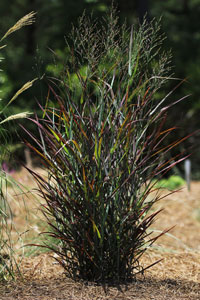
Panicum virgatum Hot Rod revs up into the red zone earlier than other switch grasses. The U.S. native is one of three plants (along with Stokesia Divinity and Muhlenbergia Fast Forward) debuting in Emerald Coast Growers’ very own new plant introduction pipeline.
Hot Rod kicks panicums up a notch with firmly upright blades that emerge blue/green, reddening rapidly until the whole plant is a rich, deep maroon. Though the foliage is obviously the real star, lovely tan flower heads appear in late summer to early fall, imparting additional interest to an already attractive plant.
Win every time with Hot Rod in bold masses, as a signature stunner or in containers or landscapes alike.
This switch grass prefers full sun—in fact, that’s where you’ll see the best color development. Hot Rod grows approximately 36 to 40 in. tall and spreads to approximately 24 in. It’s hardy to Zones 4 to 10.
Planting Plant one liner (size 38, for example) per 1-gal. trade pot using a medium with good drainage.
Finish time Panicum Hot Rod finishes in approximately 12 to 14 weeks for a 38-cell liner.
Media Choose a well-drained, fertile growing medium.
EC & pH Maintain electrical conductivity (EC) at 0.75 to 1.25 mS/cm using the 2:1 extraction method. Keep pH at approximately 5.5 to 6.2.
Temperatures Grow Panicum Hot Rod at the optimum growing environment with nights at least 45F (7C) and daytime temperatures of approximately 70 to 90F (21 to 32C). Warm soil temps will encourage growth.
Light requirements Panicum Hot Rod loves high light, full sun conditions of 5,000 foot candles (fc) or greater. Full sun promotes the best color development, really bringing out the red tones.
Encourage growth during winter by providing supplemental lighting to extend day length to a minimum of 12 hours.
Pinching and PGRs No pinching is necessary and plant growth regulators (PGRs) generally aren’t necessary.
Fertilizer Provide a liquid feed of 150 to 200 ppm or a slow-release fertilizer at 0.75 to 1 lb. of nitrogen per yard.
Irrigation Water thoroughly, letting media dry between waterings.
Pest control Treat with a preventive broad spectrum fungicide rotation. Follow a standard sanitation program and pests shouldn’t be a problem.
Josiah Raymer is head grower and general manager for Emerald Coast Growers, one of the country’s largest ornamental grass producers.
 A Double Take on Surfinia Petunias
By Delilah Onofrey
A Double Take on Surfinia Petunias
By Delilah Onofrey
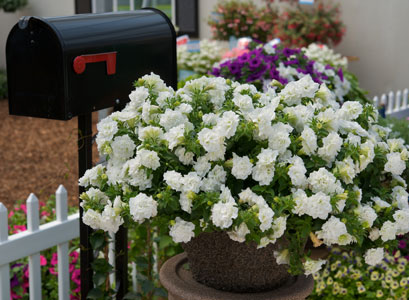
The new double petunias on the market are definitely worth a second look. Traditionally, double petunias couldn’t keep up with the single-flowered ones that have become the mainstay annual for landscape beds, baskets and containers. Doubles were later to flower, had fewer flowers, unruly habits, and could get downright nasty and slimy in the rain. The flowers were beautiful, but more trouble than they were worth.
Suntory Flowers has reinvented double petunias with a new series bred for performance—Surfinia Summer Double. The Summer Doubles are a spinoff of the Surfinia petunias that created the entire vegetative petunia class 23 years ago. Advantages growers will find in the Summer Doubles include earliness, uniformity, heat and weather tolerance, and a superb presentation.
Compact plants flower profusely and early, presenting excellent coverage in 4-in. pots and baskets. The series is uniform across three colors—Pink, Rose and White. While double petunias are typically later than single-flowered, Surfinia Summer Doubles are the earliest to bloom in the double petunia category.
In the garden, Summer Doubles are heat and weather tolerant. Flowers remain double in 90-degree heat. While traditional doubles get soggy in rain, the Summer Double flowers are smaller and tightly held to shed rain with ease. As the season progresses, new flowers emerge to bury old ones, reducing the need for deadheading. Gardeners enjoy three seasons of blooms from spring through fall.
Summer Doubles represent the most modern genetics in the Surfinia line. In terms of growth habit, growers can expect them to be similar to Surfinia Deep Red and the newer Bouquet colors. Plants have a mounding, compact habit, even in the final pot size, which can be 10 in. or larger. In double petunias, you won’t find a nicer presentation in a 4-in. pot. Plants are compact and loaded with blooms. Keeping quality is excellent at retail and the high flower count is sure to stimulate impulse sales.
General culture For propagators, Surfinia is a dream to root, in three to four weeks on the bench. Pot rooted cuttings into 4- to 6-in. pots or hanging baskets. One liner per pot is recommended using a free-draining, open soil. Temperatures at this stage should be between 55 and 60F (12 and 15C).
Crop timing
• 4-in. pots—Four to six weeks with one liner and one pinch
• 6-in. pots—Seven to eight weeks with one liner and two pinches
• 10-in. baskets—10 to 12 weeks with three liners and two to three pinches
• For larger containers and baskets, plant liners in odd numbers—three or five.
Surfinia petunias will require pinching to encourage the right habit and breaks to get a bushy and spreading plant. The first pinch should occur two weeks after potting.
Irrigation & fertilization Keep growing media pH between 5.5 and 5.8. Overwatering will lead to root rot. A little-and-often regime is encouraged when plants are young. As they grow, Surfinia petunias become heavy feeders. Using slow-release fertilizer in addition to liquid fertilizer is recommended as they grow.
Controlling plant growth Surfinia petunias respond to plant growth regulators. Apply B-Nine or other daminozide products at a rate of 2,500 to 5,000 parts per million. A Bonzi drench can be applied at 1 to 3 parts per million. Apply as needed. Surfinia grows rapidly in high light and high heat.
P ests & diseases
 Key pests to monitor are aphids, fungus gnats, mites, shore flies, thrips and whiteflies. Diseases include Botrytis, Phytophthora, Pythium, Powdery Mildew and Rhizoctonia.
Delilah Onofrey of Flower Power Marketing supports Suntory Flowers’ marketing and communications efforts in North America.
Suntory has developed mobile sites and digital tools that will help you in the greenhouse. To become a pro at growing Surfinia petunias, Million Bells calibrachoas or any of the annuals in the Suntory Collection, visit m.suntorycollection.com/growers. Check production information when you need it; videos, photos and data are readily available at your fingertips. Suntory has also launched mobile sites for Sun Parasol mandevillas—m.sunparasol.net—and Senetti pericallis—m.senetti.com.
 Small Flowers with Big Impact: Picobella Cascade Trailing Petunias
By Matt Blanchard
Small Flowers with Big Impact: Picobella Cascade Trailing Petunias
By Matt Blanchard
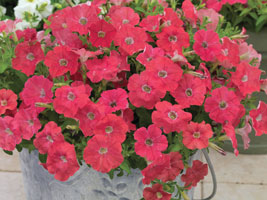
New for 2012, the Picobella Cascade series of miniature trailing petunias from Syngenta Flowers, Inc. includes seven different colors that are extra-early to flower. The series has a densely branched and spreading habit with numerous dainty flowers throughout the plant. Ideal for premium baskets, mixed containers and jumbo packs, this trailing mini-petunia maximizes color, minimizes maintenance and holds longer at retail. With extra early, uniform flowering, Picobella Cascade extends the season for growing and selling this new garden classic.
Plug culture
Germination: Place seeded trays (recommended 288) into germination chamber at 72 to 76F (22 to 24C), media moisture level 5. Cover seeds lightly with coarse vermiculite to maintain humidity around the seed. Remove trays when radicle begins to emerge (about 3 to 5 days after sow). Move germinated trays to a greenhouse at 65 to 68F (18 to 20C) media temperature, 40% relative humidity and media moisture level 4 to 5 until first true leaves expand.
Media: pH 5.5 to 5.8, EC 0.75 to 1.0
Temperature: 65 to 68F (18 to 20C)
Light: Days 7 to 14: 1,500 to 2,000 foot candles; Days 15 to 28: 3,000 to 4,000 foot candles
PGR treatment: Plant growth regulators are usually not required. If necessary, apply B-Nine plant growth regulator at 2,500 to 3,500 ppm.
Plug time for 288-cell trays: 4 to 5 weeks at an average daily temperature of 65F (18C)
Growing on
Container size: Jumbo packs or 4-in. pots—1 plug per pot; 10 to
12-in. hanging baskets—3 plugs per pot.
Media: pH 5.5 to 5.8, EC 1.0 to 1.5
Moisture: Alternate moisture between levels 4 and 1. Over-watering will reduce root development and promote soft growth.
Light: 4,000 to 7,000 foot candles. Facultative long-day plant; long-days are not required, but flowering is faster under day lengths greater than 13 hours or under 4-hour night interruption lighting.
Temperature: Night: 60 to 65F (16 to 18C); Day: 65 to 75F (18 to 24C)
Fertilizer: 14-4-14 or 17-5-17 at 100 to 150 ppm Nitrogen. To avoid stretching under low light and cool conditions, do not use ammonium-based fertilizers.
PGR: Little PGRs are required if grown at moderate temperatures or in quarts or larger containers. If necessary, Bonzi plant growth regulator can be sprayed at 2.5 to 5 ppm or B-Nine can be sprayed at 2,500 to 3,500 ppm. Higher application rates may be needed at warm temperatures. A Bonzi drench can be applied at 1 ppm to hold the finished crop.
Pests and diseases: Common insect pests include fungus gnats, thrips and aphids. Scout plants regularly and use appropriate chemical control materials such as Flagship insecticide, Citation insect growth regulator, Endeavor insecticide and Avid insecticide integrated with Bioline biological control agents. Common diseases include Botrytis, Pythium and Rhizoctonia. Subdue Maxx fungicide, Medallion fungicide, Micora fungicide, Palladium fungicide, Daconil fungicide and Heritage fungicide are products that are effective in managing common plant diseases.
Crop time
Finish time from transplant of 288-cell trays: ADT of 70F (21C) and under long days: 4 to 5 weeks for packs and 4-in. pots; 6 to 7 weeks for premium hanging baskets.
Total crop time: ADT of 70F (21C) and under long days: 7 to 9 weeks for packs and 4-in. pots; 9 to 10 weeks for hanging baskets. Timing is 1 week shorter at an ADT of 73F (23C).
Matt Blanchard works for Syngenta’s technical services department. Matt brings more than a decade of research and academic experience to the Syngenta team. He develops training programs and technical systems for Syngenta and its grower customers.
 Goodness Gracious! A Great Ivy Geranium!
By Paul Hammer
Goodness Gracious! A Great Ivy Geranium!
By Paul Hammer
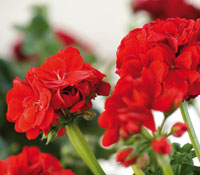
A true ivy geranium series, Great Balls of Fire stands up to the summer heat. Many of the varieties showed their great heat tolerance in one of the hottest summers in many years at trials around the country.
Handling/arrival of unrooted cuttings Unpack cuttings upon arrival. Open bags and put cuttings on clean shelves of carts and place in a cooler at 45 to 50F (7 to 10C) for at least four hours (best if stored overnight in a cooler before sticking). Use a pest-free, well-drained rooting medium with a pH of 5.8 to 6.2. A rooting hormone treatment can improve the speed and uniformity of rooting. Maintain a root medium temperature of 68 to 72F (20 to 23C) during rooting. Ivy geraniums require less mist and irrigation than zonal geraniums. Avoid over-misting and too-wet conditions to reduce occurrences of diseases. Provide 1,000 to 2,000 foot candles. As soon as roots initiate, stop misting and irrigate with fertilizer solution at 75 to 150 ppm N as needed. Quickly increase to 200 ppm N as roots develop. Increase light levels to 2,500 to 4,000 foot candles, reduce humidity, and decrease temperatures to 62 to 68F (17 to 20C) night and 68 to 72F (20 to 22C) day. Cycocel or Citadel (chlormequat) at 750 to 1,000 ppm or B-Nine or Dazide ((Daminozide) at 1,000 to 2,000 ppm)/Cycocel or Citadel (chlormequat) at 750 to 1,000 ppm tank mix can be used to improve plant form. An early application of plant growth regulators is important. Plan 4 to 5 weeks for rooting.
Handling/arrival of rooted cuttings Rooted liners should be potted as soon as they’re received.
Potting rooted liners Use a pest-free, well-drained root medium with a pH of 5.8 to 6.2. Plant liners at or slightly below the root medium level, but avoid planting cuttings too deep to avoid disease problems. Water planted liner well into the new root medium with a complete fertilizer solution at 225 to 275
ppm N.
Light/temperature For optimal growth, provide 60 to 65F (16 to 18C) night and 65 to 75F (18 to 24C) day temperatures. Though this new series has been specifically bred for fewer occurrences of Edema, one should avoid large and quick temperature changes. Great Balls of Fire ivy geraniums can tolerate greater amounts of light than traditional ivy geraniums. Provide 3,500 to 6,000 foot candles. Use shading to control high temperatures as needed.
Fertilizer Irrigate with a complete fertilizer at a 250 to 300 ppm constant feed. Maintain a root medium pH of 5.8 to 6.2 and EC below 2.5 (SME). Irrigate in the morning and maintain a moist root medium so not to reduce conditions that promote Edema.
Environment/PGR For best growth control, provide higher light, lower temperatures and space on time. Start baskets on benches or the floor where it’s easier to manage temperatures. Space plants before they grow into each other.
Early (around day 10 days after transplanting) application of Cycocel or Citadel (chlormequat) (750 to 1,250 ppm) or B-Nine or Dazide (Daminozide) (1,500 to 2,000 ppm)/Cycocel or Citadel (chlormequat) (750 to 1,250 ppm) tank mix will reduce early stretch and large leaves. Apply applications as needed to improve finish plant quality. Adjust application and rates as needed to avoid stunted plants from over-application.
Tips for producing in smaller pots The use of a type of “cage” or plant “rings” which slide up the pot can facilitate in shaping the plant and protecting it from breakage in shipping and retail displays. Be sure to use early and light applications for these sizes of pots and don’t over schedule the crop.
Plant protection Scout plants for thrips, spider mites, aphids, fungus gnats, Botrytis, Pythium, Rhizoctonia and Xanthomonas.
Scheduling from rooted liner Plant 1 plant per pot in a 4-in. and provide 7 to 10 weeks of growth. In a 6-in., plant 2 liners per pot and grow for 8 to 11 weeks. For 10- and 12-in. baskets, plant 3 to 5 plants per and provide 10 to 13 weeks.
Note: Registration of chemicals can vary among states and Canada. Always check local registrations and carefully follow label recommendations. Chemical recommendations are only suggestions that need to be confirmed by the grower.
Paul Hammer is Research and Development Manager for Dümmen USA. Contact techservices@dummenusa.com for any questions on Great Balls of Fire or other Dümmen varieties.
 Compact Cuteness: Calipetite Calibrachoa
By Mark Seguin
Compact Cuteness: Calipetite Calibrachoa
By Mark Seguin
Few plants in floriculture have enjoyed the success and sales growth that calibrachoa have experienced since the first commercial hybrids were introduced some 20 years ago. Given the many favorable attributes calibrachoa offer, their success in the marketplace has been well earned. With the introduction of the all new Calipetite series, Sakata offers growers a uniquely compact calibrachoa that is ideal for small-pot and mini-color bowl production.
What really sets the Calipetite series apart from all the others is its naturally compact growth habit and day-length neutrality. There is no need to apply chemical growth regulators or provide supplemental lighting to produce beautiful, dense, well-mounded pots covered with flowers. Available in five bright colors, the Calipetites are well-matched and can be mixed to produce high-impulse color bowls or long lasting mini-planters. The series also features exceptional tolerance to extremely high pH levels (7.2+). Plants are able to maintain their healthy, rich green foliage throughout the production and delivery process for stronger retail shelf appeal.
It’s critical that growers recognize Calipetite is not the same as traditional calibrachoa and should never be treated with plant growth regulators (PGRs) to limit growth—no PGRs during propagation or during the finishing stages. Applying growth regulators can severely stunt future growth. Although Calipetite will spread to 10 to 12 in. across, they may not be the first choice for growers looking to finish larger containers or hanging baskets quickly. Still, adding Calipetite to your product assortment is an excellent way to maximize your production output, provide higher turnover and deliver a quality product that is sure to peak your customer’s satisfaction.
Rooting Calipetite If you purchase your Calipetite as unrooted cuttings, the culture you follow for rooting will not differ greatly from most other calibrachoa with one key exception—no PGRs.
Stage One: Sticking to callus (Days 1 to 6)
Stick cuttings into a pre-moistened, sterile rooting medium. Target the media pH between 5.5 and 6.0 and the EC at less than 0.75 mmhos (1:2 slurry). If conditions are less than ideal, a rooting hormone with up to 2,500 pm of IBA may be applied to enhance root development.
Calipetites root best at a media temperature between 68 to 72F (20 to 22C). Optimum light level for propagating Calipetite is 1,500 to 2,000 foot candles (16,000 to 22,000 lux). Mist regularly until callus formation and then apply mist only as needed to keep the cuttings turgid. Frequency of misting is highly dependent upon light and temperature and should be adjusted as conditions change.
Stage Two: Root emergence (Days 7 to 13)
Once roots start to emerge, raise the light level to 3,000 to 3,500 foot candles (32,000 to 38,000 lux) to speed development. Reduce air humidity to 70% to 80% and target a day and night temperature of 68F (20C). Maintaining as close to a 0-degree DIF (difference between day and night temperature) as possible reduces stretching and promotes compact cuttings. When roots form, apply 75 ppm nitrogen from a well-balanced calcium nitrate-based formulation to strengthen the plants.
Stage Three: Bulking (Days 14 to 20)
With roots established, allow the plants to dry down somewhat between irrigations. Keeping the media too wet promotes a hydroponic root that is less effective in supplying water and nutrients to the plant once transplanted or stressed. Remember, Calipetite is naturally compact and branching—so no PGRs!
Stage Four: Toning (Days 21 to 30)
Calipetites root easily and should be ready for transplanting in 4 weeks (no pinch) or 5 weeks (pinched) from sticking. As the liners reach the transplant stage, allow them to dry down between watering to tone. If the liners need to be held, lower the temperature to 60F (16C). Pinching is highly recommended to improve branching and enhance the development of dense, compact finished plants.
Transplanting Calipetite is ideal for small pot (4-in., quart) production. Without the need of supplemental lighting or PGR treatments, growers can produce high-quality, retail-ready color with minimum effort. Establish the crop at 63 to 70F (17 to 21C) during the day and at 63 to 65F (17 to 18C) at night. For faster cropping, establish and grow at an average daily temperature of 68F (20C). Calipetite is day-length neutral, but plants that are subject to excess shading (<3,000 foot candles) from overhead basket lines tend to flower later, produce less flowers and develop unwanted stretch. In high light areas, like California, Calipetite flowers in early March.
Be careful not to initially over-saturate the media after transplanting. Allow the media to dry down between irrigations, but don’t allow excessive drying, which may result in damage to foliage and flowers. Delay applying fertilizer until the roots are established. Then begin feeding with a complete, balanced fertilizer at 200 to 250 ppm N constant liquid feed (CLF). An EC level of 1.2 to 1.5 (1:2 slurry) is a good target range. Provide a complete minor element program. Calipetite is more tolerant of a higher pH and less prone to iron deficiency. Provide periodic clear water applications if excess soluble salts accumulate. Cal/Mag formulations such as 13-2-13, 15-5-15 and 17-5-15 work well to supply valuable calcium and magnesium. The growing media should be routinely tested every two weeks to monitor EC and pH levels.
Total production time from stick to ship is typically 10 to 12 weeks for 4- to 5-in. pots. For additional information, please visit
www.sakataornamentals.com.
Mark Seguin is Global Ornamental Marketing Manager, Vegetative Cuttings for Sakata Ornamentals.
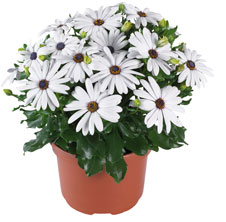 Growing the “Supreme” Osteo
By Dr. Roger Styer
Growing the “Supreme” Osteo
By Dr. Roger Styer
Osteospermums have become a gardener’s favorite, with their early color in spring, wide range of colors and blooming even into the summer heat. Growers everywhere have experience growing them in large cell-packs, 4-in. pots and all the way up to large hanging baskets. Some series need to have cool temperatures to initiate flowering, while other series will flower fine without the cool period. Fides-Oro is a leader in osteospermum breeding and cutting production, and now is proud to introduce a larger-flowering series called Margarita Supreme.
Propagation Stick one cutting per cell in 72, 84 or 105 trays. Use a rooting hormone on the base of the cutting of 1,000 to 3,000 ppm IBA. Maintain a rooting soil temperature of 70 to 72F (21 to 22C) until the roots come out, then you can lower to 65 to 68F (18 to 20C) soil temperature. Apply mist to keep leaves moist until roots appear (about 14 days), then reduce frequency. It’s important to avoid over-saturating the growing media in the first 14 days, so keep mist cycles shorter and more frequent. Over-misting will also cause losses from Botrytis and Pythium. Fungicides may be needed. Rooting can be enhanced with 400 to 500 foot candles HID lighting for 14 hours daily in mid-winter production. Foliar feed daily with 50 to 75 ppm N from 15-5-15, 17-5-17 or 13-2-13 with extra micronutrients added. Once roots appear and cuttings are off of mist, increase feed levels to 100 to 125 ppm N watering into the growing media. Control plant growth with B-Nine sprays at 1,500 ppm as needed. Rooting time is 28 days.
Transplanting & finishing Plant the liner so the surface of the liner is just below the level of growing mix in the finished container. Avoid holding liners too long, as this will negatively affect branching. Use a well-drained, medium-to-coarse growing mix with media pH 5.8 to 6.2. Pinch plants about 2 weeks after transplanting, allowing 4 to 5 nodes for 4-in. pots, 6 to 7 nodes for 6-in. or larger pots. Trial spraying Configure at 150 to 250 ppm just before or just after pinching to promote lateral branching.
Water through the container each time. Allow plants to dry slightly between irrigations, but avoid keeping too wet or too dry. Keep growing temperatures 68 to 72F (20 to 22C) day, 61 to 64F (16 to 17C) night, until side shoots are about 1 in. long. Afterwards, drop temperatures by five degrees day and night. Margarita Supreme does not need cool temperatures to initiate flowers, but cooler temperatures will increase flower size and slow flower opening.
Use maximum light intensity (5,000 to 6,000 foot candles), supplementing with HID lighting in mid-winter crops. Avoid shading from overhead crops. Flowering occurs with both short and long days (day neutral), but faster flowering occurs with higher light intensities.
Good crop growth is obtained with 100 to 150 ppm N from 15-5-15, 17-5-17 or 13-2-13 plus extra micronutrients with each watering. Avoid fertilizers high in ammoniacal nitrogen and phosphorus that encourage soft, stretched growth, especially during low-light months. Keep growing mix EC 1.5 to 2.0 (SME).
Margarita Supreme series is more vigorous than regular Margarita series, so plant growth regulators may be needed. Use B-Nine at 2,500 ppm or tank mix of B-Nine at 1,500 ppm + Cycocel at 500 ppm as needed after pinching, but avoid applications once flower buds are visible. Bonzi (1 to 3 ppm) or Sumagic (0.5 to 1 ppm) drenches can be used at that time for height control.
Pot sizes for Margarita Supreme series should be 5 in. or larger, due to the increased vigor compared to the regular Margarita series. Plants can be grown pot-tight until foliage touches, then spaced for best growth. Avoid growing this series in 4-in. pots with no spacing. For planting liners mid-January until late February using the growing temperatures outlined earlier, plan on 9 weeks for 4- to 5-in. pots, 10 weeks for 6- to 8-in. pots, and 12 weeks for 10-in or larger pots and baskets. If growing cooler, then more crop time will be needed. Warm up growing temperatures once flower buds are visible to speed up opening of flowers.
Potential insect problems include aphids, leafminers, thrips and whiteflies. Use yellow sticky cards placed 2 in. above the crop to monitor pest populations. Scout crops regularly for any pest problems. Potential disease problems include Botrytis, Pythium, Phytophthora and powdery mildew. Avoid overwatering, especially early in root development. Use proper spacing and provide good air circulation around plants. Foliage should be dry before night. See pesticide and fungicide labels for registered use, rates and application methods for prevention and control of the above insect and diseases.
Dr. Roger C. Styer is Technical Rep for Fides-Oro and can be reached by phone at (630) 842-1629, email at r.styer@fides-oro.com or through “Ask the Doctor” on the Fides-Oro website at www.fides-oro.com.
 A 3-in-1 Petunia
By Michael Huggett
A 3-in-1 Petunia
By Michael Huggett
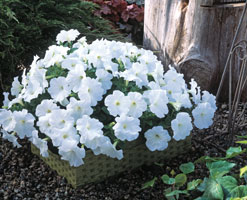
With ever-increasing pressures and grower demand, Takii has dedicated itself to developing more environmentally responsible products. During the 2012 California Spring Trials, Takii launched a significant series of petunia that fits the criteria of this mission. Trilogy Petunia was developed with all three of the market segments in mind: grower, retailer and consumer.
For the grower, Trilogy carries with it less demand for a regimented growth regulation protocol when compared to other petunia series. Trilogy accomplishes this by having shorter breaks between the internodes under less-than-optimal conditions. The result is a plant that will stay more compact for a longer period of time. On top of this, Trilogy Petunia requires less light to flower and, as a result, requires less energy to produce. Among the other benefits of the series is that the grower can produce the plants in less space. Trilogy Petunia will spread up to 36 in., however, the plant takes longer to reach this width allowing the grower to maintain a “pot-tight” production format throughout the entire finishing sequence. This, of course, saves the grower time and money.
Colors available: White, Lavender Blush, Rose, Salmon, Scarlet, Purple and Salmon Morn
Height: 12 to 15 in.
Width: 30 to 36 in.
Novelty characteristics:
• Dome habit (tighter habit than comparisons)
• Prolific flowering on compact plants
• Long shelf life (retains short internodes even after blooming)
• Less sensitive to day length than existing varieties
Market use: Mixed containers, garden beds, hanging baskets
Cultural recommendations:
Container size:
Sowing: 288 to 512 tray
Finish container: 4- in. pots, 6-in. pots, 1 gal. pots, large containers
Plug stage:
Germination: Emergence 4 to 7 days / 72 to 76F (22 to 24C) / Leave seed uncovered. Soil must be near saturation for good germination. Once emergence has occurred, lower both temperature (65 to 68F/18 to 20C) and moisture content.
EC (pour-thru method): Emergence to cotyledon expansion = 0.8 to 1.0 mS/cm
Cotyledon expansion to true leaf growth = 1.0 to 1.25 mS/cm
Plug finish = 1.25 to 1.75 mS/cm
Plug finish time: 3 to 5 weeks in a 512 tray (dependent upon temperature)
Finishing:
Transplant: 20 to 30 days after sowing
Day to flower: 8 to 10 weeks (from
sowing)
Temperature: 60 to 70F (15 to 21C) day / 55 to 60F (12 to 15C) night
EC (pour-thru method): 1.75 to 3.25 mS/cm
pH: 5.3 to 5.9
Common disease/pests: Botrytis, Rhizoctonia/aphid, thrips
Growth regulators:
Realistically, growers will likely find themselves in need of applying a plant growth regulator to Trilogy. In this case, it’s recommended that an application of B-Nine at 2,500 ppm to 3,600 ppm be used at the grower’s discretion. B-Nine can be applied at anytime during production, plug stage through pre-finished stage, but it’s recommended that all applications cease at the first sign of visible budding. Also, for those growers who utilize other plant growth regulators such as Bonzi, it’s recommended that the grower test the rates that are recommended by the manufacture. Use of Bonzi may greatly inhibit the trailing habit of Trilogy in the later stages of consumer use, as well as reduce flower size.
Michael Huggett is Eastern Sales Manager for American Takii, Inc. He’s based in Michigan and can be reached at mhuggett@takii.com.
 A Breathtaking Summer Sunset—From Seed!
By Tom Linwick
A Breathtaking Summer Sunset—From Seed!
By Tom Linwick
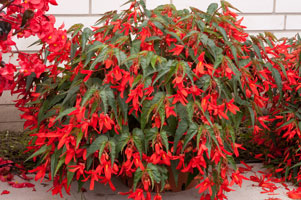
At California Spring Trials, Benary introduced the first
Begonia boliviensis from seed—Santa Cruz Sunset. This summer it was trialed across the country and now the results are coming in. The verdict? Santa Cruz Sunset definitely takes the heat. In fact, it showed that it could tolerate extreme weather conditions in every area of the country by winning the American Garden Award. But best of all, Santa Cruz Sunset doesn’t need pinching, saving you time and money. Excellent seed quality (85 %+ germination) in easy-to-sow pellets assures your success.
Germination Overall, Santa Cruz Sunset should be grown like a tuberous begonia, but it will finish a little faster.
Stage I: 7 to 14 days at 70 to 73F (21 to 23C) and relative humidity of 95%. Maintain high moisture. Santa Cruz Sunset needs light to germinate, so don’t cover pellets. Additional light (50 W/m2) accelerates germination and improves quality of the seedlings.
Finishing
Stage II: Plugs should be grown for 7 to 14 days at 68 to 70F (20 to 21C). Continue long day lighting (14 hrs.), and avoid saturated or dry media and low humidity levels. Water temperature should be 64F (18C).
Stages III to IV: When well-established in the final container, plants can be grown for 28 to 42 days at 64 to 68F (18 to 20C). Ten days before selling, the temperature can be decreased to as low as 60F (16C), if necessary. Temperatures below 57F (14C) will result in tuber formation and crop delay.
Fertilization Moderate fertilization levels are required. Fertilize weekly with 150 to 200 ppm nitrogen, using a complete and potassium-balanced fertilizer (N:K2O-ratio: 1:1.5). Keep low ammonium levels, otherwise the roots become damaged. At high nitrogen levels the foliage can become very big. Avoid pH above 6.5, as high pH causes iron deficiency. Apply chelated iron if chlorosis becomes a problem. To prevent magnesium deficiency, apply magnesium sulphate (0.025 %) 1 to 2 times. Additional foliage fertilization with potassium supports compact plant growth and provides a dark green foliage color. Avoid high soluble salts in the soil.
Production tips Do not pinch! Pinching will delay the crop by 2 weeks and could change the plant habit to a more prostrate one.
Uses Annual—Ideal for hanging baskets, containers and garden landscapes.
Exposure Sun to shade
Garden height 12 in. (30 cm)
Crop time 14 to 16 weeks
Sowing method One seed/pellet per plug. For best results, a 288-tray or larger cell size is recommended.
Tom Linwick is North American Technical Manager for Ernst Benary of America, Inc.
 Intenz-ify Your Celosia Crop
By Ed Higgins
Intenz-ify Your Celosia Crop
By Ed Higgins
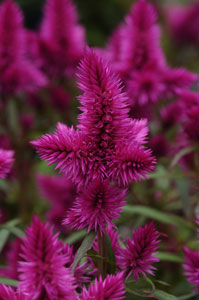
Celosia has been a garden staple for many years. New Celosia Intenz is unlike any celosia you’ve seen before. The flowers are conical, a rich magenta purple (lighter in very hot environments), and feel almost like strawflowers to the touch. Color retention is excellent. The foliage is medium green, luxuriant and often highlighted with burgundy markings. The “Wow” flower color combined with easy-to-care-for plants attract consumer attention. Sell-through has been excellent at retail.
Intenz is a photoperiodic annual and can be flowered for spring, summer or fall sales—just like a garden mum. Intenz is very grower friendly; unrooted cuttings root quickly, branch freely and the crop time is fast. Flowers have excellent shelf life; the plants can take extreme wilting and bounce right back. And since they’re annuals they can keep blooming until a hard frost.
Spring crops can be flowered through May without the need for blackcloth in 1801s, all the way through 6-in. pots. They’re great as stand-alone items or for use in mixed containers. Outdoors, they flower until frost. Flowering pot crops schedule just like garden or pot mums. Provide long days for early growth and then move into a short-day area (blackcloth) for forcing. Flowering response under blackcloth is fast—5 to 6 weeks. In fall
(natural-season crops), Intenz wants to flower in the early part of September in much of North America. Plant in early- to mid-July for this crop and utilize any container or size pot your customers desire.
Propagation
Unrooted cuttings should be stuck into well-drained media. For best rooting: media temperature approximately 70F (21C), air temperature 5 to 10 degrees higher during the day, and night temperatures approximately 68F (20C). Misting or “tent” propagation both work well. Rooting hormone is not necessary. Chrysanthemum “night lighting” is recommended during propagation to help keep the cuttings vegetative. Provide 10 foot candles of light at cutting level from 10:00 p.m. until 2:00 a.m.
Pinching Cuttings should be well-rooted in 12 to 14 days and ready to pinch in 16 to 18 days. Pinch “hard,” not “soft.” Hard pinching helps develop optimal basal branching. Allow approximately 6 to 8 leaves to remain after pinching is done. Only one pinch is required.
Growth regulators B-Nine (Alar) is typically used at 2,500 ppm to assist in minimizing internode stretch. The first application should be made approximately 2 weeks after the pinch, when new shoots are about 1.5 in. in length. Then spray once a week for about 3 weeks. Bonzi can also be effective.
Nutrition Celosia Intenz should be treated as a heavy feeder and given rates commonly used for mums. Constant liquid feed throughout production with rates of 250 to 300 ppm will result in well-branched plants, attractive foliage and maximum flower power.
Photoperiod Like mums and asters, Celosia Intenz is photoperiodic. As recent trials have proven, Intenz is not as sensitive as other celosia varieties and can be grown without blackcloth. However, for top uniformity, it’s recommended to create short-days to encourage flowering.
Celosia Intenz vegetates under long days and flowers with short days and longer nights. It’s recommended to provide interrupted night lighting as with chrysanthemums, from 10:00 p.m. until 2:00 a.m. during the rooting process. This helps to reduce early budding. Celosia Intenz may display some early buds as it comes out of propagation; however, these are typically removed during pinching. Celosia requires approximately 13 hours of darkness each night to flower. Celosia Intenz flowers with an approximate 5- to 6-week response time.
Containers Celosia Intenz should prove to be a very versatile plant. Produce Intenz in 4-, 6- and 8-in. pots as your most popular sizes. Utilize 10-in. and larger pots for dramatic color displays or for use as combination planters.
Ed Higgins is a Product Manager for Ball Seed based in West Chicago, Illinois.
 Cool-Season Garden Revival
By Scott Rusch
Cool-Season Garden Revival
By Scott Rusch
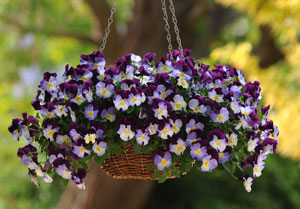
Cool Wave Pansies are debuting in stores nationwide this fall. As part of the popular Wave brand, the series has a full marketing campaign behind it: it’s supported at retail with point-of-purchase materials and informational signage; it has a revamped website and mobile web experience for shoppers on the go; and it has an existing fan base ready to expand their interest in cool-season gardening!
Creating a desirable finished product with plenty of spread and color is crucial for continued consumer interest.
Plug size
It all begins with the right plug. A larger size plug helps promote branching early on and will reduce the total crop time. We recommend a 128-plug or similar size; 288-plugs are also acceptable. Smaller plug sizes can check the plant growth and increase the crop time; we don’t recommend growing from smaller than a 288. Transplant the plugs on time so they don’t become root-bound or stunted in the tray, as this can delay spreading and add crop time.
Growing on to finish
Use a well-drained, disease-free media with a pH of 5.4 to 5.8 and a medium initial nutrient charge. Night temperatures should be 50 to 60F (10 to 18C) and day temps 62 to 70F (16 to 21C).
If you generally grow spring pansies cold (frost-free night temperatures around 35 to 40F/1.6 to 4C), start Cool Wave off a bit warmer for the first several weeks after transplant to encourage growth at 50 to 60F (10 to 18C) night temperature. This will encourage quicker spread than starting off cold right after transplant. When the plants have reached the desired size, cool down gradually over a few days to your more normal pansy growing conditions. The cool temperatures will tone the plants, encourage flowering and maximize flower size. Keep light levels as high as possible while maintaining appropriate temperatures.
Cool Wave pansies require more fertilizer than is usually recommended for standard pansies. For best results starting a week after transplant, apply nitrate-form with low phosphorus fertilizer at rate 4 (225 to 300 ppm N/1.5 to 2.0 mS/cm EC) every other irrigation. For constant feed programs, apply fertilizer at rate 3 (175 to 225 ppm N/1.2 to 1.5 mS/cm) using predominantly nitrate-form fertilizer with low phosphorus. If needed, alternate with a balanced ammonium and nitrate-form fertilizer to encourage growth and balance the media pH. Maintain the media EC at 1.50 to 2.00 mS/cm and pH at 5.4 to 5.8. If the media pH is greater than 6.2, take corrective measures.
During spring production, minimal to no plant growth regulators are needed if appropriate temperatures are achieved. For smaller container sizes or in baskets that you want to control more for ease of shipping, use tank mix sprays of B-Nine/Alar (daminozide) at rates up to 5,000 ppm (5.9 g/l of 85% formulation or 7.8 g/l of 64% formulation) and Cycocel (chlormequat) at rates up to 500 ppm (4.3 ml/l of 11.8% formulation or 0.7 ml/l of 75% formulation) to control plant growth starting 10 to 14 days after transplant and later on in the production cycle to tone or hold the crop as needed.
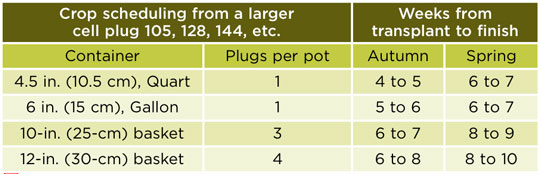
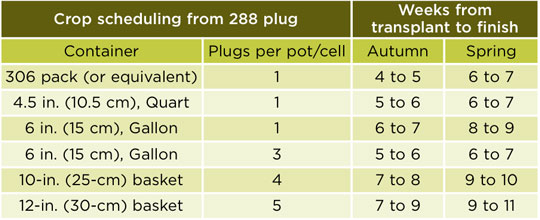
Crop scheduling
Crop times are longer in the spring; use the charts shown to plan your production depending on the input size. If growing at colder temperatures than recommended, please add additional time to your production plan.
GT
Scott Rusch is Assistant Director of Product Development for PanAmerican Seed.