9/26/2011
Culture Crash Course
Jennifer Zurko
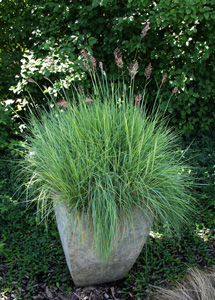 Flowering Annual Grasses
BY JOSIAH RAYMER
Josiah Raymer is head grower and general manager for Emerald Coast Growers, one of the country’s largest ornamental grass producers.
There’s a great niche out there that few are taking advantage of, and it could be your next big opportunity. Flowering annual grasses—some call them designer or boutique grasses—offer huge options in color, size, habit, form and texture.
Melinis nerviglumis Savannah is an outstanding container and garden specimen, with pink flowers that will continue to bloom into fall.
Great in patio pots, window boxes or large mixed containers, many tender ornamental grasses can also do double duty as cut, fresh or dried flowers.
In addition to the visual aspect, flowering annual grasses have the added appeal of a fast finish time with big impact. A good companion program for potted annuals, they’re economical and full of potential. Successfully producing them is easy with a few simple tips.
Planting. Plant one liner per 4-in. pot and one to three liners per 6- to 8-in. pot for the fastest finish. Typically, they’ll finish in seven to 10 weeks.
Media. Choose a light, well-drained medium.
pH/EC. Maintain pH at 5.5 to 6.5 in soilless media, and keep electrical conductivity (EC) at approximately 0.75 to 1.2.
Temperatures. Grow on at 55F-70F (12C-21C).
Light. Light levels should be approximately 2,500 to 3,500 footcandles. Extended day length may help growth in early spring.
Pinching/PGRs. No pinching or PGRs are necessary.
Fertilizer. Fertilize with a liquid feed at a medium level 150 to 200 ppm, or a slow release at 1 lb. nitrogen per yard.
Irrigation. Water requirements are moderate; keep evenly moist for best results.
Pest control. Consider a preventive fungicide after potting.
Mixed containers. For mixed containers, finish in a 4-in. pot, then place the finished 4-in. into the mixed container ready for sales. Assemble your components when you’re ready to sell the mixed container, instead of trying to grow the mixed container. This eliminates the problem of different chemical and irrigation needs during finishing.
One recipe for a great mixed container showcasing a flowering annual grass: Try
Panicum elegans Frosted Explosion with
Duranta erecta Cuban Gold and
Heliotropium amplexicaule Azure Skies.

Where to start. Not sure where to start with flowering grasses? Here are a few cultivars to try—all sun lovers and all great for containers.
- Take a look at Briza maxima (big quaking grass), which features decorative seed clusters up to 1 in. long on slim stems that mature from chartreuse to tan. Grows 24-30 in. tall in an upright habit, and is also good cut, fresh or dried.
- Eragrostis tef (love grass) Ruby Silk displays long burgundy seed heads draped over upright foliage. Reaches 18-24 in. tall and also offers great staying power in the vase.
- Lagurus ovatus (bunny tails) has soft fluffy white flowers (thus the name) above green foliage. A petite choice at just 12-18 in. Very drought tolerant and easy to grow, with a long vase life as a cut.
- Panicum elegans Frosted Explosion’s airy white plumes shine against long, green strap-like leaves. At 25-30 in., a high impact pot or cut.
- As the name suggests, Pennisetum villosum (feathertop grass) bears feathery, ivory-white plumes and grows 24-30 in. tall in a clumping habit. Great for pots or cuts.
- One final suggestion, this one for containers or as a garden specimen: Melinis nerviglumis (ruby grass) Savannah, with its showy pink flowers that emerge in summer and continue well into fall. Reaches 18-24 in. tall.
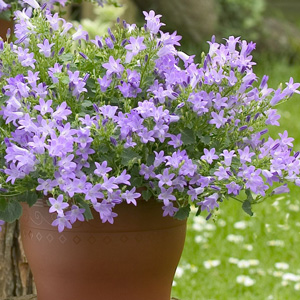 Growing a Different Campanula
BY BLAIR HOEY
Blair Hoey is new product development manager and western regional sales manager for Northwest Horticulture.
Looking for something different in the perennial campanula world? Look no further than
Campanula portenschlagiana Royal, a new series with two colors from Denmark’s Butterfly Garden and represented in North America by Greenex. (pictured:
Campanula portenschlagiana Royal Blue)
The
Campanula portenschlagiana Royal series consists of both a Blue and a White flower. Both varieties are floriferous with large numbers of oversized flowers and high bud counts. Blue produces a nice dark blue flower, while White is a crisp and clear white. Both varieties offer the traditional star-shaped campanula bloom.
The two varieties thrive in sun to partial shade and are hardy to Zone 4. With strong vigor and a long shelf life, they can be used both indoors and outdoors. Both make great table-to-patio plants that can be used as pot plants initially and then moved to a patio container or garden.
The perennial campanula will naturally bloom starting in June and continue through August. If needed, the perennials can be programmable for flowering by using long days or day-extending lighting. These have a controlled plant habit, staying just 8-12 in. tall in a mounding, upright habit that spreads to only 8-10 in.
Propagation. When using URC cuttings allow 21-28 days for rooting at 68F-72F (20C-22C). When rooting the cuttings under long days, growers will need to utilize short days on the propagated plants to assist with both rooting and plant bulking prior to transplanting the rooted cuttings. Their short propagation time does add to their appeal as a summer-blooming perennial when propagated in the early spring season.
Production. Plant a single rooted 128-cell liner per 4-in. or quart pot, or one 72-cell liner per 1-gal. pot. Ten-inch baskets will use three liners. When transplanting campanula, always leave approximately ¼-½ inch of the plant and the rooted plug above the soil to help reduce the risk of disease and/or botrytis following transplanting.
Finish time for 4 in. or quarts is 2-3 weeks of short days followed by 12-13 weeks of natural or long days. One-gallon containers will need 4-5 weeks of short days after transplant followed by 10-12 weeks of natural or long days.
Ten-inch baskets will finish using 5-6 weeks of short days followed by 10-12 weeks of natural or long days.
Campanula portenschlagiana Royal can also be planted in the fall with all of your cold-hardy perennial crops. Gallon containers can be planted with a single 72-cell rooted plug from August through September for bulking prior to overwintering. Depending on your location you can overwinter the gallons under blankets or, if needed, in unheated poly-covered tunnels for northern climates.
Force as a normal perennial campanula for summer blooming in the spring either outside after the last freeze date or in unheated poly-covered tunnels. A single shaping trim can be performed if needed to even overall plant growth once the plant starts to regrow in early spring.
Cultural information:
- Provide day temperatures of 58F-65F (14C-18C) for finishing Campanula Royal.
- Plant in a well-balanced, well-draining commercial mix with minimum of 30% perlite.
- Maintain a soil pH at 5.3-5.5 and electrical conductivity (EC) at 2.0-2.5 µmhos, reducing to 1.0-1.5 µmhos at visible bud through flowering.
- Irrigate using a constant feed of 125-150 ppm of a complete and balanced commercial fertilizer mixture.
- Campanulas are a fine-rooted plant and will need to have even soil moisture with no extreme wet or dry cycles.
- The Campanula Royal series will need a general-purpose pesticide and fungicide spray program during their production cycle. Monthly preventative fungicide drenches are recommended.
- Note: These suggestions may need to be altered to suit your individual growing conditions. Always read and follow labels, and check instructions for your region.
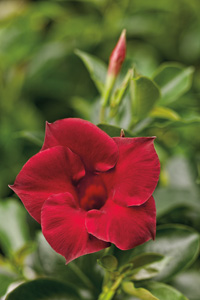 Strike a Pose: Mandevilla Vogue
BY MATT MART
Matt Mart is director of research and development for EuroAmerican Propagators in Bonsall, California.
Long known purely as a tropical vine with limited market potential and some confinement to certain geographical areas, the Mandevilla genus, now also housing the varieties formerly known as Dipladenias, is actually quite versatile and offers opportunities for growers, retailers and consumers alike from east to west and south to north.
Mandevilla Vogue is easy to produce when following some basic principles. Start with determining the kind of product you would like to grow. Vogue is extremely versatile, with some varieties being suitable for pots as small as a 4 in., while others are great to grow specimen plants in large hanging baskets or in 10- and 12-in. containers as either a bushy plant or a trellised vine. Keep in mind that not all varieties are ideal for all growing applications, so make sure you determine the best variety for your container size and desired end result.
Crop times will range from 10 to 12 weeks for the smallest containers growing a spring and summer fast crop, while large containers will take up to 10 months, thus you will start them the previous year. Most mandevillas are being retailed in the months of April through June, so calculate backwards to hit these sales targets. For northern growers and retailers, this might mean starting with a nice beefy liner or a prefinished plant that can just be grown into size.
Start your growing process with a nicely rooted prepinched liner, planting either 1 (up to 6 in.) or up to 5 plants per pot for big hanging baskets. The ideal media should be well drained and not too fine (keep in mind the potentially long crop times), with an ideal pH ranging between 5.8 and 6.2.
Since mandevillas are tropical plants, it’s important to ensure ideal growing temperatures. Targeting 75F (23C) during the day and 64F (17C) at night will keep your plants growing nicely. While much higher temperatures during the day are actually beneficial and will increase your growth rate, try to avoid higher night temperatures to avoid soft growth and increased disease pressure.
One of the unique features of Mandevilla Vogue varieties is their ability to cope with cooler-than-normal growing temperatures. This is important to note, as much of the nation’s mandevilla production is outside in the southern parts of our country, so extremely low night temperatures (upper 30s) does not affect them as severely as other mandevilla types. As for light levels, keep them at 5,000-7,000 footcandles.
Mandevilla Vogue varieties are moderate feeders, responding best to a balanced fertilizer at a rate of 100–200 ppm. For large pots a low to medium rate of a standard slow-release fertilizer should be added at planting time. Monitor EC regularly, especially after excessive rains in the more tropical growing regions. Keeping feed and moisture levels relatively consistent throughout the entire crop cycle will give you the best results.
Pinching will usually be done at the liner level, so a second (soft) pinch can prove beneficial when growing pots, hanging baskets and bushes, but is not required. For trellises and pyramids, additional pinching is naturally not recommended, but immediately start the process of “training” the vines up your fixture to avoid entanglement and to create a dense plant.
As for plant health matters, please follow standard best practices to avoid any unnecessary pests and diseases, with bacterial or fungal diseases being the greatest threats at times of high water pressure when growing outdoors. Choosing the right media and using some preventative products can protect your crop.
Vogue Mandevilla varieties:
- Vogue Audrey—Bright red, lively and producible in any size container, as well as in hanging baskets. Will flower from spring through autumn and is resistant against early autumn frosts.
- Vogue Ginger—Most popular pink, a great variety, especially in hanging baskets. Will flower all season long through the early autumn frosts.
- Vogue Rita—The newest variety in the series, Rita displays unique coral rose-colored blossoms on a floriferous and a vigorous habit. Nicely extends the color range and is as versatile as the other varieties in the offering.
- Vogue Ruby—Extra large-sized flowers that are a rich, velvety chocolate-red color. Moderate growth rate, making it ideal for patio containers, hanging baskets and window boxes.
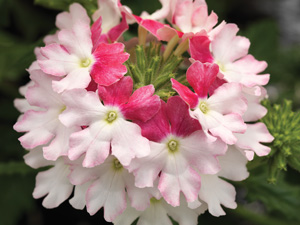 Aloha! A New “Twist” for the Lanai Verbena Series
BY MARK SANFORD
Mark Sanford is technical services representative with Syngenta Flowers.
Syngenta Flowers has expanded the Lanai verbena series with the introduction of Twister Pink for the 2011-12 growing season. Twister Pink is a breakthrough in verbena breeding in which the upper two petals of every flower are darker than the other three. This creates a bicolor look that is truly unique in verbena. Twister Pink is one of the more vigorous varieties in the Lanai series and also one of the first to flower. It will fill pots and baskets quickly with flowers all over the plant.
Propagation
Propagation of Twister Pink is easy and quick, the same as for any Lanai verbena. Soil temperatures of 72F-75F (22C-23C) should be maintained for the first 7-8 days to expedite root development. Mist for 4-6 days is generally sufficient until roots start to appear. Turn off the mist cycle at night after Day 2. Shade cuttings in propagation at 1,500-2,000 footcandles.
As cuttings begin to root, reduce mist significantly to prevent the development of diseases. Treat with appropriate fungicides as needed to prevent Botrytis. Maintain media moisture levels that are wet to the touch but not saturated. After roots are developed, keep foliage as dry as possible. Irrigate in the morning to prevent Botrytis infections. Fertilize as soon as roots start to appear with nitrate-based fertilizer at a rate of 100 ppm. Check EC levels regularly and maintain media ECs of 1-1.5.
Light levels can gradually be increased to 3,500-4,500 footcandles after roots have been established. Remove from mist as soon as roots are developed to prevent internodes from stretching. Plants will require a pinch about 2 ½ weeks after sticking. Leave 2-3 nodes under the pinch. The first PGR can be applied to the plants prior to transplanting. Apply 1 week before transplanting using a B-Nine plant growth regulator spray at 2,500 ppm or Sumagic plant growth regulator spray at 2-4 ppm in propagation. This will help reduce the internode stretch that sometimes occurs immediately after transplanting into fertilizer-rich soils. Many growers are using Florel plant growth regulator as well, which can improve branching.
Production
Twister Pink will be ready to transplant about 21 days after sticking. Transplant rooted cuttings into moist media that is porous and drains well, with pH levels of 5.8-6.2. Temperatures should be set at 68F-72F (20C-22C) days and 60F-62F (15C-16C) nights. Twister Pink is very responsive to negative DIF, which can be used to control growth.
Maintain high light levels throughout the production cycle.
Alternate moisture levels from wet to dry, but do not let plants wilt. Always irrigate in the morning when possible so foliage is dry before nightfall.
Begin constant liquid feed of a nitrate-based fertilizer at a rate of 200-250 ppm once plants have rooted out. Leaching may be required to maintain correct EC levels of 2-2.5. If light green or yellowing leaves start to appear, soil and tissue should be tested to determine levels of nutrients and what should be applied to correct.
Growth regulators may also need to be used after transplant to keep internodes short. Bonzi drenches at 2-3 ppm work well. Apply at lower rates, multiple times as needed for best results.
Smaller pots (4-in.) or quarts will need to be pinched once and larger pots, gallons and baskets will need two pinches for best shape. Florel can also be used in place of pinching. The first application should be two weeks after transplanting. A second application may be needed two weeks later if growing in larger containers.
Finishing Twister Pink outside (after the threat of frost has passed) or in a retractable roof greenhouse will help produce tough plants with healthy foliage and darker flower color.
Finishing times from a rooted cutting are 5-6 weeks for a 4.5-in./quart (1 ppp), 8-9 weeks for an 8-in./gallon (2 ppp), and 10-11 weeks for a 12-in. basket (4-5 ppp).
Common pests to look out for during production are thrips (which can carry INSV), whitefly, aphids, leaf miner and spider mites.
A common disease is Botrytis. This variety, as all Lanai verbenas, is highly mildew tolerant, though do watch for signs of infection under high-pressure environments.
For questions and advice regarding Twister Pink or any other Lanai verbena, contact the Syngenta Technical Services team anytime at
flowers.tech.help@syngenta.com.
 Success with SunPatiens: They’re Not Your Mama’s New Guinea!
BY MARK SEGUIN
Mark Seguin is marketing manager—cuttings for Sakata Ornamentals.
Even though SunPatiens are entering their seventh year on the market, many growers are just now beginning to realize their full sales potential and that these exceptional hybrids are not just another New Guinea impatiens. Much of the success growers and retailers have experienced with SunPatiens this past spring can be directly attributed to their better understanding of how to grow this unique product, and that when positioned clearly, how few items can match the value that SunPatiens delivers to their customers. Here are a few key factors essential for maximizing your success with SunPatiens.
Grower performance at a lower cost
The real impact SunPatiens provides is much greater than just a sun-tolerant, heat-loving impatiens. In addition to their performance in the garden, SunPatiens offers outstanding benefits at all levels of the value chain: grower, retailer, landscaper and home gardener. The durability of SunPatiens is ideal for extending the selling season, providing high impact, living color right up through a hard frost.
Forget what you know about New Guineas
In order to truly capitalize its sales potential, it’s important to first recognize that SunPatiens are not New Guinea impatiens (NGI) and should be grown accordingly. SunPatiens features a much more aggressive root system that allows growers the option to either direct stick in finished containers (up to 5-in. pots) or root liners extremely fast (2 weeks versus 4 weeks for typical NGI). SunPatiens also grows well over a wider temperature range (55F-70F/12C-21C night temperatures), providing flexibility with production scheduling. Plants can be finished under cool conditions, with petunias and geraniums for instance, saving energy as well as minimizing or eliminating the need for PGR applications.
Part of the success SunPatiens enjoys with their award-winning outdoor performance can be attributed to their strong, vigorous plant habit. While this feature is valued by landscapers and home gardeners who desire quick-filling, aggressive plants, it can be challenging to the growers whose primary experience has been in producing compact New Guinea impatiens. By far, the most important lesson to learn when growing SunPatiens is they are extremely responsive to water uptake and will literally take all the water you provide. In other words, the more water you apply, the longer the internodes and the taller your SunPatiens will grow.
 Control your water application … and no pinching, please!
With SunPatiens, proper water management is critical for controlling plant growth and developing a well-conditioned plant. Once roots are established, begin restricting water uptake by allowing the plants to dry between irrigations. Waiting until the plants show a slight wilt before watering promotes a strong root system and increases uptake of calcium for sturdy, healthy stems and leaves. As the plant matures, the more water stress the plant can tolerate. This growing method also helps condition the plant for greater shelf life at retail and reduced transplant shock in the garden.
Both of these SunPatiens plants were grown under the same temperature, light and space regimes; however, the plant on the right was grown with restricted water applications.
Pinching is NOT recommended for controlling plant height as it can adversely affect the overall symmetry of the finished product. Simply put, combining cooler temperatures, high light and limiting water uptake is the most effective way to produce short, well-branched, early flowering, healthy plants with high retail appeal.
A SunPatiens for everyone
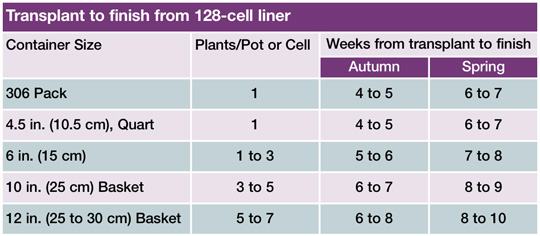
SunPatiens is offered in an array of colors within three distinct families: Compact SunPatiens—bred for having shorter internodes and a dense, bushy habit for smaller (5-in. and 6-in.) pot production; Spreading SunPatiens—which feature a more mounding habit that is ideal for baskets or landscape applications where a spreading form is preferred; and Vigorous SunPatiens—featuring a fast-growing, upright habit capable of growing 40-48 in. tall. While most commonly produced in larger containers (gallon, 8-in.), these plants cover a lot of bare ground fast and can be offered as 60-70 mm “ready-to-plant” liners. This package provides quick turns for the grower and is ideal for the commercial landscaper looking to save labor and simplify planting of large areas where a mass of color is desired.
To see the complete listing of all 18 varieties offered, learn more about available point-of-purchase marketing tools, download pictures and/or access our complete cultural recommendations for growing high quality SunPatiens, please visit our website at
www.SunPatiens.com.
 Proven Its Worth: Lobularia maritima Giga White
BY DANNY BROOKS
Danny Brooks is a product support specialist and culture advisor for Ernst Benary of America.
Lobularia Giga White has proven itself this summer in trials across the country. Its incredible heat tolerance, well-branched, mounded habit and large, fragrant florets have made it a showstopper from Florida to Michigan. But the best feature of all is that it’s from seed. Once you get the seeds, your season is set—no diseased or frozen shipments, no guesswork. Here are some growing tips to help you get started.
Plug production:
Plug crop time: 4-5 weeks
Germination:
For the optimal germination yields, we recommend days at 72F-74F (22C-23C) for Stage I: 2-3. For full-looking plugs, we recommend using 5-6 seeds per cell or a multi-pelleted seed in a media with very low soluble salt levels EC less than 5 and pH 5.5 to 5.6. If you’re using raw seed, do not cover them. Light is required for germination. However, when using multi-pellets, a cover of vermiculite and sufficient initial watering will help to dissolve the pellet at sowing. Keep soil slightly moist but not wet. Temperatures below 64F (18C) will increase germination time to 3 weeks. Avoid direct sunlight during propagation.
From Stage II reduce the moisture, but do not allow the plug to dry out. Reduce temperature to 68F-72F (20C-22C). The roots are sensitive to high salt levels and wetness in substrates, so do not let the soluble salt level rise above 0.75 EC.
Fertilization:
Fertilization should remain constant with a feed of 100 ppm using a 17-5-15 or 15-5-15 fertilizer. During Stage III and Stage IV, temperature can be reduced to 64-68F (18-20C).
Growing on:
Flowering pots: 9-10 weeks
Four to five weeks after sowing, transplant into packs or 3-, 4- or 5-in. (9-10 cm) pots.
Use a well-drained growing substrate. Grow at 55F-59F (13C-15C) day temperature and 50F-54F (10C-12C) night temperature. Temperatures above 61F (16C) will cause stretching. This can easily be controlled with growth regulators.
Low to moderate levels of fertilization are required. Fertilize the crop weekly with 100-150 ppm nitrogen, alternating a potassium-balanced fertilizer and a calcium nitrate fertilizer. Avoid high ammonium and nitrogen levels. To prevent a magnesium deficiency, apply magnesium sulfate (0.025%) 1-2 times and in case of iron deficiency (pH above 6.0), apply iron chelate 1-2 times.
Tips for success:
- Avoid excess humidity as this will create conditions favorable for diseases.
- Avoid drought stress or over watering. Either condition can cause chlorosis and necrosis of the leaves.
- Lobularia does not tolerate temperatures below 28.5F (-2C).
- Cultivation in cool temperatures with high light intensity promotes a compact plant habit and a very good plant quality.
- During winter or early spring cultivation, supplemental lighting is recommended.
 New Cool Wave Spreading Pansies: The Next Generation
BY SCOTT RUSCH
Scott Rusch is assistant product group director for PanAmerican Seed in Santa Paula, California.
For the past 16 years, the Wave series has been synonymous with highly colorful, vigorously spreading plants that last all season. It’s garnered raving fans across the nation who are the envy of their neighbors with lush, full baskets and landscapes. Now, an all-new spring and fall pansy series from PanAmerican Seed has made the grade. Home gardeners can fill their gardens with known and trusted Wave varieties for three seasons of color with new Cool Wave Pansy added to the lineup.
This
Viola x wittrockiana delivers the same easy-care, long-lasting color as Wave petunias: It’s a vigorous, cool-season basket spiller (up to 30 in./75 cm) and it’s a quick, high-impact groundcover (spreading up to 24 in./60 cm in the landscape). Cool Wave Pansy also demonstrates superior overwintering in U.S. and European trials. Watch for its Spring Trials debut in March 2012.
Plug production
Use a well-drained, disease-free media with a pH range of 5.4 to 5.8 and EC less than 0.75 mmhos/cm (2:1 extraction). Keep the phosphorus level as low as possible to avoid initial stretch. Sow in a 128-cell tray with 1 seed per cell (a larger cell size such as 128 will help promote branching early on and will also reduce the total crop time).
Cool Wave pansies can also be produced in a 288-cell size tray; however, the 128 size will promote vigorous growth and quicker finish. Smaller plug sizes can check the plant growth and increase the crop time. A medium covering of coarse-grade vermiculite is recommended at sowing to help maintain humidity around the germinating seed for better germination performance.
Germination takes approximately 3 to 4 days. Germination temperature in Stage 1 is recommended at 65F-70F (18C-21C). Light is not required. Keep the soil wet (level 4) and maintain 95%-97% relative humidity until cotyledons emerge.
Temperature in Stage 2 should be 65F-72F (18C-22C) days, 60F (16C) nights, with up to 2,500 footcandles (26,900 Lux). Keep the media medium (level 3) to medium wet (level 4). Apply fertilizer at rate 1 (less than 100 ppm N/less than 0.7 mS/cm EC) with a nitrate- form fertilizer with low phosphorous.
During Stage 3, retain temperature at 65F- 70F (18C-21C) days, 60F (16C) nights and up to 2,500 footcandles (26,900 Lux). Moisture levels should be medium wet (level 3) during Stages 3 and 4. Increase the fertilizer rate to 2 (100 to 175 ppm N/0.7 to 1.2 mS/cm EC). Maintain a media pH of 5.4 to 5.8 and EC at 0.7 to 1.0 mS/cm (1:2 extraction). A higher pH (greater than 6.2) can induce boron deficiency.
At Stage 4, temperatures should be 62F-67F (16C-19C) days, 55F (12C) nights. Light levels can be up to 5,000 footcandles (53,800 Lux) if temperatures can be maintained. Fertilize the same as Stage 3.
Plant growth regulators
When compared to standard pansies, Cool Wave pansies require fewer PGRs, or under ideal conditions they require no PGRs, in the plug stage. This is to ensure the spreading habit isn’t delayed or stunted. If needed, treat with a foliar spray of A-Rest (ancymidol) at 5ppm (19 ml/l of 0.0264% formulation) once during the plug stage at about 3 weeks after sowing, when the first set of true leaves are fully open. Transplant the plugs “on time” to avoid flower bud initiation in the plug stage. Plugs that are initiated will not fill out the finish container well at the time of flowering.
Growing on to finish
Use a well-drained, disease-free media with a pH of 5.4 to 5.8 and a medium initial nutrient charge. Night temperatures should be 50F-65F (10C-18C) and day temperatures 62F-70F (16C-21C). For a faster finish and to increase spread, which is particularly important for spring production, grow in a warmer zone for the first several weeks after transplant to encourage growth at 60F-65F (15C-18C) night temperature. This will encourage lush, vigorous growth and quicker spread. When your plants have reached the desired size, cool down your zone gradually over a few days to your more normal pansy growing conditions. The cool temperatures will tone the plants and encourage more blooms. Keep light levels as high as possible while maintaining appropriate temperatures.
Cool Wave pansies require more fertilizer than is usually recommended for standard pansies. For best results starting a week after transplant, apply nitrate-form with low phosphorus fertilizer at rate 4 (225 to 300 ppm N/1.5 to 2.0 mS/cm EC) every other irrigation. For constant feed programs, apply fertilizer at rate 3 (175 to 225 ppm N/1.2 to 1.5 mS/cm) using predominantly nitrate-form fertilizer with low phosphorus. If needed, alternate with a balanced ammonium and nitrate-form fertilizer to encourage growth and balance the media pH. Maintain the media EC at 1.50 to 2.00 mS/cm and pH at 5.4 to 5.8. If the media pH is greater than 6.2, take corrective measures.
Maintain optimal media moisture, i.e. not too wet or not too dry. Since this is a spreading-type pansy and mostly grown in larger containers, such as hanging baskets, minimal to no plant growth regulators are needed. Pinching is also not recommended. If PGRs are needed for pack or 4.5-in (10.5 cm) pot production, you can use tank mix foliar sprays of B-Nine/Alar (daminozide) at 5,000 ppm (5.9 g/l of 85% formulation or 7.8 g/l of 64% formulation) and Cycocel (chlormequat) at 500 ppm (4.3 ml/l of 11.8% formulation or 0.7 ml/l of 75% formulation) to control plant growth.
 Crop scheduling
Sow to transplant, it takes approximately 6 weeks to finish a 128-cell liner. A 288-cell plug will finish in 5 weeks. Crop time transplant to finish can be 10-14 days longer when grown from a smaller size plug such as a 288-cell size. Note: Overcrowding plugs can result in a more mounded basket that will not trail over the sides as much.
 Callused Cuttings in a SNAP!
BY REBECCA SIEMONSMA
Rebecca Siemonsma is technical services manager for the Paul Ecke Ranch in Encinitas, California.
The Ecke SNAP System 78 or ES78 is a revolutionary new product from the Ecke Ranch. ES78 is a pre-stuck callused cutting shipping in a proprietary media from their Guatemalan production facility. Products available in ES78 include poinsettias, geraniums and spring annuals from Ecke Ranch.
Why is ES78 so special?
The fact that cuttings are callused is not new to the industry. What’s so exciting is the fact that the cuttings are already stuck, which is a bonus for growers for many different reasons.
Advantages to ES78 include:
- Cuttings are callused, which allows growers to reduce production schedules by two weeks. Reduced bench time can be especially valuable if space issues are a concern.
- Reduced bench time may also eliminate two weeks of costly heating and misting.
- Sticking labor can be expensive. Because ES78 is pre-stuck, sticking labor is eliminated.
- Callused cuttings are generally more resilient to the stresses of shipping and the propagation environment. Growers will benefit from fewer issues with leaf yellowing or disease that can be problematic in the early stages of propagation of unrooted cuttings.
- ES78 are callused and graded for uniformity and quality. Growers can expect superior quality.
- For the grower that is very conscious of material costs, ES78 includes media, strips and trays, which eliminate a portion of production costs.
Products that growers may have historically struggled with when propagating unrooted cuttings due to less than optimal propagation environments and systems will find that because ES78 is callused, certain products become options for growers that may not have been before. This is especially important in today’s competitive market where a diverse product offering is critical.
What do growers need to grow ES78?
Cuttings are callused and placed in media, but still need some type of propagation system. This may even include hand misting or sprinklers—growers just need to keep in mind that for the first couple of days after shipping close attention to moisture management, just like with unrooted cuttings, is very important until cuttings rebound from shipping stresses. A state-of-the-art propagation system is not a requirement. Typically cuttings propagate 1 to 2 weeks earlier than unrooted cuttings, depending on the species.
Growers will need to provide an environment very much like a traditional propagation environment. Depending on the time of year and the product, cuttings will likely need to be shaded. Adequate humidity and airflow are still important.
Callused cuttings will be ready for fertilizer. Depending on the product, generally, most growers begin fertilizing in propagation on Day 10-14. Growers should treat ES78 the same as cuttings that are in Day 10-14 in propagation and fertilize accordingly.
Growers should apply fungicides, insecticides and growth regulators and again treat ES78 as a cutting Day 10-14 in propagation. If your environment generally warrants application of such chemicals be prepared to treat ES78 the same way.
Cuttings should be ready for transplant in 2-3 weeks. Plan schedules and labor accordingly.
Culture after transplant:
- Cuttings should be transplanted once well rooted. Avoid holding cuttings over in propagation just as you would with unrooted cuttings in traditional propagation.
- Depending on the product form, acclimation to the finishing environment with reduced misting needs and high light will be necessary.
- All other aspects of culture should remain the same including fertility, pest management, environmental management and height management.
- Review production schedules for each product. Finishing from transplant will be the same as cuttings propagated in traditional propagation systems and then transplanted.
ES78 offers growers many advantages and the ability to increase margins with reduced production-related costs. For more information, contact your regional Ecke key account sales manager.
GT