3/15/2010
Maximum Advice on Mini Roses
Norman White
Prior to taking on the challenge of growing any new crop, including miniature roses, the first thing you do is ask yourself a series of questions. Let’s start with the really big question first: “What do I need in the way of greenhouses and greenhouse environment to grow quality miniature pot roses?” Here are the basics for growing this specialty crop:
- Greenhouse with modern computer controls, good light and a cooling system.
- Floor or under-bench heating system to maintain a 75F to 78F (24C to 26C) day and night temperature in the propagation areas.
- HID lights in the production and growing areas.
- Tray system for moving plants easily from sticking area to shearing/cutting area and onto growing/finishing area.
- CO2burners or a liquid CO2 system with which to increase CO2 from the natural level of 350 ppm to about 800 to 1,000 ppm.
- Automatic cutting machine to cut roses to the proper height.
- Tray system for watering or a bench spaghetti bleeder system.
- Cooler set to 38F to 40F (3C to 4C) to pre-cool finished roses and store cuttings prior to sticking.
- Soil mix. We prefer a peat mix with about 6% perlite, a pH of 5.5 to 6 and a starter charge added to give an EC reading of 1.0 to 2.0. EC. PH management throughout the crop should be about 1.7 to 2 EC and a pH of about 5.5 to 6.
- Most importantly, a grower who understands the importance in how to use all of the above. Plus, he or she needs to understand how and when to use PGRs and other plant enhancements.
The art of growing miniature pot roses
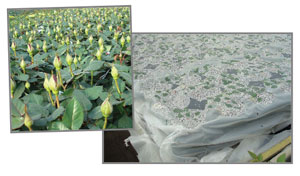
The starting/rooting area needs to have bottom heat as indicated above. This area should also have automatic shade of about 60%. For best rooting, cover the newly stuck roses with a clear plastic sheet no more than 0.02 mm thick punched with ¼-in. holes about 10 in. apart. You can also root roses with a fog system in lieu of plastic.
Remove this plastic eight to 12 days after sticking, depending on variety, then apply a sheet of Remay over the roses. This gives the cuttings air but limits light. After two to four days, remove the Remay and keep the roses in the starting area for about two more weeks with only automatic shade to control light levels. Move the roses to a growing environment with full light and temperatures between 69F to 70F (20C to 21C) day and night.
Producing finished roses with one shear
Between 33 to 35 days after sticking, make the first shear. This creates the cutting material for the next generation. Shearing will also ensure the plants develop many flowers for the finished pot. The first shear height will depend on pot size. For a 4½ in. pot, cut about 13⁄8 in. above the pot’s lip. For a 6-in. pot, this cut should be about 1¾ in.
After the shear, space the pots in a 69F to 70F (20C to 21C) day and night greenhouse to finish. Final spacing should be complete within seven days after first cut. You can make a second cut 17 to 20 days after the first cut. If the second cut is delayed by two to three days, it will result in a large amount of yellow leaves at the lower part of the plant.
PGRs
The first PGR (Bonzi, Paczol or Piccolo) should be applied about 10 to 11 days after shearing. Go with a very light application of about 1- to 1¼ oz. per gal. three to four days apart. Some varieties are more aggressive than others; you’ll have to determine when to apply and at what strength. Now that we have the roses off to a good start with final spacing, HID lights, and PGRs, don’t forget all the other little things that can ruin your day, such as thrips, spider mites and mildew.
GT
Norm White is owner of White’s Nursery and Greenhouses in Chesapeake, Virginia.