10/1/2017
Grow with the Flow
Jennifer Zurko
 By Dr. Alicain Carlson, Technical Scientist, Syngenta Flowers
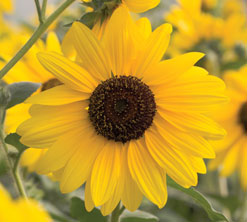
Sunfinity Sunflower is the next generation of annual sunflower from seed that offers multiple branches and flowers all season long. Unlike the current pot-type sunflowers that flower once and die after a couple weeks, Sunfinity keeps branching and blooming for nine to 12 weeks! Since Sunfinity is unique compared to typical sunflowers, there are some key production factors you need to know to produce the best product.
Plug production
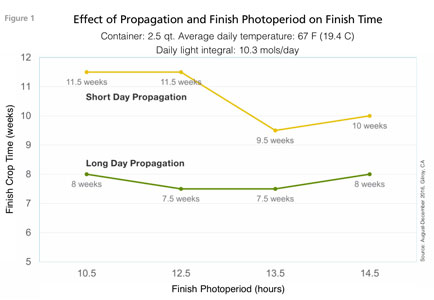
Photoperiod—Sunfinity is a facultative long-day flowering plant. Daylengths longer than 13.5 hours provided during the four weeks of propagation will initiate flowering and are highly recommended, as it reduces crop time by two to four weeks (See Figure 1).
PGRs—A Bonzi PGR (paclobutrazol) 2 to 3 ppm sprench (3 to 5 qts. per 100 sq. ft.) within 48 hours of sowing is recommended to control hypocotyl stretch and create a stacked plug. This PGR application is important for controlling internode length early to create a well-branched architecture for the finished plant.
Plug quality at finish—Be sure to transplant plugs on time (approximately four weeks after sow or when pullable) or apply another PGR if they’re needed to be held to help avoid excessive internode stretch that will diminish finish quality. Expect plugs to be approximately 3- to 4-in. tall at transplant. Sunfinity can be produced in tray sizes from 128 to 50 cell, but a 72 cell is recommended.
Finish production
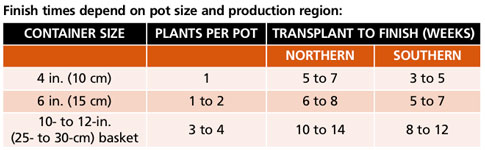
Finish containers—Sunfinity is recommended for 2.5-qt. pots or larger. With its vigorous habit, Sunfinity performs well in large pot sizes that command higher value at retail. Branded pots are available in 2.5-qt. and 1.5-gal. sizes and Sunfinity pot tags are required. See Figure 2 for plants per pot recommendations.
Fertilization—Sunfinity are moderate to heavy feeding plants, therefore nitrogen concentrations should range from 150 to 200 ppm. Maintain constant liquid fertilization until market to supply your customers with sufficient nutrient charge for preliminary garden performance. Encourage retailers to supply gardeners with fertilizers to maintain tone and vigor for nine to 12 weeks.
Photoperiod—Sunfinity is a facultative long-day plant. If Sunfinity plugs were propagated under long days (>13 hours), then the finish photoperiod isn’t critical and plants will be market-ready seven to eight weeks after transplant. If plugs were propagated under short days, then long days or a four-hour night interruption is highly recommended to speed flowering.
Pinching—Pinching is highly recommended, as it highlights the unique branching quality of Sunfinity. The pinch also helps to control vigor—un-pinched plants get quite tall. After six to seven nodes develop, pinch leaving four nodes. The nodes of Sunfinity are opposite, so a pinch to four nodes would leave eight leaves. This is a hard pinch—similar to poinsettias. At this time, you’ll also want to remove any early laterals that may be forming from the cotyledon or between the cotyledon and first node, as these can become dominant and cause uneven branching.

PGRs—Sunfinity will require PGRs during finish at a minimum of three key times: 1) 2 to 3 ppm Bonzi drench one to two weeks after pinching; 2) 2 to 3 ppm drench at first sign of visible buds; and 3) 2 ppm drench when flowers start cracking color (or just before) to hold for finish. Higher rates (4 to 6 ppm) may be necessary under high light, long days and high temperatures (summer programs).
It’s very important to control Sunfinity early on with PGRs. The first PGR helps to set the branching architecture that started with the PGR during propagation. The second and third applications help to control the peduncle stretch that’s common as the buds swell, especially under long days. We’ve found that the timing of the PGR is more critical than the rate applied. Extremely high rates applied too late will not be effective. Excessively high PGR rates early in production (>8 to 10 ppm) can suppress garden vigor and minimize the true potential of Sunfinity.
Pests and diseases—Pests to prevent are aphids, spider mites, thrips, whitefly and caterpillars. Insecticides, such as Mainspring and Flagship brand insecticides, are recommended for control of chewing insects on outdoor plants. Avid 0.15 EC miticide/insecticide is also effective for caterpillars, whitefly and spider mites in warm, dry conditions. Preventive fungicide applications for powdery and downy mildew are recommended, especially in high humidity environments. Palladium, Micora and Segovis fungicides are effective.
For more information on Sunfinity culture (including videos!) and Syngenta’s branded program, please visit
www.SyngentaFlowers-US.com/Sunfinity.
By Emily Mason & Tanner Douglas Cole, Dümmen Orange – North America
New for 2018, the Bloomtastic series was bred to be the most vigorous calibrachoa offered by Dümmen Orange. This vigor, combined with daylength neutrality, makes Bloomtastic an ideal choice for early color in small pots or for irresistibly impressive planters and baskets.
Pictired: Bloomtastic Calibrachoa has been trialed over the past two years at eight regional trial locations, scoring high marks in heat and humidity tolerance. Vaughn Fletcher, Fletcher Consulting, said of Bloomtastic Serenity:
“… unquestionably, Serenity is the most floriferous and eye-catching variety in the [Metrolina] container trial.”
Bloomtastic Rose Quartz and Bloomtastic Serenity feature remarkable heat tolerance, extra-large flowers that shimmer in full sun and a spreading growth habit. Both new introductions have been trial-proven over the past two years at eight regional trial locations, scoring high marks in heat and humidity tolerance. Such excellent garden performance makes Bloomtastic one of the few calibrachoa on the market appropriate for landscape applications.
An even sweeter deal is Confetti Garden Bloomtastic Blossoms, which showcases both cultivars in a delightful pastel combination. Rose Quartz and Serenity root together, time together and bloom together for a duo that’s perfect for spring and summer sales.
Propagation and finish
Sticking—Good soil-to-stem contact is extremely important for calibrachoa rooting. If using a dibble, make sure the dibble hole isn’t too large for the cutting. After sticking, water the cuttings uniformly to help “seat” them in the soil media. A typical well-drained, peat-based media is suitable in propagation, but coir-based and hydrofiber-type media can work just as well.
Make sure major changes to soil media are trialed for at least one crop cycle before switching entirely. A rooting hormone powder or spray (100 to 200 ppm IBA) is recommended for uniformity of rooting. 50, 72, 84 and 105 count trays or strips are suitable for rooting calibrachoa.
Moisture—Cuttings should be misted for the first eight to 12 days with just enough water to keep the leaves turgid. Excessive misting can result in iron-deficient chlorotic foliage that’s at higher risk of disease occurrence. Throughout production, keep media moderately moist with mild dry cycles.
Fertilizer & pH—Fertilizing through mist can be beneficial at 50 to 75 ppm N using a 15-0-15 formulation. Once roots emerge and misting is reduced, fertilize at 100 to 150 ppm N, alternating between 15-0-15 and 20-10-20 formulations. This rate can increase to 200 to 250 ppm N after transplant. An acidifying fertilizer with additional iron will likely prevent chlorosis in new photosynthetic tissue. EC levels should be maintained around 2.0 to 3.5 mS/cm by saturated media extraction (SME) during propagation and 3.5 to 5.0 mS/cm SME during finish. Bloomtastic should be grown in a pH range of 5.2 to 5.6 to ensure proper nutrient availability.
Pinching—Bloomtastic should be pinched about 21 days after stick and seven to 14 days after transplant. A 300 to 500 ppm Florel (3.9% ethephon) application will further improve branching if applied seven to 10 days before transplant.
Temperature—During the rooting phase of production, soil temperatures should be maintained around 70 to 75F (21 to 24C), while air temperatures can range from 70 to 75F (21 to 24C) during the day and 68 to 72F (20 to 22C) at night. This can widen to 65 to 73F (18 to 23C) days and 68 to 75F (20 to 24C) nights during finish.
Light—Light levels and root development bear a direct relationship; as rooting increases, so should light. Bloomtastic is a fully daylength-neutral series. Brightness should be maintained between 5,000 to 9,000 foot candles (53,800 to 96,900 lux) during finish.
Growth Regulation—B-Nine (85% daminozide) at 2,500 to 5,000 ppm can be used to control growth as needed in propagation.
Due to the high vigor of Bloomtastic Calibrachoa, PGRs will almost certainly be required at finish. Consider the below options, but keep in mind that lower PGR rates are necessary in northern production areas, while higher rates may be required in southern regions to achieve similar results.
• 2,500 to 3,000 ppm B-Nine (85% daminozide)
• 1 to 4 ppm drench Bonzi (0.4% paclobutrazol)
• 1 to 2 ppm Sumagic (0.055% uniconazole)
Providing high light, cool temperatures and a negative DIF also helps to reduce stretch.
Pot sizes & timing—Bloomtastic unrooted cuttings are usually ready to transplant four weeks after stick.
For more information, contact Joel Kempfer, Product Manager at Dümmen Orange, at
J.Kempfer@DummenOrange.com.
By Bob Croft, Technical Support Manager & Trials Coordinator, Sakata Seed America, Inc.
Celosia Century is a semi-tall type series that produces extremely large, 12-in. (30-cm) long colorful plumes with numerous basal branches. All colors, including the new Century Pink, are uniform in both habit and flowering and put on a great show of color.
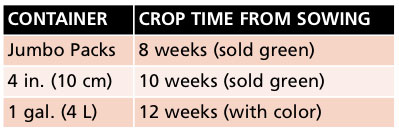
Century is ideal for use in mass plantings or as a thriller in mixed containers and is especially nice to sell in late summer for a great show of color through autumn. Plants grow 27-in. (70-cm) tall by 10-in. (25-cm) wide. Celosia Century is a mid-early type that produces flowers in 80 days from sowing. Century is a long-time favorite and a tried-and-true series … in fact, Century Mix is a 1985 All-America Selections winner!
Plug stage: 4 to 5 weeks
Tray size—Celosia is generally produced in a 392-plug tray for pack production and a 288 for 4-in. (10-cm) pots.
Photoperiod—Century Celosia is a facultative short-day plant. To promote vegetative growth, the seedlings require long-day conditions (>13 hours) to prevent premature flowering.
Media—A well-drained peat-lite media with a pH of 5.5 to 6.0 and EC less than 0.7 mmhos (2:1 slurry).
Cover—A light cover of medium vermiculite is needed to maintain optimum
humidity.
Temperature—Optimum germination temperature ranges from 70 to 75F (21 to 24C).
Fertilizer and watering—When the cotyledons are up and lying flat, apply 100 ppm N to strengthen the seedlings. As true leaves form, increase the fertilizer to 150 ppm N and target the EC at 1.0 to 1.4 mmhos (2:1 dilution). Water early in the day and rinse the foliage with fresh water, as young foliage is sensitive to salts.
Stress—Celosia is sensitive to stress, (moisture, high temperature, root banding), which causes premature budding and stunted growth later in production. As mentioned earlier, celosia will bloom more quickly under short-day conditions. To avoid premature flowering, produce plugs under increasing daylength with a minimum of 13 hours.
Growth regulator—In general, not required in the plug stage if proper culture is followed.
Crop timing—Crop time ranges from four weeks in a 392 or 288 tray to five weeks in a 128 tray.
Finish stage: 4 to 6 weeks
Transplanting—Celosia has a soft stem and delicate root system. To avoid damage, use a plug popper to dislodge plugs and only handle the seedlings by one leaf. Also avoid deep transplanting to prevent rhizoctonia.
Container—Cell packs, 606 jumbo tray and 4-in. (10-cm) pots.
Media—Well-drained, porous media with a pH between 5.5 to 6.0 and a starting EC less than 0.7 mmhos.
Temperature—Maintain the plants at a temperature of 65 to 75F (18 to 24C). Avoid temperatures below 61F (16C).
Photoperiod—Providing long-day conditions (>13 hours) after transplanting will promote vegetative growth and prevent premature flowering for better consumer performance and garden height.
Light—High light, full sun is best.
Growth regulator—Not necessary. Do not pinch.
Fertilization—Celosia must be kept growing vigorously in order to reach favorable size before flowering slows their growth. Apply 100 to 150 ppm N as needed to maintain the EC at 1.0 to 1.4 mmhos (2:1 dilution). It’s important to supply sufficient amounts of potassium in the fertilizer. A lack of potassium causes smaller and abnormal-shaped flowers. Boron deficiency causes deformed foliage and a witch’s broom effect.
Diseases—Celosia is susceptible to Botrytis, Downy Mildew, Pythium and Rhizoctonia.
Insects—Aphids, cut worms, nematodes and thrips.
Culture watch point—Celosia is sensitive to vaporized gases of certain herbicides like methylurea, methoxy, dichlorophenyl and dichlorobenzonitrile.
Flowering—Century Celosia is a facultative short-day plant, so providing long days (> 13 hours) in the plug and early development is necessary to build sufficient plant body. In North America, Century begins to flower outdoors in early July as the daylength begins to shorten. To force color earlier in containers under long-day conditions, apply short days (< 12 hours) for a few weeks once the plants are fully developed. Plant age, root banding and moisture stress also trigger flowering.
Extra tip—Applying a soft pinch to actively growing (vegetative) plants a few weeks after transplanting produces a greater show of color.
By Jen Calhoun, Marketing Specialist, Ernst Benary of America
Your customers want something new; you need something versatile enough for multiple programs with great sell-through. Benary’s new Bed Head Calocephalus is the best of both worlds! This Australian native is relatively unknown here in the U.S., but it’s extremely popular in Europe. The foliage looks a bit like a silver tumble weed, but is soft, flexible and oh-so-touchable—that’s why we called it Bed Head!
Its silvery foliage makes eye-catching mixed containers, mono-culture pots or topiaries. It can even be dyed and used in wreaths or crafts, and works great as a modern component in cool-season combinations. Here are a few tips on how to grow the new, must-have novelty item from seed.
Plug
• Crop time is six to seven weeks to a 288 tray and 10 to 11 weeks from a 288 to a
4-in. pot. Plants can be produced at lower temperatures along with pansy and violas, but this adds crop time.
• Sow four to six seeds per cell and cover seeds very lightly with vermiculite. Media should have a pH of 5.5 to 6.2
• Germination occurs in 14 to 21 days.
• The ideal temperature for germination is 70F (21C), but can be reduced to 60 to 64F (16 to 18C) after 10 days.
• Initially water in trays until saturated, then dry back slightly (after radicle emergence) until germination is complete.
• In the plug stage, humidity should be kept high (95% to 100%) until Day 20, then reduce to 40% to 60%. Provide proper ventilation and horizontal airflow.
• Avoid direct sunlight after sowing. Increase light levels on Day 21, but continue shade under high light and high
temperature.
• Begin low rates of fertilization on Day 14. Supplemental iron applications are beneficial.
• During plug bulking, light levels can be increased to 8 to 10 mols, 2,500 to 3,000 foot candles (25,000 to 30,000 lux).
• Plants prefer to be cultivated on the dry side. Establish a good wet-dry cycle and be sure to provide proper ventilation and horizontal airflow.
• Apply one to two applications of B-Nine (daminozide) sprays in the plug stage or shear the young plants at six weeks.
Growing on
• To avoid additional diseases, do not transplant plugs too deep.
• Maintain a pH of 5.5 to 6.2 with an EC of 1.5 to 1.75.
• Provide light levels of 12 to 16 mols, 3,500 to 4,500 foot candles (35,000 to 45,000 lux). This is a full-sun plant that can be produced outdoors, especially in summer and fall.
• If possible, maintain 60 to 64F (16 to 18C) temps for the first two weeks, then lower to 50 to 56F (10 to 13C).
• Alternate between moisture levels wet (4) and medium (2). Make sure that plants are allowed to dry back between watering(s). Calocephalus prefer drier cultivation with good ventilation and horizontal airflow.
• Relative humidity of 40% to 60% is ideal.
• Use a moderate feed program with a well-balanced calcium-based fertilizer. Additional potassium and iron are beneficial during the finishing stages.
• Sprays of B-Nine (daminozide) or pinching/shearing, two to three times will result in fuller plants.
• Apply fungicides during long periods of low light and high humidity.
• Fertilize with potassium nitrate at 100 ppm one to two weeks prior to shipping.
By Rick Schoelhorn, New Products, Proven Winners
Salvia occupies such a great niche in production, providing constant color for spring through fall. They also take advantage of the consumer’s ever-increasing interest in pollinator gardens and nature gardening by attracting both insects and hummingbirds to their nectar-rich
flowers.
Whether you grow in the north or the south, there’s a salvia for your climate and growing conditions, with a bonus of being so easy to produce. Salvia are in the mint family, which means they’re fast growing and quick to come into flower. Depending on where you are in the season, they’re vigorous enough to grow in larger containers. But if you want to quick-crop them, they can make a simple fast crop for 4.5-in. containers as well.
Proven Winners has a variety of salvia depending on your production needs. The Color Spires series is a northern perennial line, best with vernalization, and hardy in USDA Zones 3 to 8; the Ablazin’ collection is the traditional annual Salvia splendens type, which provides quick and easy annual color; and new for 2018, are two temperate perennial forms, Rockin’ Deep Purple and Rockin’ Playin’ the Blues improved
(pictured).
Temperate perennial salvias are hardy in USDA Zones 8 to 10, and often used as long-blooming annual color farther north. They require no vernalization and are fast growing with mid-spring to fall flowering. The two new Rockin' Salvia have the same production needs as the annual forms of salvia, so they fit well into any bedding plant production calendar.
Rockin’ Playin’ the Blues is the latest improvement in breeding that lead to Indigo Spires and Mystic Spires. With each successive improvement, the overall plant size has been reduced and the energy that used to go into stem length is diverted into more flowers. Rockin’ Playin’ the Blues is more compact than the other forms and a bit earlier to bloom, but retains all the color, ease of production and tolerance to lower frequency watering. The flowers delight with dense, upright spikes. These salvia deliver shorter, faster, easier and excellent performance for your landscape, as well as retail customers.
Rockin’ Deep Purple is an exciting new hybrid for spring 2018 with a dense, upright, vase-like habit. Rich purple blooms with lustrous black calyces are produced in loose open spikes across the top of the plant. This plant has demonstrated itself as a true hummingbird magnet, so don’t forget to promote salvia as pollinator friendly when working with customers.
The single most important production aspect with any of the salvia is light levels. High light is essential to building the best plant structure and getting the earliest flowers. Warmer production temperatures can help speed a crop along, but high light is required. Low light and cold wet conditions will delay a crop or reduce the quality very quickly.
Salvia prefer evenly moist conditions and while many, including the Rockin' collection, are quite drought tolerant once established in the landscape, avoid drought stress in production, as it will cause lower leaf drop. A balanced bedding plant blend of fertilizer is all that’s required; however, using fertilizer high in ammonia content can cause stem stretch and lack of flowers, so a balanced nitrate ammonium blend is preferred. High pH levels can lead to chlorosis—check pH levels regularly, especially if you have a very alkaline water supply.
Basics of production
pH: 5.8 to 6.2
EC (2:1 Extraction Method): 0.6 to 0.9
Fertilization: Medium rates = 150 to 200 ppm
Light requirements: High
Water categories: Moderate to Moist
Growing temperature: 65 to 72F (18 to 22C) or warmer
Holding temperature: 50 to 60F (10 to 15C)
Planting and timing information: Spring to fall finish
1 liner/gal. or 4.5 in., 3 liners/10 in. or 14 in. upright
Finishing times
4- to 5-in. and quart pot: 4 to 5 weeks
6-in. and gallon pot: 6 to 8 weeks
7- to 9-in. pot: 8 to 10 weeks
10- to 12-in. and 2-gal. pot: 8 to 10 weeks
Pinching and growth regulators
For small pot production, pinching is not needed. For larger containers, pinch as needed. Use of cold temperatures can also help control growth.
As with most salvia, and most other members of the mint family, there are few pests or diseases in production. Simply follow good sanitation practices, including keeping greenhouses clean at all times, eliminating weeds and debris, disinfecting equipment in greenhouses as often as possible, and keeping hose ends off of the greenhouse floor. Good water management practices are critical for good, healthy plant growth.
Rockin’ Playin’ the Blues and Rockin’ Deep Purple are both excellent additions to your annual crop portfolio. For growers across the southern tier of the U.S., these plants may also be sold as temperate perennials, depending on the location. However, they make outstanding landscape color, have a long retail shelf life anywhere in North America, and are easy to grow and sell. Don’t forget to promote these tough, reliable and drought-tolerant plants as pollinator friendly to your customers as well.
By Jeremy Windemuller, Grower & Trial Manager, Walters Gardens
It may be a surprise to some people that clematis is a bigger genus than just flowering vines. In fact, there are many different species of clematis that are non-vining and herbaceous (die back to the ground). Stand by Me is a new herbaceous clematis for the Proven Winners Perennial line, first available as bare root for the fall 2017/spring 2018 season. This type of clematis may be unfamiliar to some growers, so we’ve laid out some grower suggestions for best success.
Potting and timing
Stand by Me Clematis is currently only available as a bare root. We recommend planting the bare root in a trade 1-gal. container, with one set of nodes approximately 1 in. below the soil surface, leaving at least one set of nodes above the soil surface, just as you would for a vining clematis. Allow for six to eight weeks finishing time.
Whether starting with plugs or bare root material, use a
well-drained soil mix composed of bark and peat with a pH of 5.7 to 6.4.
NOTE: Since Stand by Me does not vine, it doesn’t require a trellis in the pot. However, it would benefit from some kind of support ring, such as a mum or poinsettia ring, that you can purchase from your preferred container supplier.
Vernalization
Clematis requires vernalization to bloom, to achieve a mature habit and to produce multiple stems per pot. Eight to 10 weeks is the cold requirement at 40 to 50F (4 to 10C). Bare root plants purchased in spring will already have been vernalized.
Cultural recommendations
Fertility—Use water-soluble fertilizers at a rate of 50 to 100 ppm nitrate delivered under a constant feed. To prevent salts from reaching undesirable levels, irrigate with clear water every fourth watering. The recommended EC rate is 1.5 to 2.5 using the pour-through method.
Moisture—Keep plants consistently moist during the bulking stage. Once a good root system is established, they can be grown a bit drier. Keep plants moderately moist, using a well-drained potting media. Allow plants to dry slightly between waterings.
Lighting—Clematis is daylength neutral and doesn’t require artificial lighting to flower. However, high light levels are recommended during the growing season—this is a full sun plant. Grow this crop under clear plastic indoors or in direct sunlight outdoors.
Temperature
Growing temperature—Clematis is best grown in cooler temperatures (40 to 50F/
4 to 10C), first to promote root growth before the top growth appears. After root growth is developed, you can grow at warmer temperatures (55 to 60F/12 to 15C), holding at 40 to 50F again after
finishing.
Overwintering—The best way to overwinter clematis is in a minimally heated greenhouse kept slightly above freezing. However, they may also be overwintered outdoors under a heavy frost blanket or in an unheated greenhouse. Bait liberally for rodents over the winter and do not let plants sit wet or crown and root rots may settle in.
Pests and diseases
Leaf spot, powdery mildew, rust and stem rot can occasionally be found. Growing under ideal conditions will alleviate most of these issues. Clematis is generally pest free, but we recommend scouting on a regular basis. Do NOT apply fungicides containing the active ingredient Etridiazole, trade names Banrot, Terrazole and Truban. These chemicals will cause severe phototoxicity and most likely plant death.
Finishing tips
We’ve observed that once Stand by Me Clematis is in flower, it tends to hold for a long period of time, so staggering timing isn’t necessary.
Spacing—Give your plants moderate spacing, although Stand by Me shouldn’t grow into its neighbors as much as your vining clematis would. Good spacing also allows for better airflow, which prevents foliar diseases.
Pinching—Generally, we don’t recommend pinching a vernalized plant. Once the flowers are finished blooming, you can do a light shearing to promote fullness to the plant.
PGRs—No PGRs are needed for Stand by Me Clematis.
By Claire Josephson, Product Marketing Manager, PanAmerican Seed
As more Millennials buy their first home and foray into creating inviting outdoor spaces, your product assortment can keep up with the times with enticing varieties that offer “boom without the bloom.”
Foliage plants appeal to new gardeners for many reasons. First, most don’t consider themselves “gardeners;” that’s a hobby and knowledge base that’s beyond them at this stage in their young, urban and active lives. They work hard and play hard—there’s no time for maintenance. Foliage keeps things simple!
Second, first homes are usually smaller and limited on space. No yard? No problem for leafy plants. In addition, homeowners with balconies are looking for green screens from neighbors to help them enjoy their outdoor entertaining.
Third, the next generation is highly attracted to the coolest new trends—provide them plants that are more than pretty. Non-flowering plants offer a gateway to gardening with fresh color, interesting texture … even sound!
For the 2018 retail season, PanAmerican Seed is excited about three new foliage-focused introductions that meet these criteria and more.
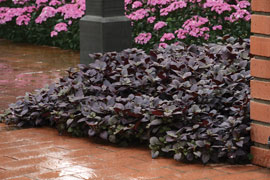 Alternanthera Purple Prince
Plug crop time:
Alternanthera Purple Prince
Plug crop time: 4 to 5 weeks
Transplant to finish: 7 to 8 weeks
This is the first compact seed alternanthera—an easy-to-grow alternative to vegetative varieties. Purple Prince is a durable carpet of ruby/burgundy ready to take on summer’s extremes, including drought and rain. Homeowners will find it very versatile as a groundcover, accent in a “spiller” mixed container or on its own as a specimen.
To get the best-looking burgundy color, grow plants with daylength longer than 12 hours. High light conditions will result in deeper color. Pinching isn’t required, but if control is needed, a paclobutrazol sprench at 1 ppm one week before plug finish can be useful as a PGR, especially when used in combination planters.
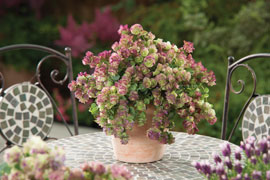 Ornamental Oregano Kirigami
Plug crop time:
Ornamental Oregano Kirigami
Plug crop time: 5 to 6 weeks
Transplant to finish: 9 to 11 weeks
Here’s a perfect patio plant. Kirigami is an eye-catching, non-culinary oregano with large purple/green bracts and clear green foliage. Its soft fragrance attracts bees, while the plant remains a heat- and drought-
tolerant texture marvel from spring through autumn. Great in rock gardens, hanging baskets or can be dried for use in flower arrangements.
During propagation, provide an active growing climate with higher light levels. This is a long-day-required plant, with a critical daylength of 14 hours. Apply a low to moderate fertilization and moderate irrigation during finishing (avoid keeping Kirigami too wet). The bracts will develop much deeper purple color when the plants are exposed to high light (12 to 15 mol•m-2•d-1) and cool night conditions (lower than 50F/10C).
Kirigami reacts well to daminozide and it should be used at lower concentrations with multiple applications to avoid stunting. Avoid daminozide once color starts in the bracts to prevent bleaching. With its versatile use, there’s no specific number of PGR applications; it’s easy to mold Kirigami to your desired look or
container size.
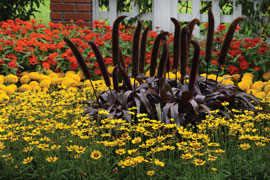 Ornamental Millet Copper Prince
Plug crop time:
Ornamental Millet Copper Prince
Plug crop time: 2 to 3 weeks
Transplant to finish: 4 to 5 weeks (green)
An exciting new color joins the only ornamental millet seed assortment on the market. Copper Prince begins as a light caramel color, then deepens to copper as it sends up a rosy, foxtail panicle. What a great way to bring “metallics” into your outdoor décor! There’s late-summer interest when birds begin feasting. Its shorter stature makes it appropriate for small-space areas.
When direct sowing into final production container, apply a 6 to 8 ppm paclobutrazol drench four weeks after sow and repeat if needed 10 days later. For transplanted plugs, use a 3 to 5 ppm paclobutrazol drench one week after transplant. During finishing, do not allow Copper Prince to become root-bound or stressed due to drought or nutrient deficiency. In addition, low temperatures (below 60F/16C) can cause foliage to become chlorotic. High light results in better basal tillering and stronger stems.
By Jim Devereux, Green Fuse Botanicals
Timing for any combination is imperative. Advancements in annual breeding for daylength neutrality and compact habit has nearly completely removed the guess work for a balanced finished combination. However, annual combos are still at the mercy of weather, relegating them to the prime season market. What about the shoulder weeks and the opportunity for increased profitability?
Pictured: First Light Compatibles Mountain Sun Mix
Green Fuse Botanicals has an excellent solution with Perennial Compatibles. Our unique line of First Light Compatibles brings annual color with perennial toughness. The largest line of daylength-neutral perennials that require zero vernalization in the industry allow for excellent, programmable mixes for most any climate. These aren’t multi-stuck liners, but rather individual cells that are transplanted at the same time into finished containers for predictable combinations in both habit and bloom time.
These predetermined mixes will not only open the season early when inclement weather is often the case, but they’ll also extend the shipping season when moisture management at the retail level is a reality. Try the Skipping Rocks Mix with Dianthus Constant Beauty Pink, Leucanthemum Angel Daisy and Veronica Vernique Blue to open the sales window in February and March.
The Skipping Rocks Compatible can be grown indoors under low temperatures. Plant traditional annual baskets or annual patio pots right behind the Perennial Compatible mix for a crop turn in time for Mother’s Day. Then transition into Stars and Stripes for June and July with Agastache Acapulco Deluxe Red, Leucanthemum White Mountain and Veronica Vernique Blue. Stars and Stripes can be grown easily outdoors in the mum field.
For a cultural example, we’ll use the popular Mountain Sun Compatible. This mix contains Agastache Acapulco Deluxe Yellow, Leucanthemum White Mountain and Veronica Vernique Dark Blue. When ordered by Compatible name, this combination will ship as 400 URC—200 agastache, 100 leucanthemum and 100 veronica.
Propagation soil temperature should be maintained 68 to 73F (20 to 23C). After sticking, Pageant at 4 oz./100 g is beneficial for fungicidal control. A foliar rooting hormone of K-IBA of 150 to 200 ppm will shorten the time in the propagation zone.
A feed rate of 65 to 100 ppm N through the mist is advised to avoid deficiencies. Ten to 11 days in the mist will allow for adequate roots. The liners should then be moved to a drier zone for 17 to 20 days to allow for hardening. Transplant week five.
At this point, pinch all varieties except for leucanthemum. This four-liner combination can be transplanted into a 10- or 12-in. (25- or 30-cm) container. Since the First Light perennial collection doesn’t require vernalization, the combination may be continuously grown at 68 to 72F (20 to 22C) day and 60 to 65F (15 to 18C) night for predictability of finish week. Cooler temperatures will enhance basal branching, but will also add time to the total production.
A 2,500 ppm B-Nine/ 4 ppm Sumagic tank mix will mimic this same tone if applied four to five weeks after transplant. Maintain a constant feed of 175 ppm N balanced fertilizer with micronutrients and a pH range of 6.0 to 6.5. Expect your containers to be in even bloom in 10 weeks for early spring production under lower light levels and eight weeks in late spring or summer.
Roots of leucanthemum are very sensitive to excessive drying, too wet or high salinity soils. Keep moisture at consistent level to avoid Pythium. While most all pest controls are possible with outstanding effect, Avid foliar applications to control mites and thrips will burn foliage of leucanthemum turning the plants to black, looking like cold damage.
Going into fall, the First Light perennial Compatibles may be divided and planted into the garden. Zone 4 hardiness ensures years of consumer enjoyment.
By Kris Carlsson, Product Launch & Assortment Manager, Ball FloraPlant
The market for “plants with benefits” is growing; today’s flowers need to do more than just look pretty. Varieties that draw the attention of pollinators are especially hot-ticket and are just what your customers need to reach new gardeners. Mealycup sage, or Salvia farinacea, is a North American native, and its upright stature and true-blue color with attractive foliage is a beacon for hummingbirds, butterflies and bees. Benches have been dominated by the likes (and awesome performance) of varieties like Mystic Spires. But its vigor and size has relegated this class to landscapes or massive containers.
Say hello to Mysty, a compact new S. longispicata x farinacea that is 25% to 35% less vigorous than Mystic Spires, making it a better choice for important mixed containers—allowing for premium retail price points. Covered with the same true-blue flowers all season and dark-green foliage, Mysty’s habit is naturally more compact, well-branched and very free-flowering. It may be smaller, but it retains all the excellent performance of its big brother—a heat-hardy plant great for late spring/summer programs.
Pictured: With 25% to 35% less vigor than Mystic Spires (right), new Mysty (left) is the better choice for premium mixed containers.
Because Mysty has a natural compact habit, we strongly recommend it for premium quarts and gallon pots. To produce top-quality Mysty in a quart and provide a whole new spec for salvia, here are a few culture guidelines and regional best practices to meet your greenhouse needs.
Propagation
No rooting hormone is required when sticking Mysty Salvia. Provide an average five to nine days with mist to encourage rooting. A pinch at this stage is optional, as Mysty has a naturally compact habit.
Average propagation time for perennials includes three to five weeks to bulk up the liner before beginning cold treatment when started in late summer or early autumn. Apply B-Nine (2,500 ppm) spray in propagation once between Day 9 and 11. Reapply after transplant if growing under long days.
Finishing
After transplant, maintain a soil pH of 5.8 to 6.2 and light levels at 6,000 to 10,000 foot candles
Day temperatures: 71 to 79F (21 to 26C)
Night temperatures: 62 to 67F (16 to 19C)
Provide fertilization 17-5-17 at a rate of 175 to 225 ppm. Regularly allow the media to dry moderately between irrigating, especially in cool periods. Proper pinching (1 to 2) and moderate feeding will improve Mysty Salvia’s habit and flowering.
PGR Culture Trials
Ball FloraPlant’s Luis Munoz and Ryan Kenny conducted culture trials this Spring in Illinois and California, and found that Salvia Mysty can be successfully grown without PGRs. In fact, this variety wasn’t very responsive to growth regulators and it only had an effect of shortening the flower spikes when B-Nine applications were made.
If needed, a low B-Nine or B-Nine/
Cycocel tank mix application can help slightly tone the plant during late spring and summer finishing. Additionally, a Bonzi drench at 1 ppm can hold a finished crop if needed. Finish dates of Week 18 were met for both the spring Illinois and California culture trials.
Please reference BallFloraPlant.com for additional information on Mysty, including the full PowerPoint slideshow with all culture trial details.
Crop Time: Rooted liner to finish
• 4- to 5-in. (10- to 13-cm) pots, quarts: 1 ppp; 4 to 8 weeks
• 6-in. (15-cm) pots, gallons: 2 to 3 ppp; 6 to 10 weeks
• 10- to 12-in. (25- to 30-cm) tubs, baskets: 4 to 5 ppp; 8 to 12 weeks
By Delilah Onofrey, Suntory Flowers
Looking for an exciting new crop for spring? Grandessa intergeneric hybrid argyranthemums will maximize your returns with a stunning show that’s sure to ring up impulse sales. Consumers are crazy for daisy flowers and love the vibrant colors and full, vigorous plants, maximizing the “WOW” factor.
Bred by Suntory Flowers through its partnership with Bonza Botanicals in Australia, Grandessa is an Argyranthemum x ismelia triploid hybrid protected by a utility patent. What sets Grandessa apart from standard argyranthemums is its impressive flower size, plant vigor and color range.
Flowers can be more than twice the size of a standard argyranthemum, spanning 3 to 4 in. Colors include White, Yellow, Red and Pink Halo, which has an eye-catching dark raspberry ring in the center. More unique colors are in the works.
Produce for early through late spring sales. Growers get a big return with just one cutting per pot. Container suggestions are 2.5 qt. and 1.5- to 2.5-gal. planters. Hardy to Zone 10a, Grandessa is an annual in most climates. Plants reach a height of 18 to 24 in. with a spread of 18 to 24 in. and prefer full sun. The higher the light levels, the better.
Pair Grandessa with premium patio pots to maximize price point. This product is excellent for endcap positioning and front sweeps to catch consumer attention at retail. Grandessa is a decorator item—grab and go for the patio! Plants also
look gorgeous planted en masse in the landscape.
Crop times (from liner)
• 6-in. pot (1 liner): 6 to 7 weeks, no pinch
• 8-in. pot (1 liner): 7 to 8 weeks, no pinch
• 10- to 12-in. pots (3 liners): 9 to 12 weeks, no pinch
Temperature
Transplant and grow in the greenhouse at 60 to 65F (15 to 18C) for two to three weeks before moving to a cooler environment. Once plants are established, begin growing at recommended cool night temperatures of 44 to 55F (6 to 12C). After four to six weeks of cool conditions, plants can be forced in six to eight weeks.
Recommended finishing temperatures are 65 to 79F (18 to 26C) during the day and 50 to 61F (10 to 16C) at night.
Light levels
Light intensity is more important than light duration to induce flowering. Recommended light levels are 6,000 to 9,000 foot candles (60,000 to 90,000 Lux).
Feeding
Keep soil pH between 5.8 to 6.2, EC at 2.0. Fertilize with 225 to 300 ppm nitrogen fertilizer. Water plants prior to wilting and allow substrate to dry out between waterings to reduce risk of root rots.
Extra iron applications may be required to promote good leaf color. Apply as iron sulphate drenches, avoiding foliage contact, or iron chelate sprays or drenches. Purpling of the foliage can be a result of low phosphorous and is more predominant in some colors. Moderate or high levels of phosphorous can cause yellow-red coloring in older foliage.
Growth regulators
Use B-Nine 1,500 to 2,000 ppm and Cycocel 750 to 1,000 ppm tank mix spray or Bonzi 2 to 5 ppm drench to control growth. Another choice is 5 to 20 ppm Sumagic spray.
Grandessa White is more vigorous and requires more Bonzi. Pink is more compact and requires less.
Disease control
Apply a broad-spectrum fungicide drench after planting. Diseases to prevent include Botrytis, Phytophthora, Rhizoctonia and Pythium.
Pest control
Monitor plants for thrips, aphids, whiteflies and leafminers.
For more information about Grandessa, visit
www.suntorycollection.com.
GT