10/1/2018
A Bit of Culture
Jennifer Zurko
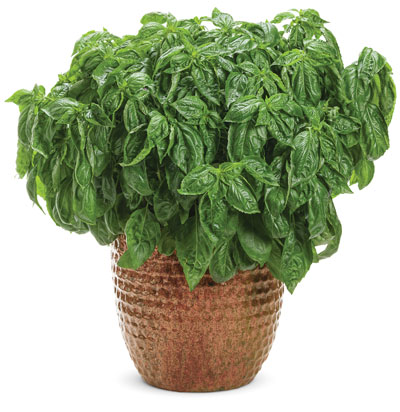
Amazel Basil
By Dr. Rick Schoellhorn, New Products, Proven Winners
Does the world really need another basil? It turns out, the answer is a resounding yes! Proven Winners has teamed up with Dr. Dave Clark from the University of Florida to introduce the unprecedented new Amazel Basil for Spring 2019. After more than a decade in development and screening plants nationally for three years, Proven Winners is releasing this new crop with extreme downy mildew resistance (the International Seed Federation definition is high resistance), enhanced flavor and increased chill tolerance. You’ll appreciate that it’s an incredibly easy plant to produce.
To understand what makes Amazel Basil so revolutionary, we must look at what’s made sweet basil such a difficult crop in the past.
1. Downy mildew was a huge problem for this crop. Most growers and consumers lost their plants to the disease.
2. Older basil hybrids were seed-produced. Under any stress, they would revert to seed set at the expense of new leaves and continued growth.
3. Typical basils were cold-sensitive and begin to shut down around 40F (4C). They would stop growing as soon as night temperatures began to drop.
Amazel Basil is the wonder child of the breeding program at the University of Florida. After many generations of selection and exposure to downy mildew, Amazel Basil consistently rated highest for mildew resistance, vigor and flavor. The plant is sterile, so like many of the best annual flowers it won’t revert to setting seed at the expense of garden performance. Since it’s produced from cuttings, each plant tastes and performs the same so growers can expect better crop uniformity than older seed strains. Crop time also gets a boost, with Amazel Basil finishing three weeks earlier than most of the basil crops in greenhouse and field trials.
All that was left to tackle was cold sensitivity. While progress was certainly made, temperatures below 40F are still to be avoided, especially early in the growing process. In row crop trials conducted in South Carolina, Amazel Basil outlasted all other commercial cultivars in the trial, extending the season for several weeks into the cooler fall months. It also has better keeping quality in the refrigerator, another selling point for consumers.
Amazel Basil can be promoted as a disease-resistant herb that’s easy to grow organically in home gardens. The more you pick, the better it grows, making this the ideal variety for pesto, Caprese salad, fresh leaf basil and other Italian recipes. Retailers can offer recipe cards near their displays to use as conversation starters and to give gardeners ideas on how to cook with Amazel Basil.
Amazel Basil production tips
Grow Amazel Basil under the same conditions as you produce coleus. Keep temperatures warm, grow under bright light and pinch the liner one to two weeks after transplant. This plant grows most vigorously under long days. Short days slow the growth and encourage plants to shift to flower production, which should be avoided. Temperatures below 40F will slow the crop, weaken growth and emphasize flower production. No insecticides are registered for herbs; use insecticidal soaps or biological controls if necessary.
• Growing media pH: 6.0 to 6.5
• EC (2:1 Extraction Method): 0.6 to 0.9
• Fertilization: Medium (200 to 300 ppm)
• Light requirements: High
• Water categories: Moderate to moist
• Rooting out and holding temp: 65 to 72F (18 to 22C)
• Growing on temperature: 65 to 75F (18 to 24C)
• Finishing times: 4 to 5 in./quart—3 to 4 weeks; 6 in./gallon—5 to 6 weeks; 7 to 9 in.—6 to 7 weeks
Learn more about Amazel Basil at www.provenwinners.com.
SunBuzz Sunflower & Hot Pops Ornamental Pepper
by Bart Sneek & Mary O’Connor, PanAmerican Seed
There’s an emerging trend that places living plants in the spaces we spend the most time: the kitchen, the office, bedrooms, etc. This trend is especially on the rise in urban areas where outdoor space is limited. And while green or variegated houseplants have been the norm, a bright, colorful bloom can add to the charm of caring for indoor plants. Not to mention, when people have success with flowering potted plants, it’s a gateway to gardening outdoors.
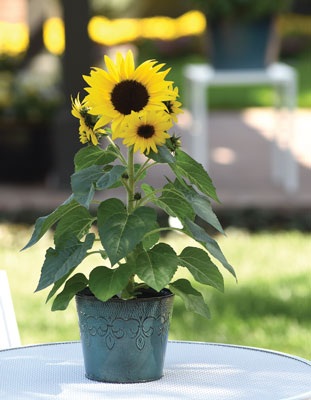 Two new introductions from PanAmerican Seed fit into the indoor plant trend. SunBuzz Sunflower has a big show of secondary flowers for extended enjoyment. Hot Pops Ornamental Pepper has small, round ornamental fruit that ripen in multiple colors for a unique indoor impact.
Here are some key growing tips to produce a quality crop of these on-trend varieties:
SunBuzz Sunflower
Plug crop time: 2 to 3 weeks
Transplant to finish: 6 to 8 weeks
We recommend one seed per cell in a 288-plug tray or it can be sown directly into smaller pots (one plant per 5-in., three plants per gallon). Cover the seed; germination is three to five days. Maintain a Level 4 (medium-wet) moisture during Stage 1 at a temperature of 68 to 72F (20 to 22C). Apply fertilizer at a rate of less than 100 ppm N.
During Stage 2, provide medium moisture at Level 3 to 4 and maintain soil temperature and fertilizer. Provide light at 1,000 to 2,500 f.c. (10,800 to 26,900 Lux). In Stage 3, lower moisture to Level 2 (medium-dry) and lower temperatures to 64 to 72F (18 to 22C). Light remains the same, but increase fertilization to a rate of 100 to 175 ppm N, 0.7 to 1.2 EC. Stage 4 lowers temperatures again to 61 to 72F (16 to 22C). Light is increased to 2,500 to 5,000 f.c. (26,900 to 53,800 Lux). Maintain fertilizers from Stage 3.
When finishing SunBuzz, plants will stay shorter under short-day conditions and grow taller under long-day conditions. Take this into consideration when using PGRs. Day temperatures should be 64 to 72F (18 to 22C). Night temperatures should be 61 to 64F (16 to 18C).
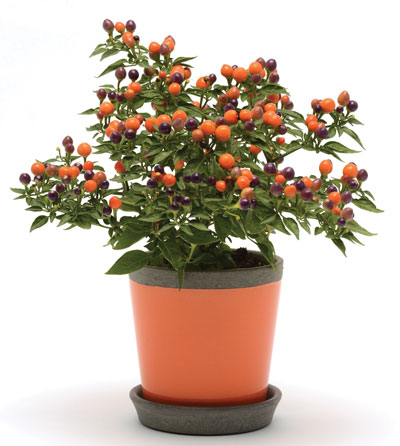
Hot Pops Ornamental Pepper
Plug crop time: 4 to 5weeks
Transplant to finish: 7 to 13 weeks
With one seed per cell in a 288-plug tray, provide a light cover for the seed. Germination is five to seven days. Plants perform best under high light and warm temperatures. Maintain a Level 4 (medium-wet) moisture during Stage 1 at a temperature of 72 to 76F (22 to 24C). Keep ammonia levels lower than 10 ppm.
During Stage 2, provide medium moisture at Level 3-4 and lower temperatures to 68 to 73F (20 to 23C). Provide light at 1,000 to 2,500 f.c. (10,800 to 26,900 Lux). In Stage 3, maintain light levels, but increase fertilizer to a rate of 100 to 175 ppm N, 0.7 to 1.2 EC. Hot Pops are naturally compact and shouldn’t need PGRs. If necessary, uniconazole (Sumagic) at a rate of 2.5 ppm can be applied at two weeks after sowing for height control. Repeat two weeks later if needed.
Increase light during Stage 4 to 2,500 to 5,000 f.c. (26,900 to 53,800 Lux). Maintain fertilizers from Stage 3.
When finishing Hot Pops, use a predominately nitrate-based fertilizer with low phosphorous and high potassium. Keep light high and temperatures warm. Day temperatures should be 68 to 80F (20 to 27C). Night temperatures should be 65 to 70F (18 to 21C). Add four to five weeks for spring production crop times.
Growers can position these varieties as part of the indoor houseplant trend and they can also extend the season of outdoor sales on the patio or become gift plant items (grab-and-go impulse items at retail). Consumers can enjoy them as part of their home’s décor or they can purchase them to nurture a living plant, gaining all of the benefits that flowers offer, like indoor air quality, stress relief and overall wellness.
Sunstrong Erysimum
by Mike Fernandez, North American Market Manager, Danziger
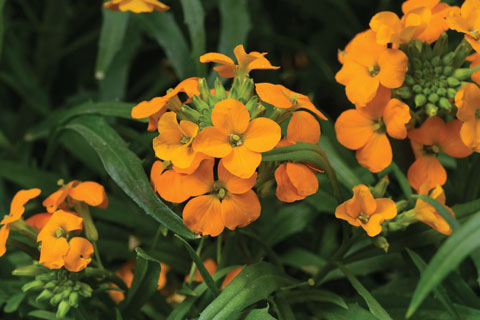
Consumers are looking for easy-to-grow perennials that provide blooms all summer long. Sunstrong Erysimum truly delivers on the promise to flower early and throughout the season. In fact, Sunstrong is set to change the erysimum category. In the past, erysimum were seen only as spring bloomers. Now, Sunstrong provides blooms all summer long, even in the southern U.S.
One of the key differences in Sunstrong’s production is that there’s no cooling needed. Developed in Danziger’s facilities in Israel, Sunstrong delivers first-year flowering without a cooling period. This gives growers the advantage of growing these perennials in a warm greenhouse, extending the season on either end. The days of reserving space and moving product during production are over. Sunstrong finishes faster and is ready earlier.
At Danziger’s facilities in Israel, the weather makes it impossible to provide a cooling period for any perennials. Because of these growing conditions, Sunstrong, along with the Solanna Coreopsis and Lucille Leucanthemum series, can all be grown in a warm greenhouse.
These varieties offer growers options and flexibility. Even though they don’t need vernalization, they can be produced with a cooling period. Several growers are having great success in traditional perennial growing programs.
Both varieties in the Sunstrong series show exceptional heat tolerance. Sunstrong Bicolor Purple features large, lavender blooms. Sunstrong Orange offers tangerine-hued flowers with a delicate, fresh scent. A great thriller plant in large containers and stunning in the landscape, Sunstrong grows to 14 in. in height.
Additional production tips for Sunstrong Erysimum
• Pot size: Quarts or gallons
• pH: Maintain potting mix pH at 6.0 to 6.5 throughout production
• Sticking: Stick one liner per cell. Apply Daconil fungicide on the day of sticking. Provide a second Daconil application in Week 2.
• Planting: Transplant to one per pot in Week 5
• Temperature: Greenhouse temperatures should be between 72 to 74F (22 to 23C) in Weeks 1 through 3. Decrease greenhouse temperatures to 65 to 68F (18 to 20C) for Week 4, 55 to 60F (12 to 15C) for Weeks 5 through Weeks 6 to 14.
• Pinching: Pinch once during Week 3
• Fertilization: Begin with 50 ppm nitrogen in a mist for Weeks 1 and 2. In Week 3, feed 100 to 150 ppm and continue with this rate through finish at Week 14.
• Light: Provide supplemental light through Week 5
• PGRs: Apply B-Nine on Week 4 if needed
• Irrigation: Normal watering program
• Electrical Conductivity: Electrical conductivity (EC) should increase slightly throughout the production process. Start with 0.80 in Week 1, then increase to 0.90 in Week 2. In Weeks 3 through 14, EC should be fairly steady at 1.0 to 1.2.
• Additional disease and pest control: Common disease and pest issues can include Botrytis, aphids and whitefly. Be on the lookout and treat
accordingly.
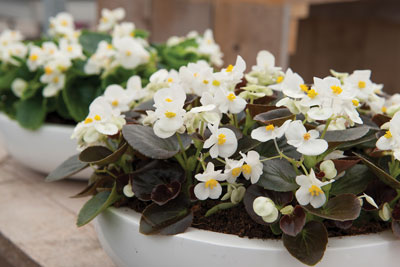
Senator iQ Begonia
By Bob Croft, Technical Support Specialist/Trials Coordinator, Sakata Seed America
Begonia semperflorens Senator is the bronze leaf counterpart to the green leaf Ambassador Begonia series with a beautiful contrast between flower and foliage. Sakata’s breeding experience and dedication to quality genetics is demonstrated in the new Senator iQ series, an upgrade to the Senator series.
Senator iQ offers a new level of quality with a complete upgrade across all characteristic in the series—it has darker bronze foliage, non-stretching in the pack/pot and have a more uniform flowering habit. Senator iQ Rose Bicolor was awarded a Fleuroselect Gold Medal in 2017.
Plug culture
8 weeks (288/12 x 24 tray)
• Stage 1 (Days 1 to 10): Sow pelleted seed into trays filled with a sterile and well-drained media with an EC of 1.0 or less (2:1 dilution). Optimum pH is 5.5 to 6.0. Do not cover the seed, as begonias require light to germinate. Provide 20 to 100 foot candles/200 to 1,100 lux in the germination chamber. Maintain a temperature of 72 to 77F (22 to 25C) with sufficient moisture to melt the pellet. The media should be wet to saturated with 100% relative air humidity.
• Stage 2 (Days 11 to 21): The cotyledons are now visible and roots are beginning to form. Maintain the media moist, but not saturated, to promote healthy root development and penetration. Reduce air humidity to 70% to 80% and maintain the air temperature at 72 to 77F (22 to 25C). Begin feeding at 50 to 75 ppm nitrogen from a well-balanced calcium nitrate-based formulation. Avoid using ammonium nitrate, which may inhibit root growth during germination and plug development. Supplemental lighting at 300 foot candles/3,200 lux to supply 50 W/m² following germination greatly reduces crop time. Strong sunlight (>2,000 foot candles/21,000 lux) will cause high leaf temperature and leaf edge burn. Highly alkaline water (> 300 HCO3) damages seedlings by causing burn.
• Stage 3 (Days 22 to 48): The first true leaves are developed and roots are beginning to penetrate the media. Allow the media to dry slightly between irrigations, as begonia roots require high levels of oxygen. Reduce air temperature to 65 to 68F (18 to 20C). Increase the fertilizer rate to 100 to 150 nitrogen* once or twice per week to maintain an EC level of 1.0 to 1.5 mmhos, (2:1 dilution).
Begonias are light accumulators and flowering is directly related to the quantity and quality of light received. Increase the light level to 3,500 to 4,500 foot candles/38,000 to 48,000 lux for bulking. It’s important to maintain the air humidity at 70% to 80% (relative humidity) to minimize leaf burning during stages 2 and 3.
• Stage 4 (Days 49 to 56): At the end of Stage 4, the plugs should have two to three sets of true leaves and the roots should hold the plug media together. Optimum air temperature is 62 to 68F (17 to 20C) to help tone the plugs. Avoid temperatures below 59F (15C) and maintain the EC level at 1.0 to 1.5 mmhos.
Trans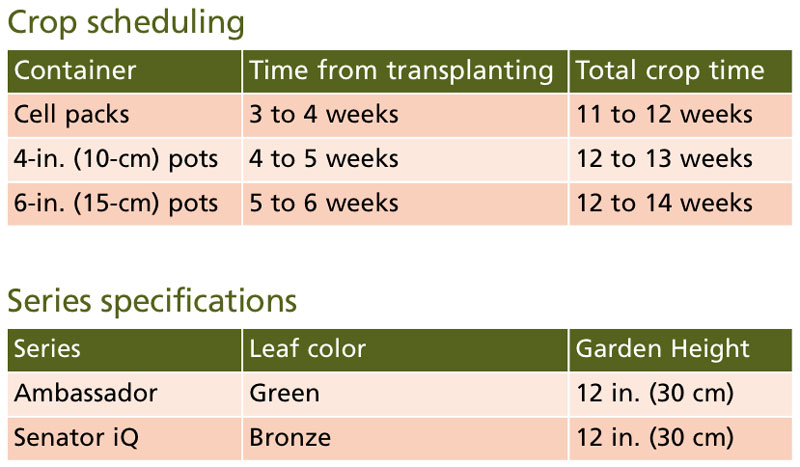 planting to flower
3 to 6 weeks
• Media: Select a sterile and well-drained media with a pH between 5.5 to 5.8 and low in nutrients (EC level less than 1.0 mmhos).
• Temperature: Optimum growing temperature is 70 to 72F (21 to 22C) during the day and 62 to 68F (17 to 20C) at night. Once established, the night temperature may be reduced to 59F (15C).
• Fertilizer: Maintain the media EC between 1.2 to 1.5 mmhos (2:1 dilution) by applying 100 to 150 ppm* of nitrogen from a well-balanced calcium nitrate-based formulation. The use of cal/mag formulations, like 15-5-15, work well to supply adequate amounts of magnesium. Tall and stretched plants with few flowers indicate too much or too little phosphorous. Stunted, chlorotic plants with marginal leaf burn indicate a lack of calcium and magnesium. To maintain optimum pH, one may alternate with an ammonium-based fertilizer like 20-10-20. Note: Water early in the day if using overhead irrigation to avoid leaf edge burn when leaf temperatures are high.
• Lighting: Provide 3,500 to 4.500 foot candles/38,000 to 48,000 lux. Supplemental lighting, up to 300 foot candles/3,200 lux to 50 W/m², will hasten development and flowering.
• Pests: Aphids and thrips
• Diseases: Blight, botrytis, pythium, rhizoctonia, Tomato Spotted Wilt Virus (TSWV)
* It’s important to supply 0.25 ppm boron at each fertilization to avoid a deficiency. There may not be sufficient boron at the 100 to 150 ppm N rate unless the irrigation water contains additional boron.
Tophat Interspecific Begonia
By Dr. Alicain S. Carlson, Technical Trial Manager, and Dr. Jamie Gibson, Technical Lead, Syngenta Flowers
Tophat Begonia is an exciting new introduction into the XL begonia class from Syngenta Flowers. It has some notable benefits to growers and consumers that set it apart from the competition.
Tophat has the only white flowered XL begonia on the market. It’s versatile and can be finished in many pot sizes, including 306 packs. It also totes the largest flowers and fastest finish compared to the competition.
Tophat’s naturally branching habit gives it a rounded, mounding habit that’s controlled and easy to ship. Flowers that cover the canopy at finish make it an outstanding gallon or 10-in. hanging basket crop. Tophat performs beautifully in the sun or shade and is great for in-ground or large containers growing to about 16- to 20-in. tall. All the colors match well together to make excellent tri-color combinations..

Propagation
Moisture management is key during begonia propagation and Tophat is no exception. Consistent moisture management and careful irrigation early in the plug crop results in highly uniform begonia seedlings, whereas uneven moisture leads to non-uniform growth and losses. Apply enough irrigation at the time of sow to adequately soften the seed pellet. Keep a consistent moisture level 4 until germination to keep the pellet from re-hardening and restricting germination.
Figure 1: No PGRs (left) vs. 2,500 ppm B-Nine spray (right).
There are many benefits to pelleted seed, like making seed easier to see and sow, but be sure to apply enough moisture to soften and eventually dissolve the pellet from your begonia seed. Keep trays in the germination chamber at 72 to 78F (22 to 25C) for six to nine days to help ensure more uniform germination. If you don’t have a germination chamber, use tenting or fabric covering over the trays for the first two to three weeks.
After 21 days, true leaves should be expanding and covering can be removed. Use a low water volume and very fine mist nozzles when irrigating plugs for the first three weeks. Too much water pressure or large droplet sizes will move the tiny seeds around and delay seedling establishment. When first true leaves are about the size of a pencil eraser, water droplet size and water volume can be increased. Use fogger nozzles for spot watering. Very fine cone nozzles should be used for irrigation booms.
We recommend a 288-cell tray with one seed per cell for producing Tophat plugs. Light is not required for germination. Tophat Begonia is daylength neutral and doesn’t have a photoperiod requirement. HID lighting providing higher a daily light integral (DLI) will speed up germination and uniformity of seedlings. Plugs should finish in about six to seven weeks.
Fertilization can be increased over the course of the plug crop from 75 to 125 ppm nitrogen; maintaining an electrical conductivity of 1.0 to 1.25 mS/cm (saturated media extract) and a pH range of 5.4 to 5.8 is critical to healthy plug growth. A B-Nine spray a week before transplant may be needed to tone plugs.
Finishing
Tophat is very versatile and can be finished from 306 packs up to 3-gal. baskets. For 306 packs to 2.5 qt. size containers, we recommend one plant per pot. For 3-qt. pots to 3-gal. baskets, we recommend three plants per pot to get to the fastest fill time.
Finishing temperatures at an average daily temperature of 65 to 70F (18 to 21C) are recommended. Pinching is not necessary. Maintain moderate fertility at 150 to 200 ppm nitrogen for proper tone and growth performance. Fungal pressures from low light and high humidity in the spring can be managed with proper air movement and broad spectrum fungicides labeled for begonias.
Once plugs have established in the finish container a PGR application of 2,500 to 5,000 ppm B-Nine spray (daminozide) is recommended to control stem elongation without reducing flower size (Figure 1). Bonzi (paclobutrazol) drenches at 0.25 ppm may also be used to control stem elongation and leaf size, but will reduce flower size by about 10%. Bonzi sprays will significantly reduce flower size—for example, a 10 ppm spray will reduce flower size by 20% and are not recommended. Cool finish temperatures and high DLI maximize flower size and help to control excessive leaf expansion.

Cadet Upright & Firehouse Verbena
by Luís Muñoz & Ryan Kenny, Ball FloraPlant
There are two things growers—and gardeners—want from verbena: 1) To stay in color all summer long; and 2) to not die of powdery mildew. When Ball FloraPlant launched its EnduraScape series a few years ago, the market took notice. Now, through a strengthened trialing process, our breeders have launched two new series out of the EnduraScape model to provide multiple plant habits of best-in-class verbena.
Like its name suggests, Cadet Upright is ideal for high-density, pot-tight production. Its upright and uniform habit won’t tangle on the bench. New Firehouse is the perfect medium-mounded basket and mixed container verbena launching with a full color range. Both new series offer less cycling, which means more color in the garden for summer and the same excellent powdery mildew resistance.
Over the course of our extensive trialing, Ball FloraPlant has provided the following best-practices for North and South climates to produce stellar plants for the end user:
Cadet Upright—North
Aiming for a Week 13 finish, we stuck cuttings Week 52 into a tray size 78 (30 mm liner). We provided a pinch Week 3 and transplanted Week 4. Fertilizer was 14-4-14 (200 ppm N). Greenhouse temperatures from January through April averaged from 67 to 71F (19 to 21C) with minimum temps at 62F (16C). Average moles: January (1.4); February (4.7); March (6.9); April (8.6).
With low light levels during Midwestern Spring conditions, the use of PGRs is recommended to avoid stretching on Cadet Upright. A 1 ppm Bonzi drench four weeks after transplant helped plants and controlled excessive growth with no effect on flowering. B-Nine 2,500/Cycocel 750 ppm tank mix also helped tone plants, but had a slight flower delaying effect.
An early spray application to liners of 3 ppm Bonzi two weeks prior to transplant is recommended to promote branching and tone plants. Total crop time was 14 weeks.
Cadet Upright—South
Aiming for a Week 15 finish, we stuck cuttings Week 4 into a 102 tray. We provided a pinch Week 8 and transplanted Week 10. Fertilizer was 17-5-17 (200 ppm N) and ideal soil pH was 5.8 to 6.2. Average greenhouse temperatures for March and April was 61 to 62F (16C) with minimum temps at 50 to 52F (10 to 11C). Average moles: March (27.3); April (36).
We were able to successfully grow Cadet Upright with no PGRs under cool nights averaging 50F (10C) and daily averages of 60F (15C). To do this, we pinched approximately four weeks after stick and transplanted two weeks after pinch.
For growers using PGRs, B-Nine 2,500/Cycocel 750 ppm tank mix spray two weeks after transplant helped tone the plants and had little impact on flowering. A Bonzi 1 ppm drench two weeks after transplant also toned the plants really well with no impact on flowering. NOTE: Florel 300 ppm spray produced a really compact plant with major flower delay. Total crop time was 11 weeks.
Firehouse—North
Aiming for a Week 15 finish, we stuck cuttings Week 52 into tray size 78 (30 mm liner). We provided a pinch Week 3 and transplanted Week 4. Fertilizer was 14-4-14 (200 ppm N). Greenhouse temperatures from January through April averaged from 67 to 71F (19 to 21C) with minimum temps at 62F (16C). Average moles: January (1.4); February (4.7); March (6.9); April (8.6).
Firehouse is well-suited for finishing in a 1-gal. container. An application of Florel 300 ppm two weeks after transplant produces a less stringy, more toned plant. Additionally, the Florel application promoted better branching within the treatment.
Alternatively, B-Nine 2,500/Cycocel 750 ppm tank mix can be used to better control the more vigorous varieties, such as Firehouse Purple. Total crop time was 16 weeks.
Firehouse—South
Aiming for a Week 17 finish, we stuck cuttings Week 4 into a 102 tray. We provided a pinch Week 8 and transplanted Week 9. Fertilizer was 17-5-17 (200 ppm N) and ideal soil pH was 5.8 to 6.2. Average greenhouse temperature for March and April was 67F (19C) with minimum temps at 61 to 66F (16 to 18C). Average moles: March (20.1); April (24).
Firehouse was successfully grown with a pinch two weeks prior to transplant and no PGRs. Growers desiring some growth control can use B-Nine 2,500/Cycocel 750 ppm spray applications two weeks after transplant or a Bonzi 2 ppm drench application three weeks after transplant. A Florel 300 ppm spray two weeks after transplant provided some control as well, with minor flower delay. Total crop time was 13 weeks.

Soiree Ka-wa-i-i Catharanthus
By Delilah Onofrey, Marketing Director, Suntory Flowers, North America
Looking for heat-loving annuals? Soiree Ka-wa-i-i Catharanthus from Suntory Flowers likes it hot, thriving in the harshest Southern conditions, while also looking great all summer up North. The word “kawaii” means “cute” in Japanese, describing the flower size and shape—think of these varieties as vinca’s cute little sister!
Advantages include an amazingly compact habit with superior branching, producing more flowers on shorter internodes in small pots. No pinching is needed. Attractive glossy foliage compliments the profusion of blooms.
New for 2019, the Ka-wa-i-i line has doubled with three new colors: Red, Light Purple and White Peppermint with a distinctive red eye. White Peppermint has been sought after as an essential combo component and to brighten the assortment, which had been mostly midrange with Coral, Pink and Lavender, which is darker than the Light Purple.
Soiree has caught on with major growers in the South, most notably Florida and Texas. But the word is spreading as growers, retailers and landscapers have seen the performance at garden trials throughout the U.S. and Canada the past few years.
Culture
Crop times for Soiree Ka-wa-i-i is six to eight weeks from liner stage for 4-in. pots. For 6-in. pots, two to three liners are recommended with a crop time of 10 to 12 weeks.
Rooting stages
Stage 1: Cutting arrival and sticking
• Cuttings may be stored at 60 to 65F (15 to 18C) for up to 24 hours; ensure boxes are open
• Stick cuttings in a substrate with a pH of 5.4 to 5.8
• Rooting hormone is not recommended; abnormal growth may result
Stage 2: Callusing
• Maintain substrate temperature of 78F (25C)
• Maintain air temperatures of 75 to 85F (23 to 29C) during the day and 65 to 68F (18 to 20C) at night
• Maintain light intensity of 500 to 1,000 foot candles (5 to 10 klux)
• Begin foliar feed of 50 to 75 ppm Nitrogen from 15-0-15
• Keep substrate moist so water is easily squeezed out of it, but not waterlogged
• Provide plenty of room between plugs or strips for good air movement
• Transfer cuttings to Stage 3 in 10 to 14 days, once 50% of the cuttings begin rooting
Stage 3: Root development
• Maintain substrate temperature of 70F (21C) once rooted
• Maintain air temperatures of 75 to 85F (23 to 29C) during the day and 65 to 68F (18 to 20C) at night
• Increase light intensity to 1,000 to 2,000 foot candles (11 to 22 klux)
• Begin drying out substrate once roots are visible
• Fertilize with 100 to 150 ppm Nitrogen once a week from 15-0-15, alternating with 20-10-20
• Roots should develop within 14 to 21 days
Stage 4: Toning rooted cuttings
• Lower air temperature to 70 to 75F (21 to 23C) during the day and 62 to 78F (16 to 25C) at night
• Increase light intensity to 2,000 to 4,000 foot candles (22 to 43 klux)
• Move liners from mist area to area with low humidity
• Fertilize with 150 to 200 ppm Nitrogen once a week from 15-0-15 alternating with 20-10-20
• Pinching is optional, not required
• Rooting should be completed in 35 to 40 days.
• Mist only as needed to prevent wilting; excess water is detrimental
• Keep foliage a lot dryer than you would with other species
Growing on
• Keep pH/EC between 5.4 to 6.0/1.0 to 2.0
• Fertilize with 200 to 250 ppm Nitrogen
• Water requirements are moderate—water plants prior to wilting; allow substrate to dry out between waterings
• Keep light levels high
• Recommended growing temperature is 75 to 85F (23 to 29C), holding temperature 60 to 70F (15 to 21C)
• Pinching is optional; always ensure you have at least two nodes, especially in cool periods
• Plant growth regulators (PGR) are optional; for best results, use B-Nine at rates of 2,500 to 5,000 ppm
• Monitor for the following insect pests: whiteflies, aphids, western flower thrips and red spider mites
• Diseases to prevent include Botrytis, Thielaviopsis, Cornespora, Phytophthora, Pythium and Rhizoctonia.
• Keep Soiree plants warm and dry ina sunny environment for the best results
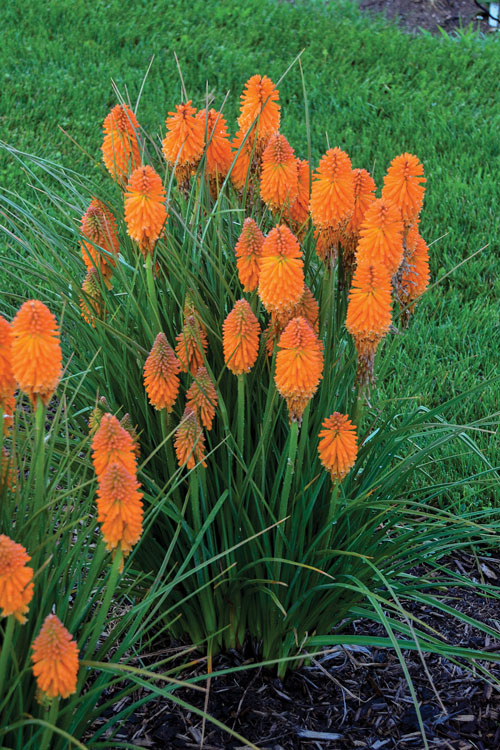
Pyromania Kniphofia
By Andrew Jager, Marketing Specialist, Walters Gardens
Kniphofia is the newest genus to the Proven Winners perennial collection and perhaps the most hotly anticipated introductions in recent years. The Pyromania Collection features six fiery new varieties with a number of exceptional characteristics to benefit the home gardener. The collection averages an intermediate height of 3 ft. and answers the landscaping need of adding height with a reduced footprint.
These plants are also exceptionally hardy for the genus, reliably overwintering in our Zone 6 trials for five years with additional trials showing hardiness in Zone 5b (though winter protection is recommended). From our trials growing this collection from bare root, here are some of our notes to get the best possible containers.
Potting up
• Potting and timing—To get the best possible container for spring sales, it’s advised to begin your bare root in either late winter or early spring in a premium 1-gal. container, expecting it to finish in about 10 weeks. If beginning production later in warmer months, Pyromania Kniphofia will finish much quicker at six to eight weeks. Additionally, bare root kniphofia can be started in fall to fill out a premium 2-gal. container for sales the following spring.
• Planting depth—Bare root material should be potted with the crown even to the soil line. Any dead foliage that remains should be situated just above the soil line after planting. If too much of the old foliage is buried it will hold excess moisture against the crown and will encourage rot.
Cultural recommendations
• Fertility—Kniphofia benefit from a moderate feed of 100 to 150 ppm N at each watering, with a soil pH of 5.5 to 6.5 and EC between 2.0 to 3.0.
• Moisture—Grow with moderate moisture in a well-drained media, as kniphofia aren’t naturally accustomed to sitting wet for prolonged periods of time. Allow containers to dry slightly between waterings.
• Lighting—Kniphofia are long-day beneficial. Increased day lengths of 14 to 16 hours will speed the time to fill a container and flower. Higher light levels will also result in more naturally compact flower spikes and reduce the need for PGRS.
• Growing temperature and holding—The quickest way to finish a container and achieve flowering is to grow your plants in a warm environment of consistent 68 to 70F (20 to 21C) temperatures. Kniphofia can be held at cool temperatures of 50 to 60F (10 to 15C) for a number of weeks to delay flowering.
• Pests and diseases—Kniphofia are generally unbothered by pests and not very susceptible to diseases. Aphids, spider mites and thrips are the most common insects to be seen during production, but rarely originate in a kniphofia crop. Alternaria, Botrytis and Sclerotium are the most likely diseases to affect kniphofia. A preventative spray usually eliminates any risk of damage to the crop from pests and disease. Growers should also scout regularly and ensure good air flow as an added measure of precaution.
Finishing tips
• Spacing—Pyromania Kniphofia have wide-spreading, arching habits. While the containers can be started growing in close proximity to each other, it’s recommended to increase the space once their grass-like habits begin arching. Increasing the spacing will improve air flow, prevent a buildup of moisture and reduce the spread of pests.
• PGRs—While PGRs aren’t necessary to finish a crop of kniphofia, a light application every few weeks can help to tone the plants. If the plants are grown in cool months with shorter daylengths or in a greenhouse, the flower spikes are susceptible to stretching. A light spray application of uniconazole at 5 ppm can be beneficial to the plants, with an increase to 10 ppm as the season progresses. A spray of paclobutrazol at 30 to 45 ppm can be used to the same effect.
• Vernalization—If you’ve received your bare root product in fall and intend to offer your plants for sale the following spring, a vernalization is recommended. While these kniphofia will bloom without vernalization, undergoing a cold period of six to eight weeks below 45F (7C) will significantly improve the vigor of the plant. A vernalized plant will also send up more flower spikes and result in a more uniform crops for sales.
• Overwintering—Before overwintering, it’s best to ensure a well-rooted container. Because kniphofia don’t require much vernalization, they can best be overwintered in a minimally heated greenhouse. If these facilities aren’t available, kniphofia can also be overwintered in a cold frame under a frost blanket or with some other form of winter protection.
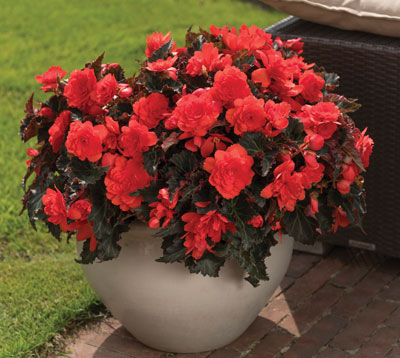
Portofino I’Conia Begonia
By Tanner Douglas Cole, Product Manager, Dümmen Orange
I’Conia hybrid begonias are inspiring the market by lending a new twist to an old classic, making the Portofino series a must-have for spring 2019. Portofino is the most floriferous of any begonia series with mounds of double flowers that sit atop a well-branched architecture.
Many growers find the production requirements to be less challenging than traditional tuberous begonias and consumers enjoy the duel indoor/outdoor appeal. The ease of production and retail appeal combined with the marketing support behind I’Conia hybrid begonias make them a total solution. Stay tuned as the I’Conia line of hybrid begonias are joined by additional advanced genetics in coming years.
Propagation and finish
• Sticking: Unpack and sort cuttings in a cooler at 54F (12C). Store in cooler overnight if not stuck immediately. Use care when sticking to not cover the apical growing point of the cutting by arranging the large leaves in one direction.
After sticking, water the cuttings uniformly to help “seat” them in the soil media. A typical, well-drained, peat-based media is suitable in propagation, but coir-based and HydraFiber-type media can work just as well. Make sure major changes to soil media are trialed for at least one crop cycle before switching entirely. 50, 72, 84 (spaceable strip) and 105 (spaceable strip) count trays are suitable for rooting begonia.
• Moisture: Mist may be required both day and night for the first 10 to 14 days with just enough water to keep the leaves turgid. Excessive misting will result in nutrient deficiencies and a much higher risk of disease occurrence. Once cuttings begin to root, mist should be reduced and completely off by around day 20.
Begonias are sensitive to overwatering and saturated soils especially after transplant. Under normal greenhouse conditions, disease pressure is minimal, but managing soil moisture is critical. Newly transplanted liners are susceptible to root and stem rot caused by Pythium, Phytophthora and Rhizoctonia. Best practices for managing the root zone include growing at a warmer soil temperature, providing plenty of air circulation and managing moisture between irrigations. A healthy root system ensures a successful crop.
• Fertilizer and pH: Once roots emerge and misting is reduced, fertilize at 50-100 ppm N, alternating between 15-0-15 and 20-10-20 formulations. This rate can increase to 100 to 150 ppm N after transplant. EC levels should be maintained around 0.8 to 3.2 mS/cm by saturated media extraction (SME) during propagation and 2.0 to 3.5 mS/cm SME during finish. Portofino should be grown in a pH range of 5.6 to 6.2 to ensure proper nutrient availability.
• Pinching: All I’Conia Begonias, including Portofino, should be pinched about 21 days after stick prior to reaching five nods or at transplant down to three nodes if not pinched during propagation. A propagation pinch is preferred to a transplant pinch.
• Temperature: During the rooting phase of production, soil temperatures should be maintained around 70 to 75F (21 to 24C), while air temperatures can range from 75 to 80F (24 to 27C) during the day and 68 to 72F (20 to 22C) at night. This should be adjusted to 65 to 73F (18 to 23C) days and 68 to 75F (20 to 24C) nights during finish.
• Light: Propagation shading is a must for Portofino. Light levels and root development bear a direct relationship; as rooting increases, so should light. Between September 21 and March 21, cuttings must receive long day photoperiods during propagation to prevent premature flowering. Mum lighting from 10:00 p.m. to 2:00 a.m. or HID supplemental light from sundown to 2:00 a.m. can be used to provide long days.
I’Conia finish best under moderate light levels of 3,000 to 7,000 fc (32,300 to 75,300 lux) during finish. Avoid moving plants from moderate light to high light or to high temperatures without acclimating first. This can result in scorched leaves.
Several environmental factors can be used to initiate flowers once the plants are 2/3 the desired finish size. Black cloth for 14 days, moisture stress (letting the plants dry between watering), low fertility (withholding fertilizer application for 14 days), a plant growth regulator application or a combination of these tactics. Plants should finish in four to six weeks after flower initiation. After induction, return plants to the same production conditions used during vegetative growth.
• Growth regulation: Although quite uniform, there are minor variances within the series that should be taken into account when applying PGRs.
Hot Orange = Most Vigorous
Yellow, Salmon and Sunrise = Medium Vigor
Citrix and Champagne = Medium-Low Vigor
Coral = Least Vigorous
500ppm Cycocel/Citadel (11.8% Chlormequat) can be used to control growth and promote branching as needed in propagation.
During finish, consider the below options, but keep in mind that lower PGR rates are necessary in northern production areas, while higher rates may be required in southern regions to achieve similar results.
— 500 to 1,000 ppm Cycocel/Citadel (11.8% Chlormequat)
— Low rates of B-Nine (85% Daminozide) at 1,000 to 1,500 ppm or Cycocel/Citadel (11.8% Chlormequat) at 250 to 350 ppm), or a tank mix spray to control growth as needed
— 1 ppm drench Bonzi (0.4% paclobutrazol) micro-drench immediately before ship to hold at retail
Providing cool temperatures and a negative DIF also helps to reduce stretch.
• Pot sizes and timing: I’Conia Portofino unrooted cuttings are usually ready to transplant four to five weeks after stick.
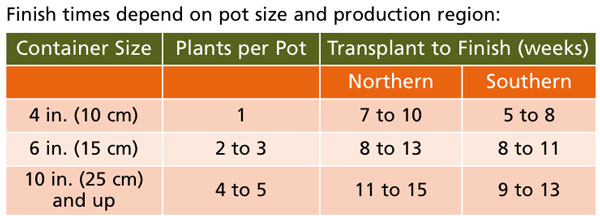
Amsonia Butterscotch
By Josiah Raymer, Head Grower & GM, Emerald Coast Growers
Amsonia hu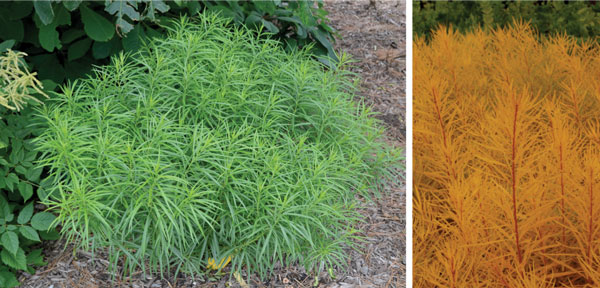 brichtii Butterscotch, an Emerald Coast Growers exclusive, is a graceful, low-maintenance variety with bright golden-yellow fall color and reddish stems. An added benefit: it won’t have the tip die-back that other varieties experience, so it maintains its gorgeous appearance for longer.
Pictured Left: Amsonia Butterscotch is a graceful, low-maintenance variety that starts green, maturing to a bright golden-yellow color and reddish stems in the fall.
Butterscotch grows in an appealing narrow, upright habit, reaching 2- to 3-ft. tall and spreading to about 4-ft. wide. Small, steel blue flowers appear from late spring to early summer.
Use Butterscotch in masses or mixed borders, as a foundation or specimen plant, or in containers or patio pots. Butterscotch prefers sun to part sun and is hardy in Zones 4 to 9. It’s an easy-growing variety, but here are a few tips for crop culture:
• Finishing: We recommend growers finish Butterscotch in a 1-gal. pot. Provide a preventive fungicide application about a week after transplant. Plants will finish for spring sales in approximately six to eight weeks.
• Media: Choose a well-draining commercial media. A slightly alkaline soil is best.
• Temperatures: Provide 65 to 75F (18 to 23C) daytime temperatures and 55 to 65F (12 to 18C) nights.
• Light: Butterscotch prefers full sun to partial sun, so provide 4,000 to 5,000 foot candles of light. No supplemental lighting is needed.
• pH and EC: Maintain soil pH at approximately 5.8 to 6.2 and keep electrical conductivity (EC) at approximately 0.8 to 1.2.
• Vernalization: Butterscotch requires cold treatment or vernalization to flower. Plants finished in fall and overwintered will need about eight to 10 weeks of cold treatment. This will result in plants that flush quickly in spring for early spring sales and give you the option to force early flowering. Plants potted in spring and finished without vernalization will finish, but may have reduced flowering.
• Pinching: Pinch plants once after bloom. Examine plants for fullness around their projected finish time to establish an accurate finish time in your production system and adjust the following year’s production plan accordingly.
• Fertilizing: Provide a constant liquid feed at medium levels of 150 to 200 ppm nitrogen in a well-balanced fertilizer. Monitor electrical conductivity levels to determine how often to apply liquid feed.
• Watering: Water thoroughly, but grow plants on the dry side.
• Pests and diseases: Treat with a preventive broad spectrum fungicide rotation. Follow a standard sanitation program. A successful preventive program will include spacing that allows for optimum airflow to reduce moisture buildup and foliar disease pressure. As always, regular scouting for diseases and insects will allow you to stay ahead of any problems that might pop up. With Butterscotch, watch for leaf spot and rusts. Maintaining a vigilant management program should prevent any pest or disease development. GT